FreeSurfer Course Software/Data Installation Instructions
Computer Requirements
To participate in the course, you will be asked to download & use the course software and data on the computer of your choice. In order to do so successfully, first, make sure that your computer meets the minimum requirements:
- Make sure you have enough free space (65GB) on your hard drive or on an external drive for the course software and data.
- Check you have at least 16GB of Memory/RAM (which will allow the software to function properly when run).
- Check you have a minimum of 2 CPUs/cores (to allow the software to function properly when run).
ARM-based processors, including M1 and M2 Macs, currently will not work with the software (VirtualBox). Intel Mac processors should work fine.
A 3D graphics card with its own graphics memory & accelerated OpenGL drivers will be necessary.
- Make sure you have a strong internet connection to participate in the lectures and tutorials fully.
On a Mac, you can check requirements #2-4 by clicking on the Apple icon and choosing "About this Mac".
On Windows you can check requirements by clicking the windows key and typing task manager. There should be a performance tab, where you can click on CPU, memory, graphics card, and disks to get more information on them.
Tips:
The FreeSurfer team has tested** the download & install on: Windows 10, Mac OS 10.14 thru 12.6 with (**using VirtualBox 6.1.30).
- If you are struggling with finding enough free space, you can delete the compressed virtual image download (*.7zip file) after it is decompressed. That will give you back 10GB.
- If you need to use an external hard drive, it is strongly recommended to use one that has USB-3.0 or USB-C connection.
Notes about the Download & Install Process
The entire download & install process will take approximately 1 hour to complete.
The steps in the process are as follows:
STEP # 1: Download and Install VirtualBox (which will be the host for FreeSurfer and the course tutorial data).
STEP # 2: Unzip/decompress the course's provided version of FreeSurfer & the tutorial data.
STEP # 3: Set up FreeSurfer to work properly on VirtualBox.
STEP # 4: Set up and test the course's tutorial data on VirtualBox.
Throughout the instructions, you may be asked to download & install a 3rd party software package. These packages and websites have been vetted by the FreeSurfer team.
If at any time, you are unable to complete these steps due to your machine not meeting requirements or other technical issues, you will likely not be able to complete the course on that device, and should contact the course organizers for assistance or to cancel your course registration.
If you want to skip down to a particular step, use this index of steps:
Downloading & Installing Virtualbox
Unzip the Course Virtual Machine
Setting up the Virtual Machine
Getting the Tutorial Data
Okay, let's begin with the first step below!
STEP #1
Downloading and Installing Virtualbox
The first step in getting ready for the FreeSurfer Course is downloading VirtualBox. It is a virtual machine software, able to easily replicate the environment and user interface of another computer (in this case one we will provide to you in step #2 that has FreeSurfer pre-installed). There are different VirtualBox download instructions for the different computer platforms: Linux, Windows, and MacOS. These are provided below - choose your adventure!
Instructions for different computer platforms::
Installing on Linux
Installing on Windows
Installing on Mac
Installing on Linux
Follow instructions here to download and install VirtualBox on a Linux OS host. After completing this step, you are ready for the next step, Unzip the Course Virtual Machine.
Installing On Windows
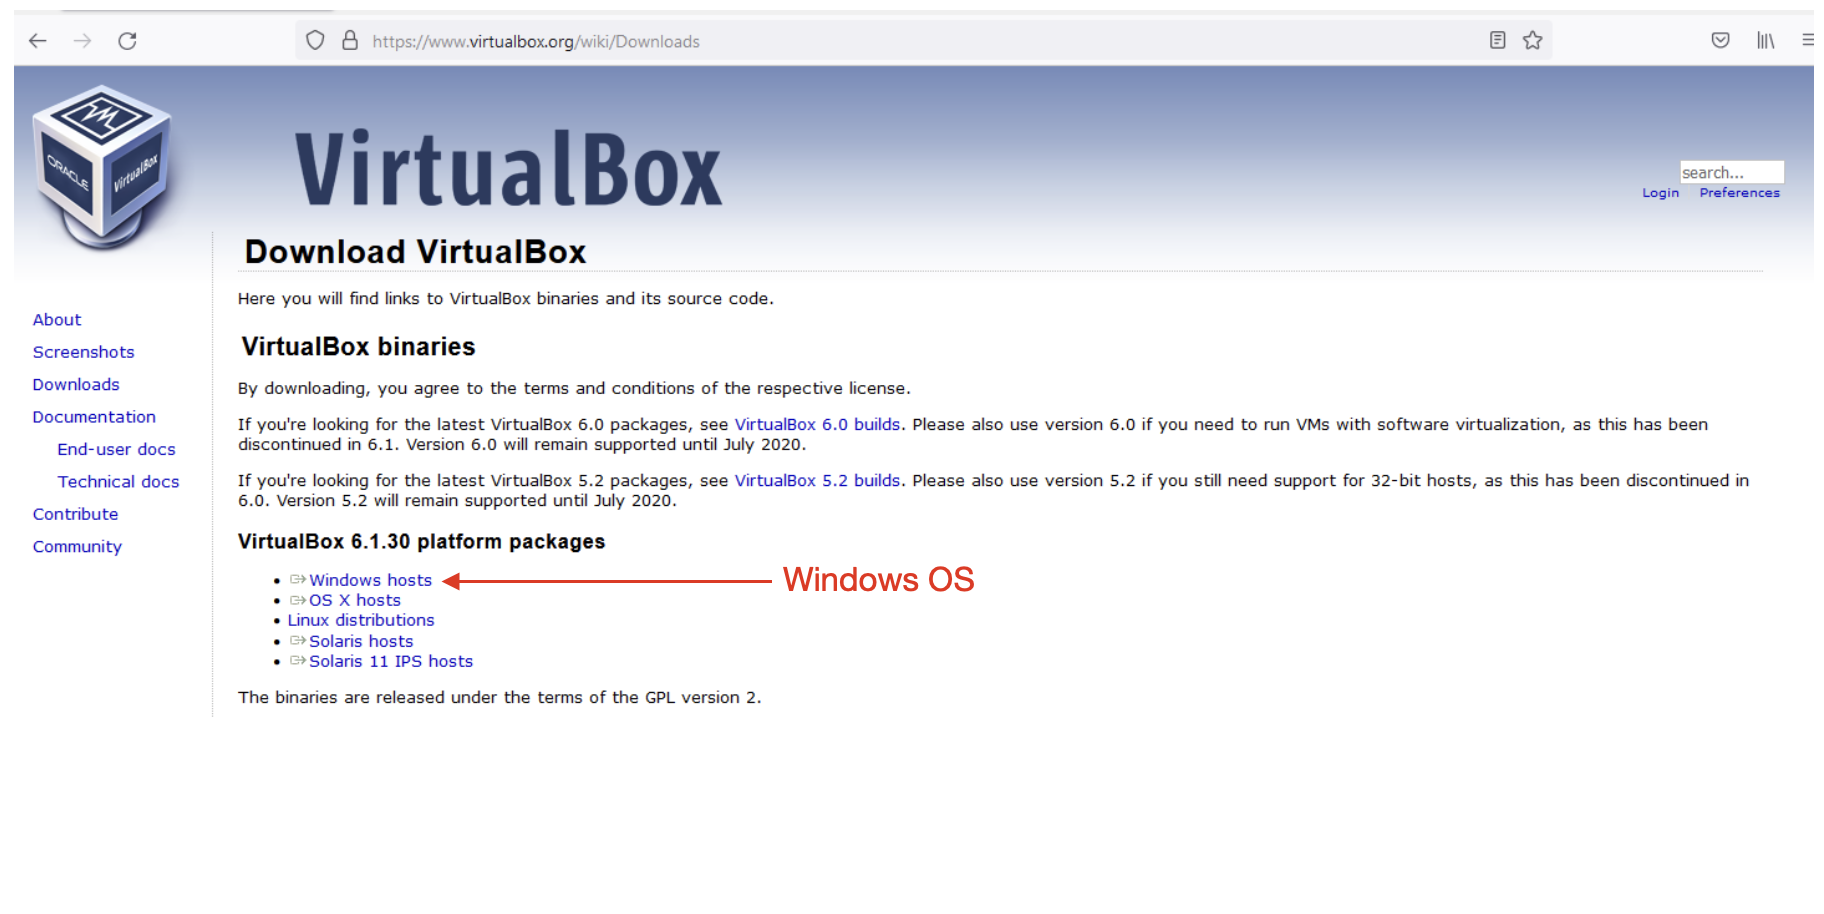
1.1 Navigate to the VirtualBox website, https://www.virtualbox.org/wiki/Downloads, and download the latest version of VirtualBox.
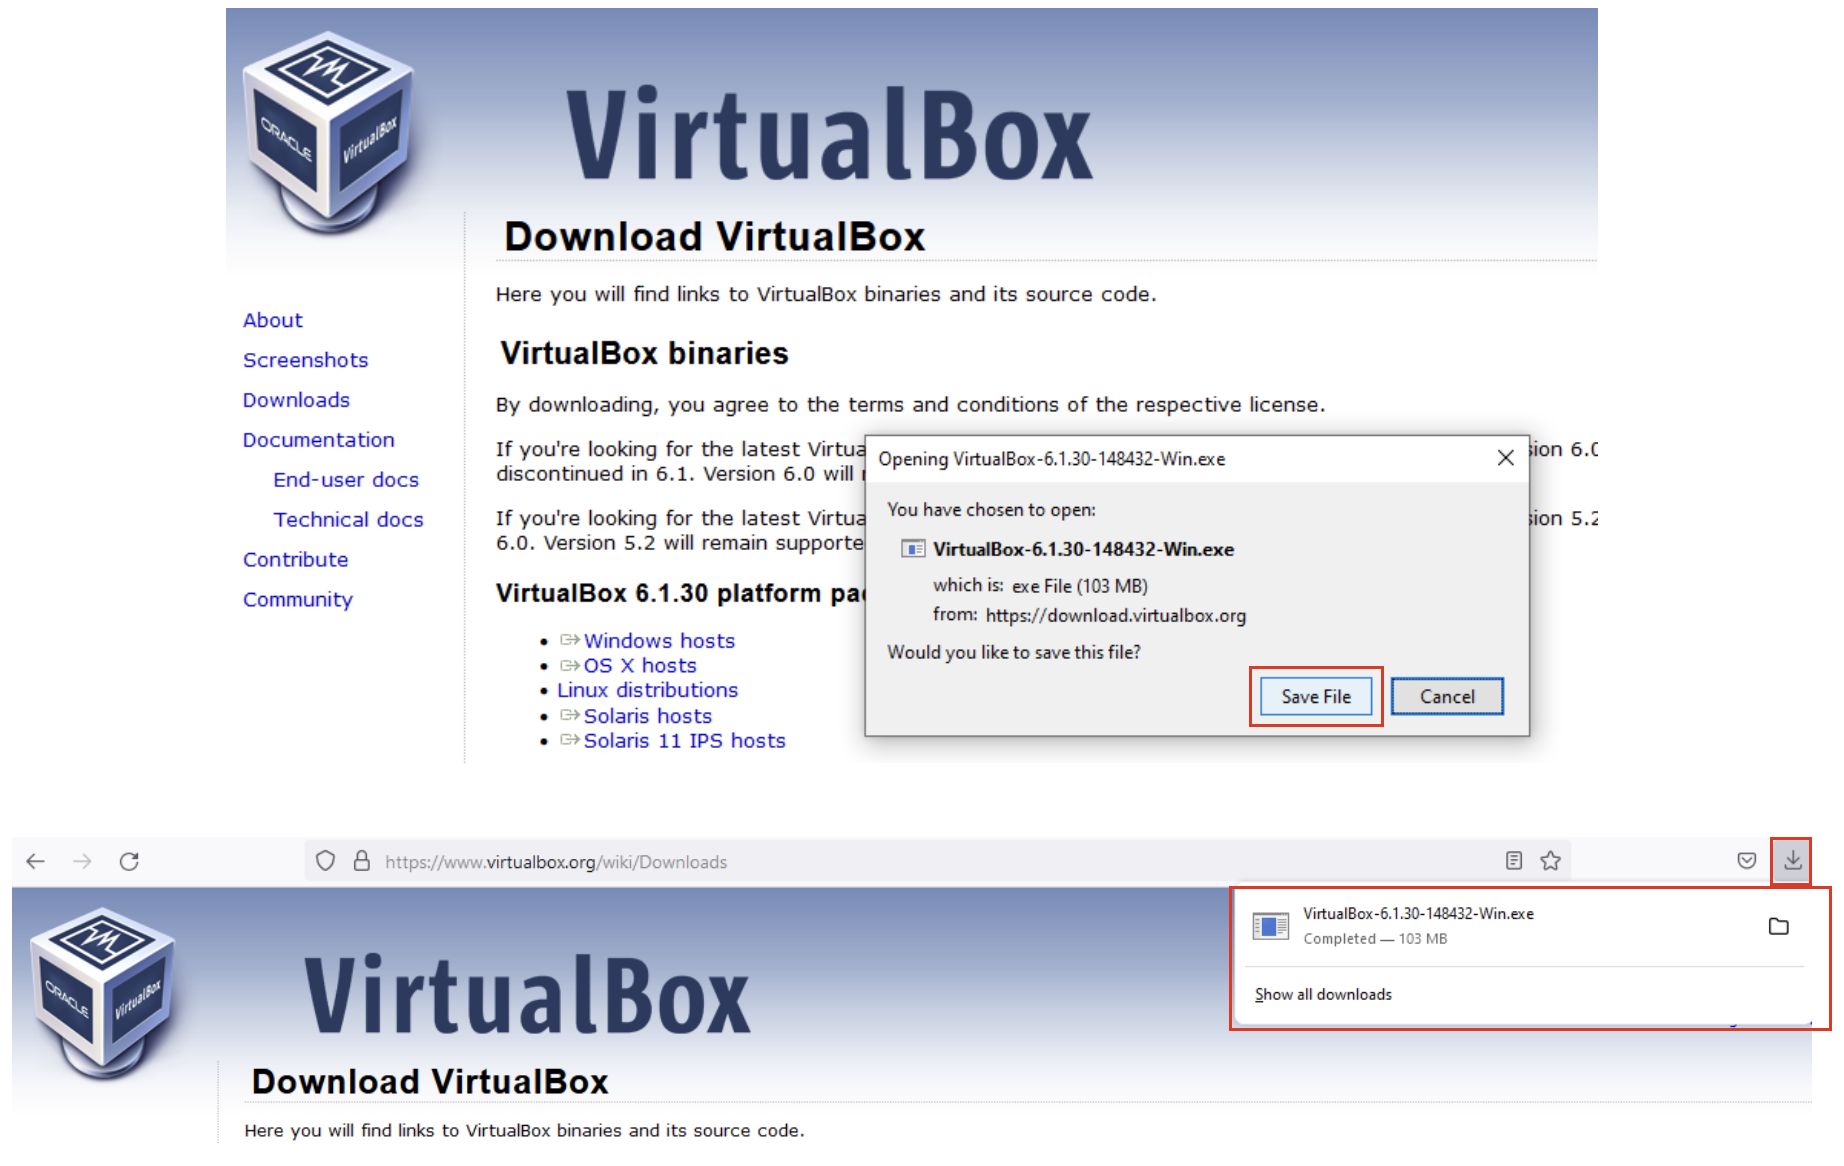
1.2 Save the installer and wait for the download to finish.
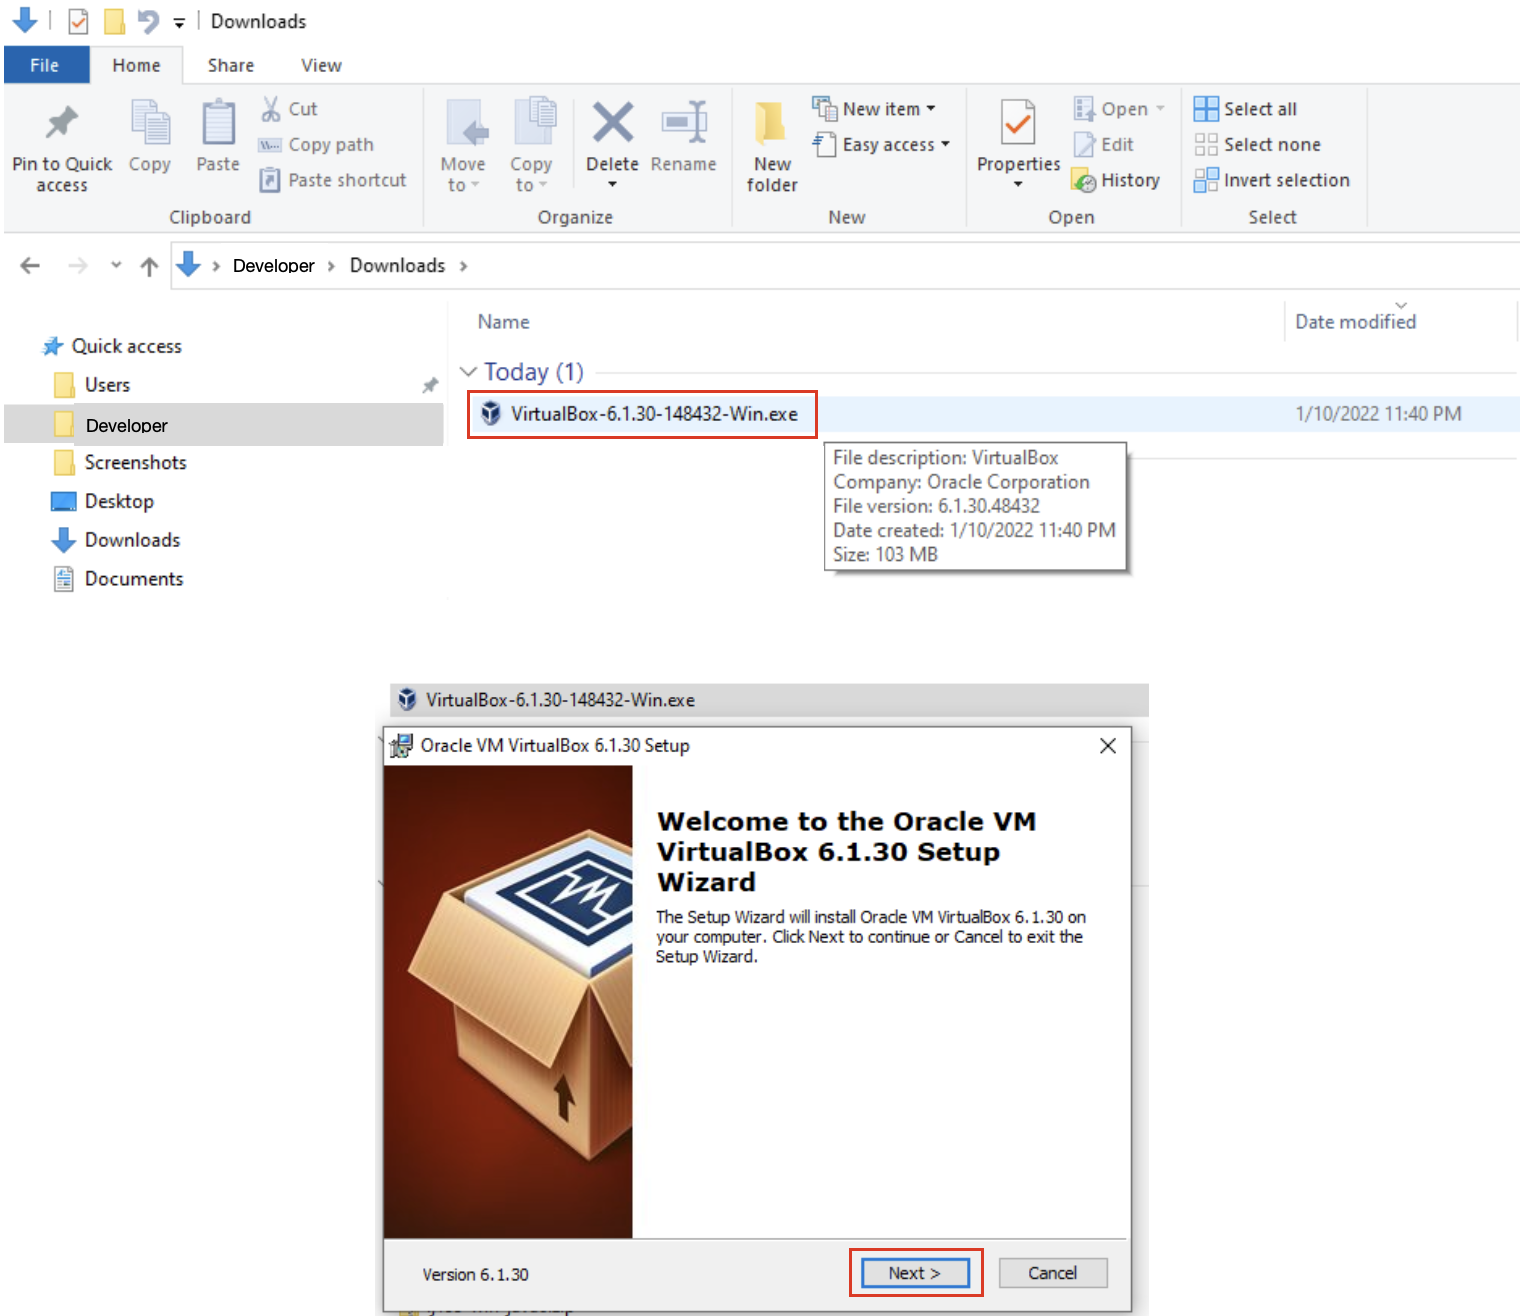
1.3 Locate the installer in the Downloads folder and double click on it to launch it.
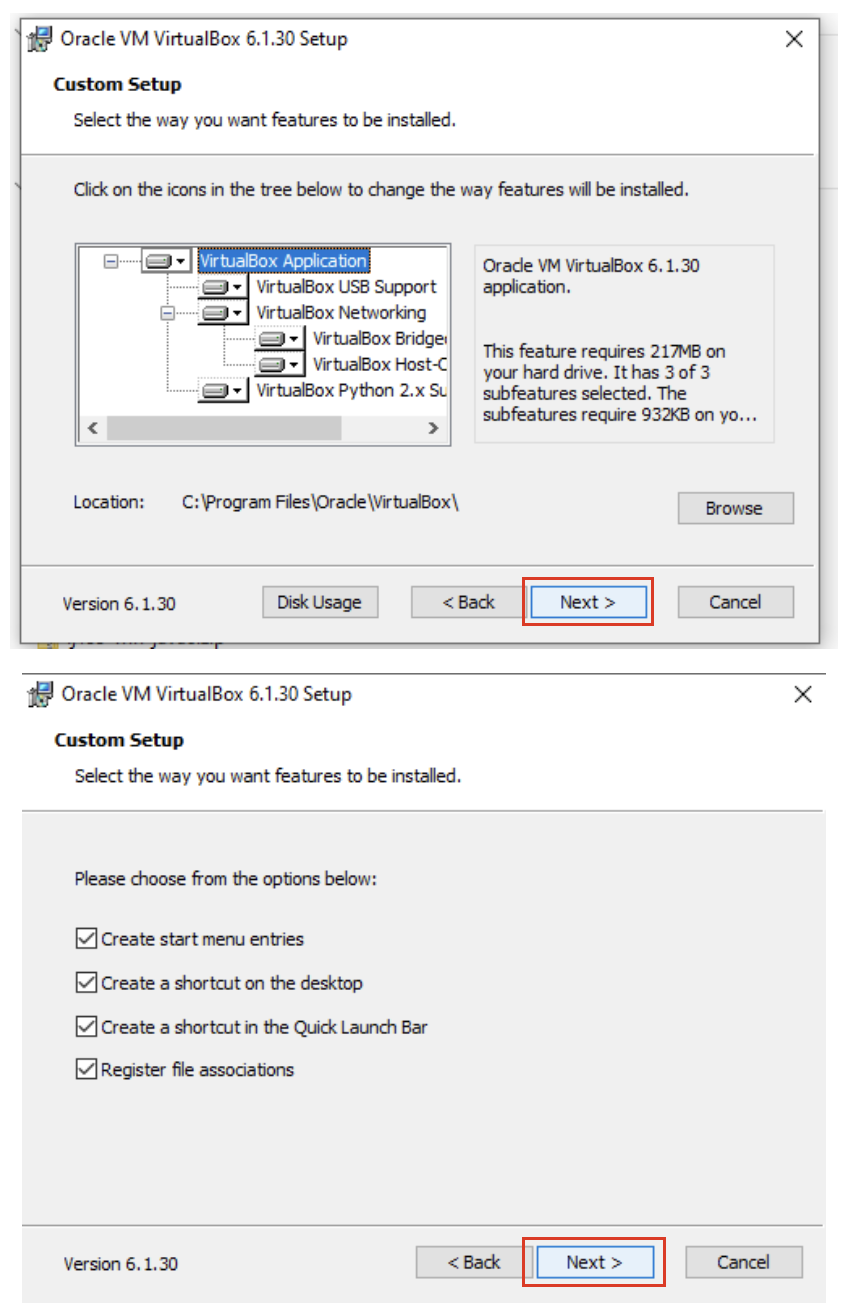
1.4 Choose to install the default setup/configuration with the default options
1.5 Allow the network connection to be reset and start the installation.
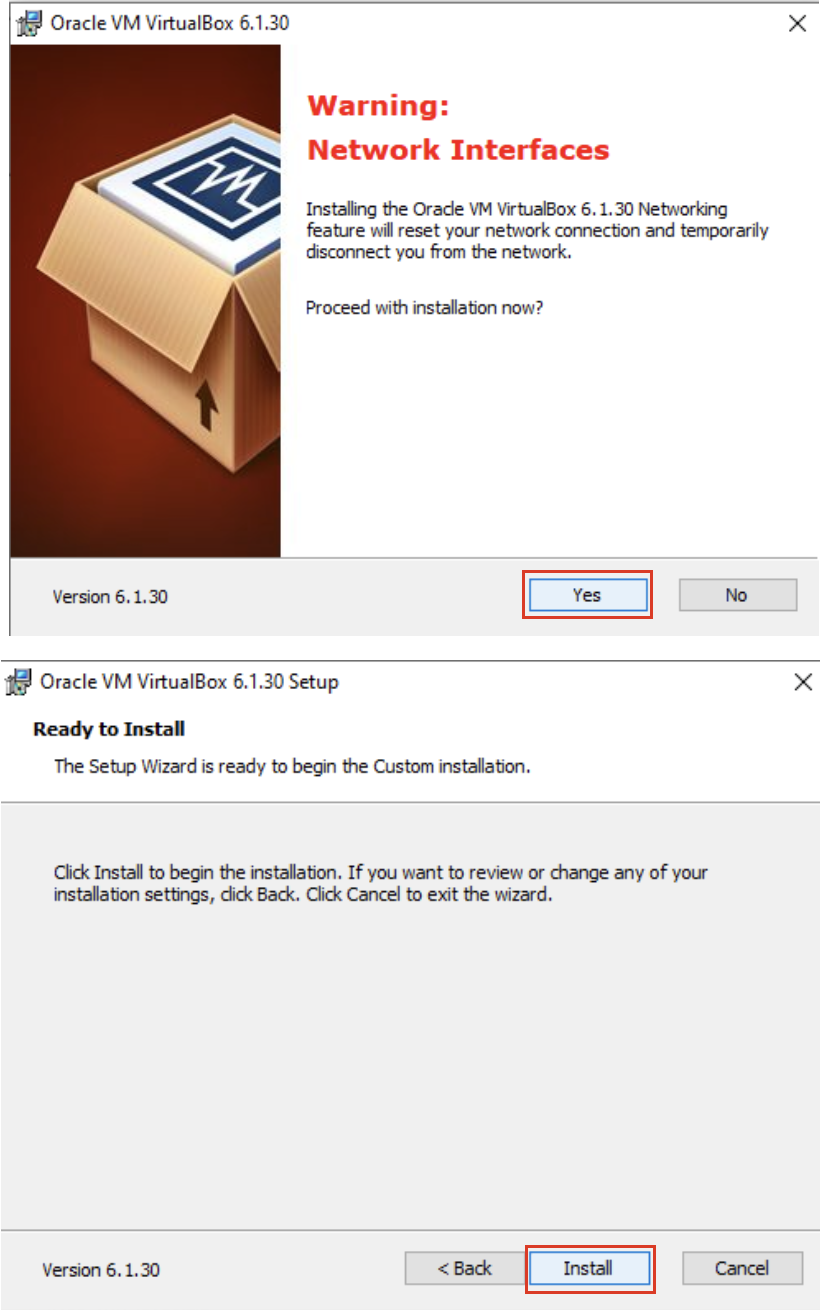
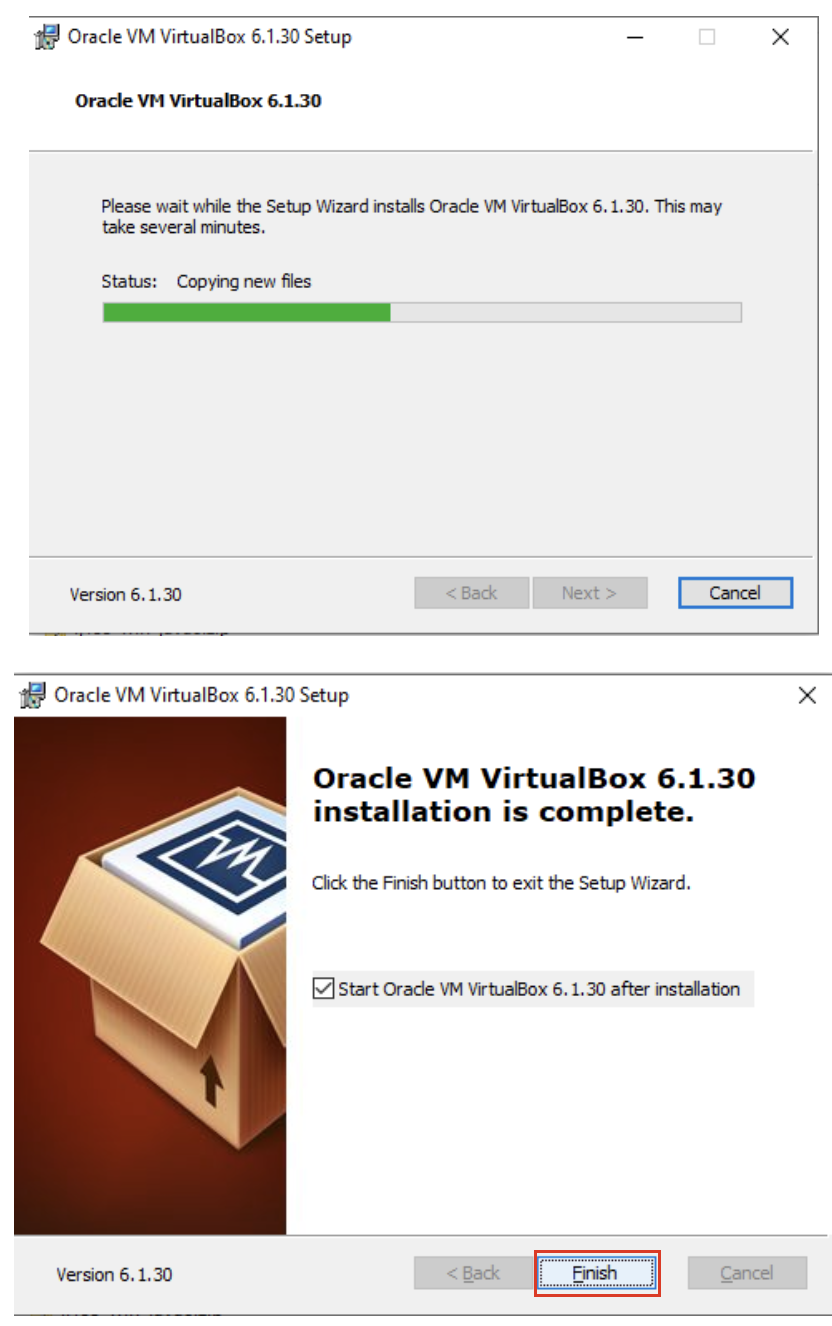
1.6 Allow the installation to progress and complete. Then click the finish button.
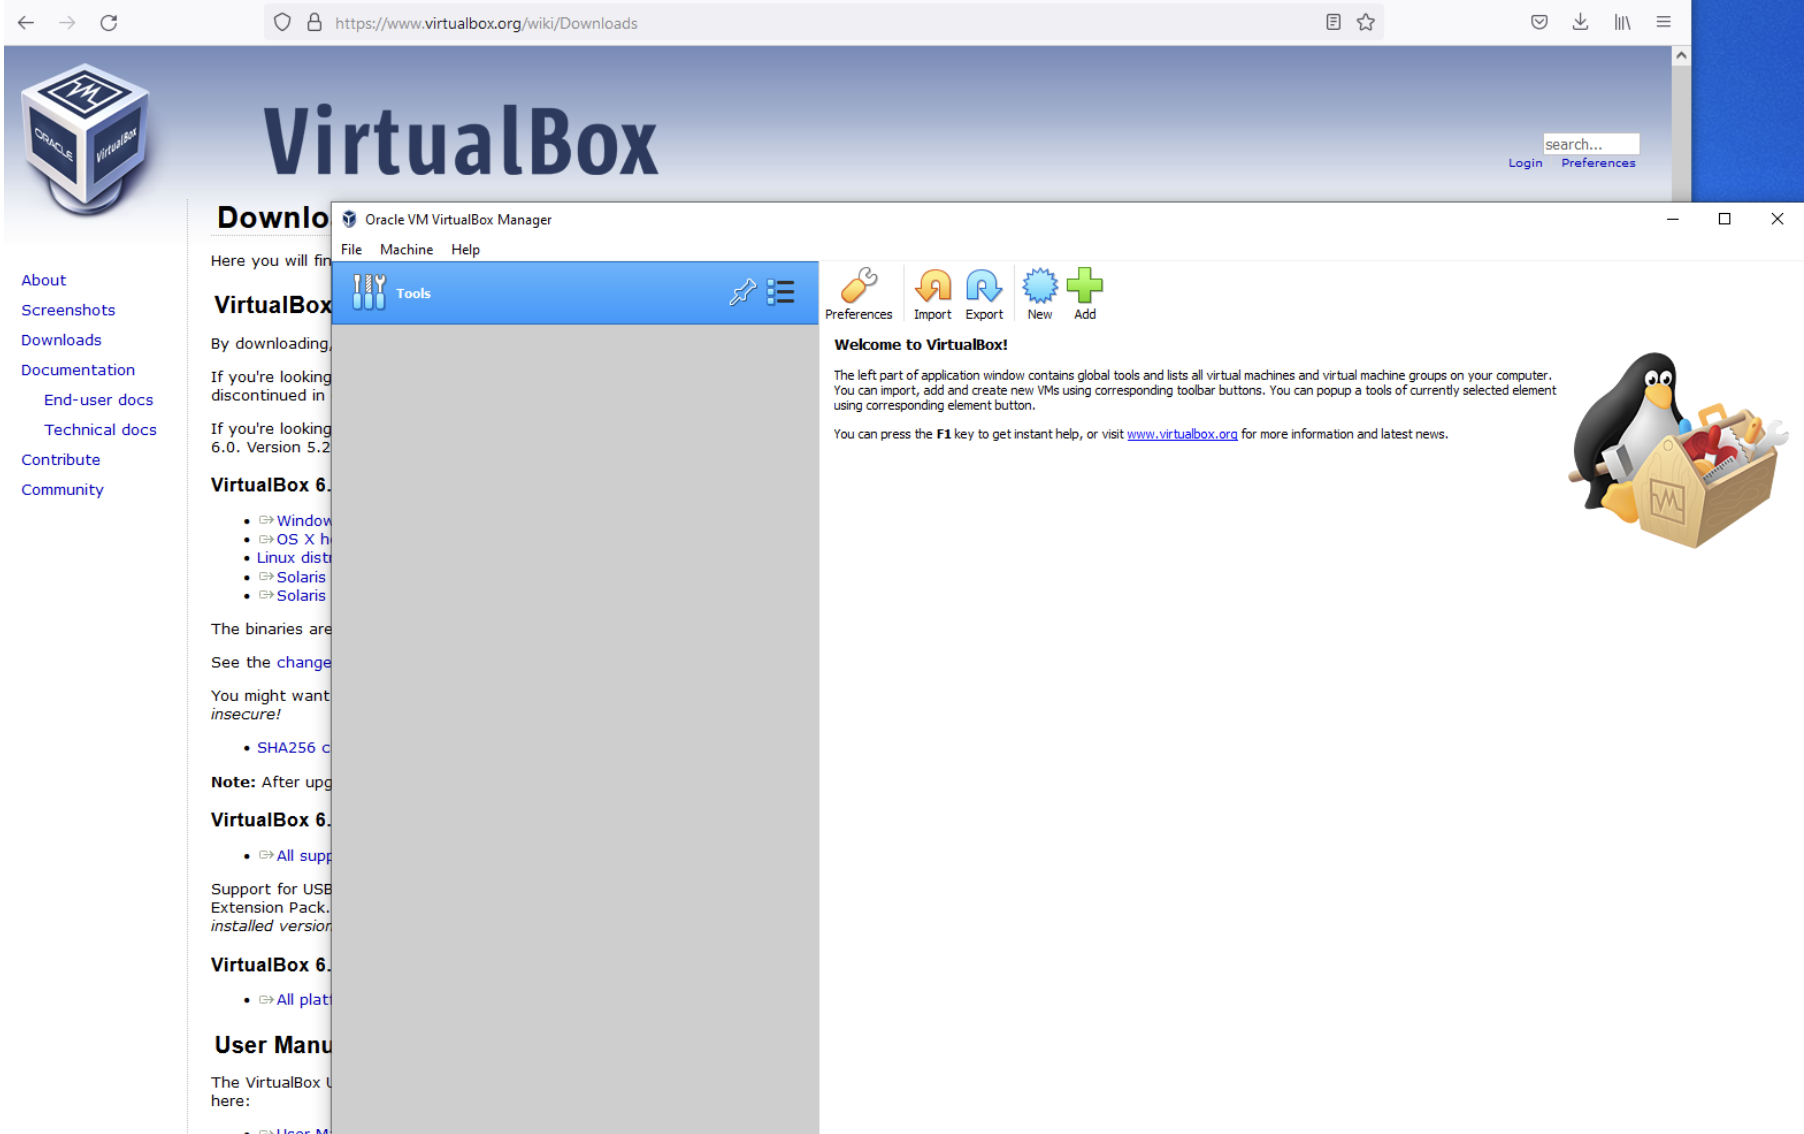
1.7 VirtualBox should automatically launch and display an empty window (containing no virtual machines).
1.8 You are now ready for the next step, Unzip the Course Virtual Machine.
Installing on Mac
Reminder: Any ARM based computers, including M1 and M2 Macs, will not work with VirtualBox, or our planned course.
1.1 Navigate to the VirtualBox website, https://www.virtualbox.org/wiki/Downloads, and download the latest version of VirtualBox.
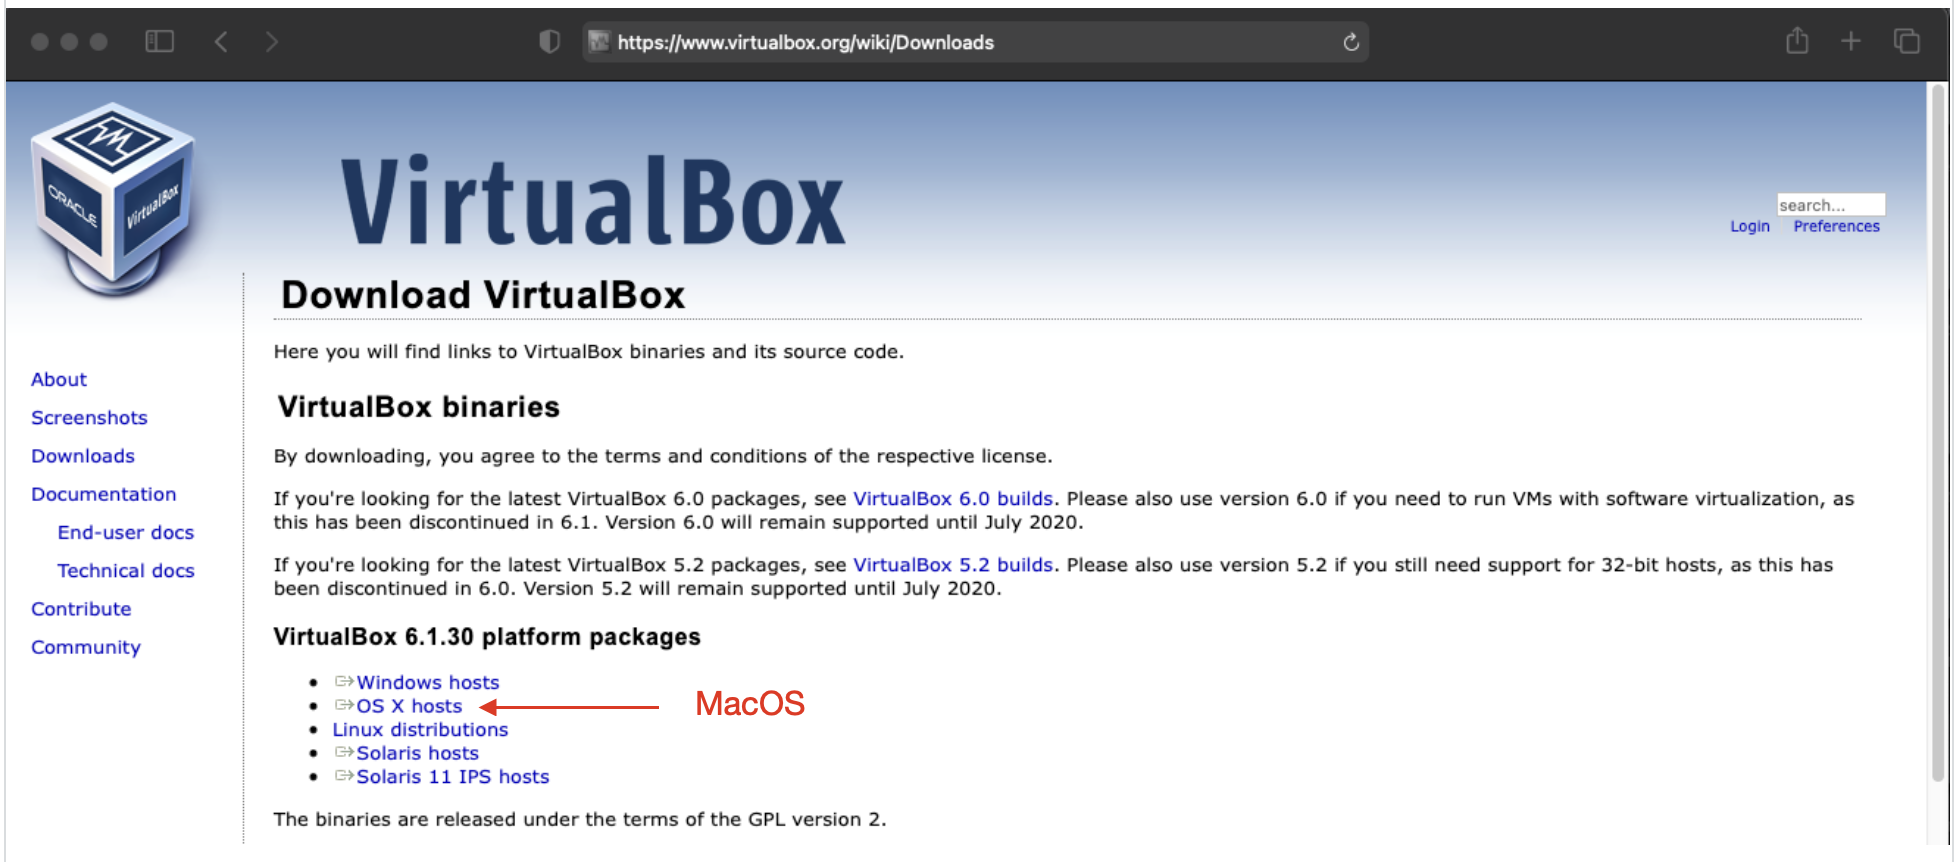
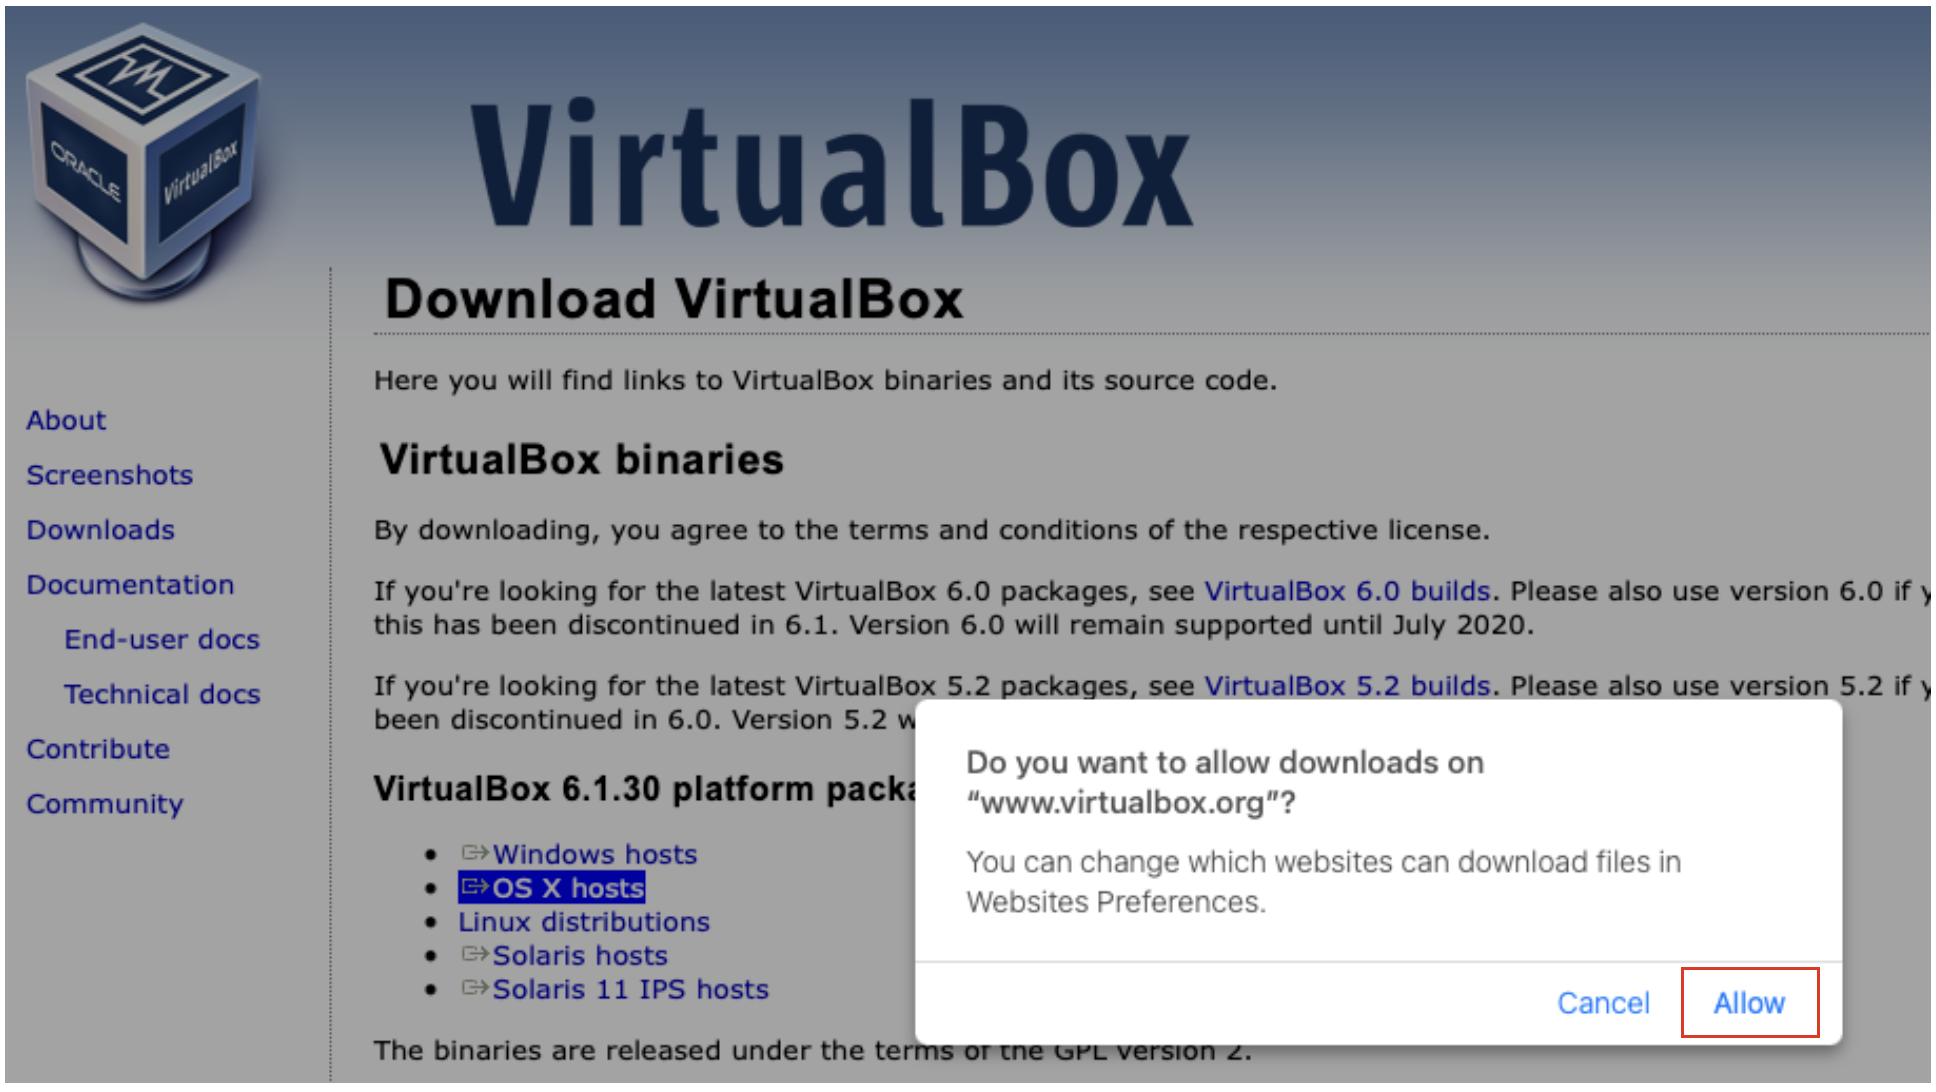
1.2 Allow downloads from the VirtualBox web site.
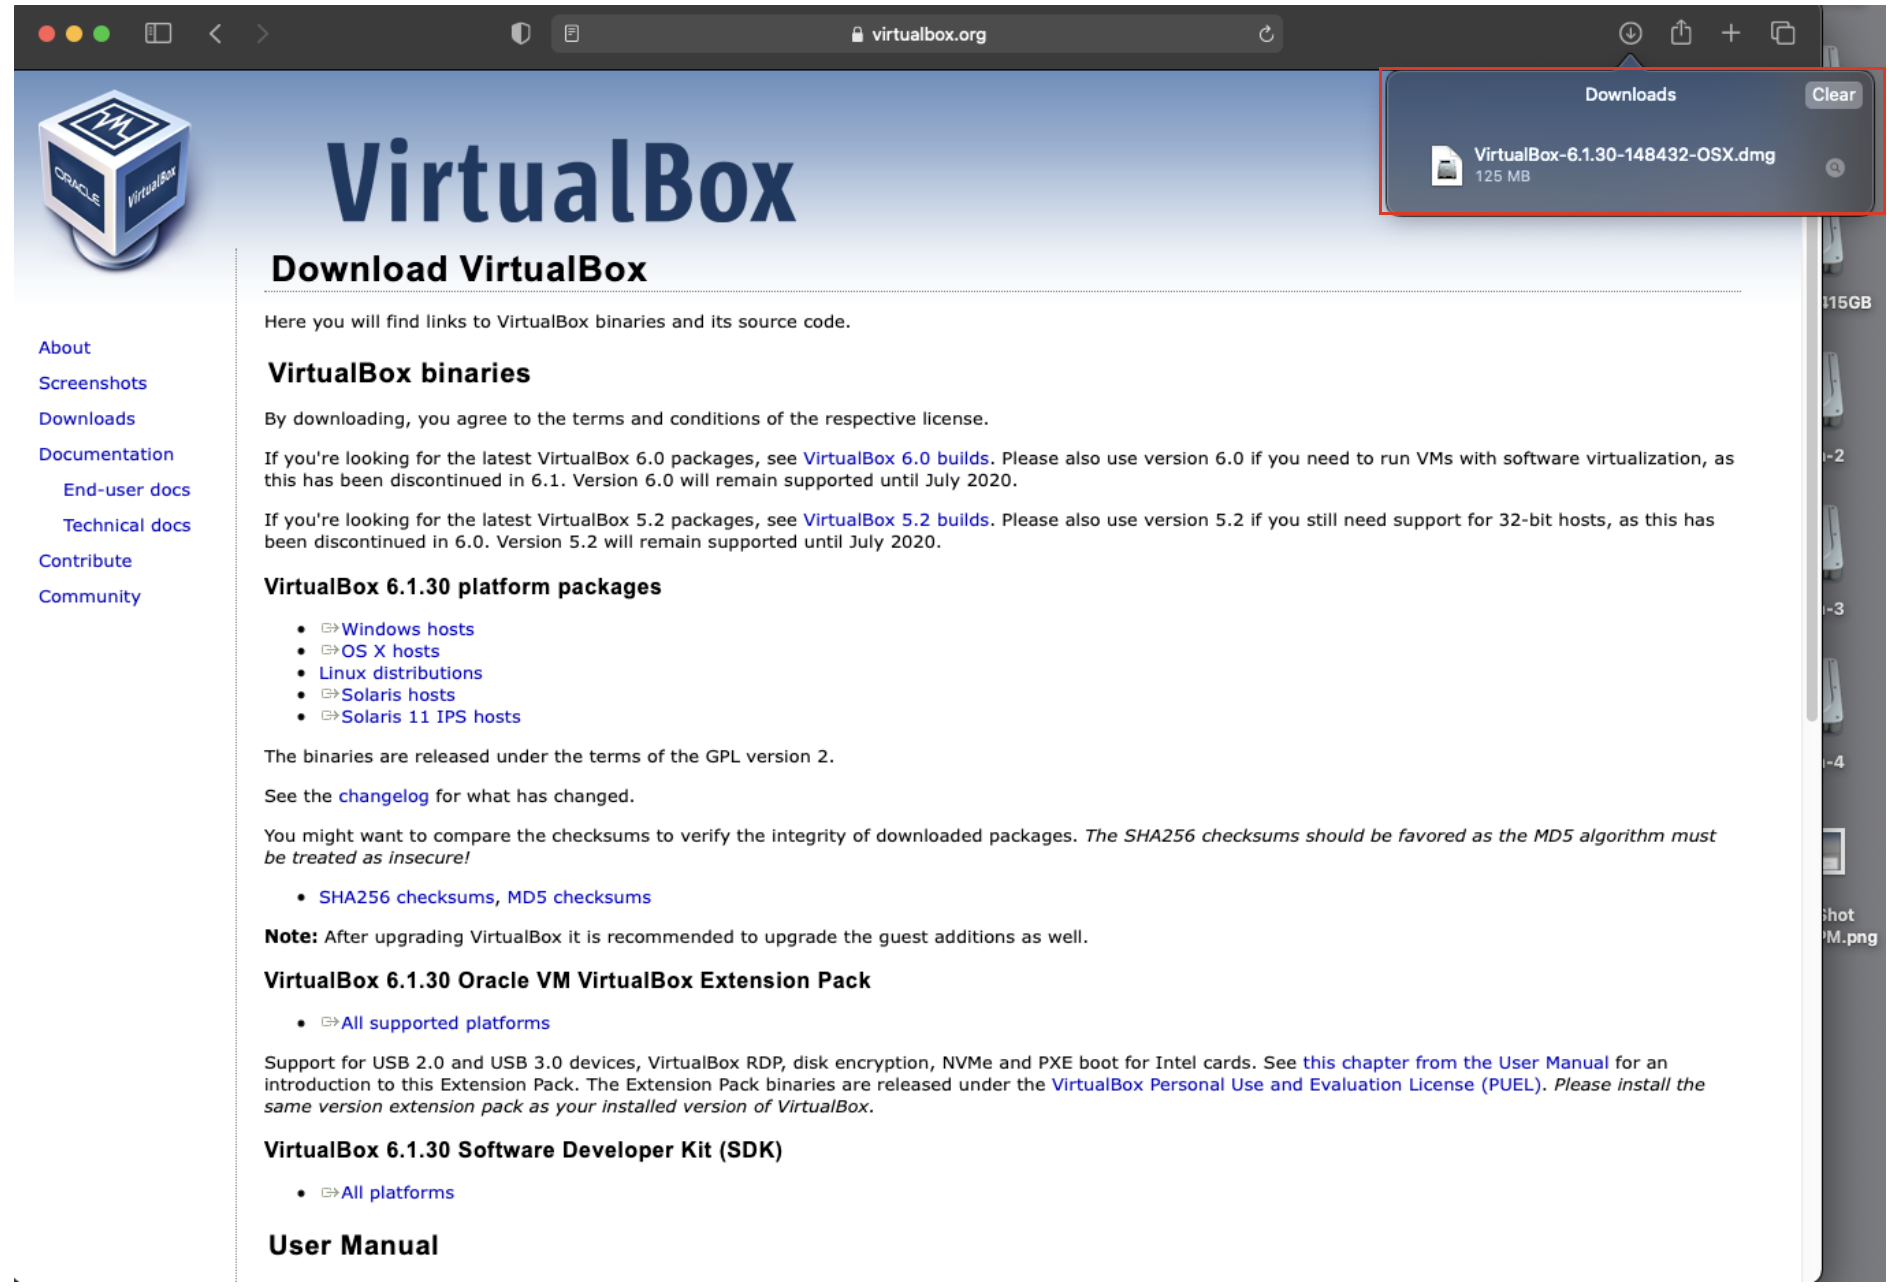
1.3 Open the download archive when it finishes.
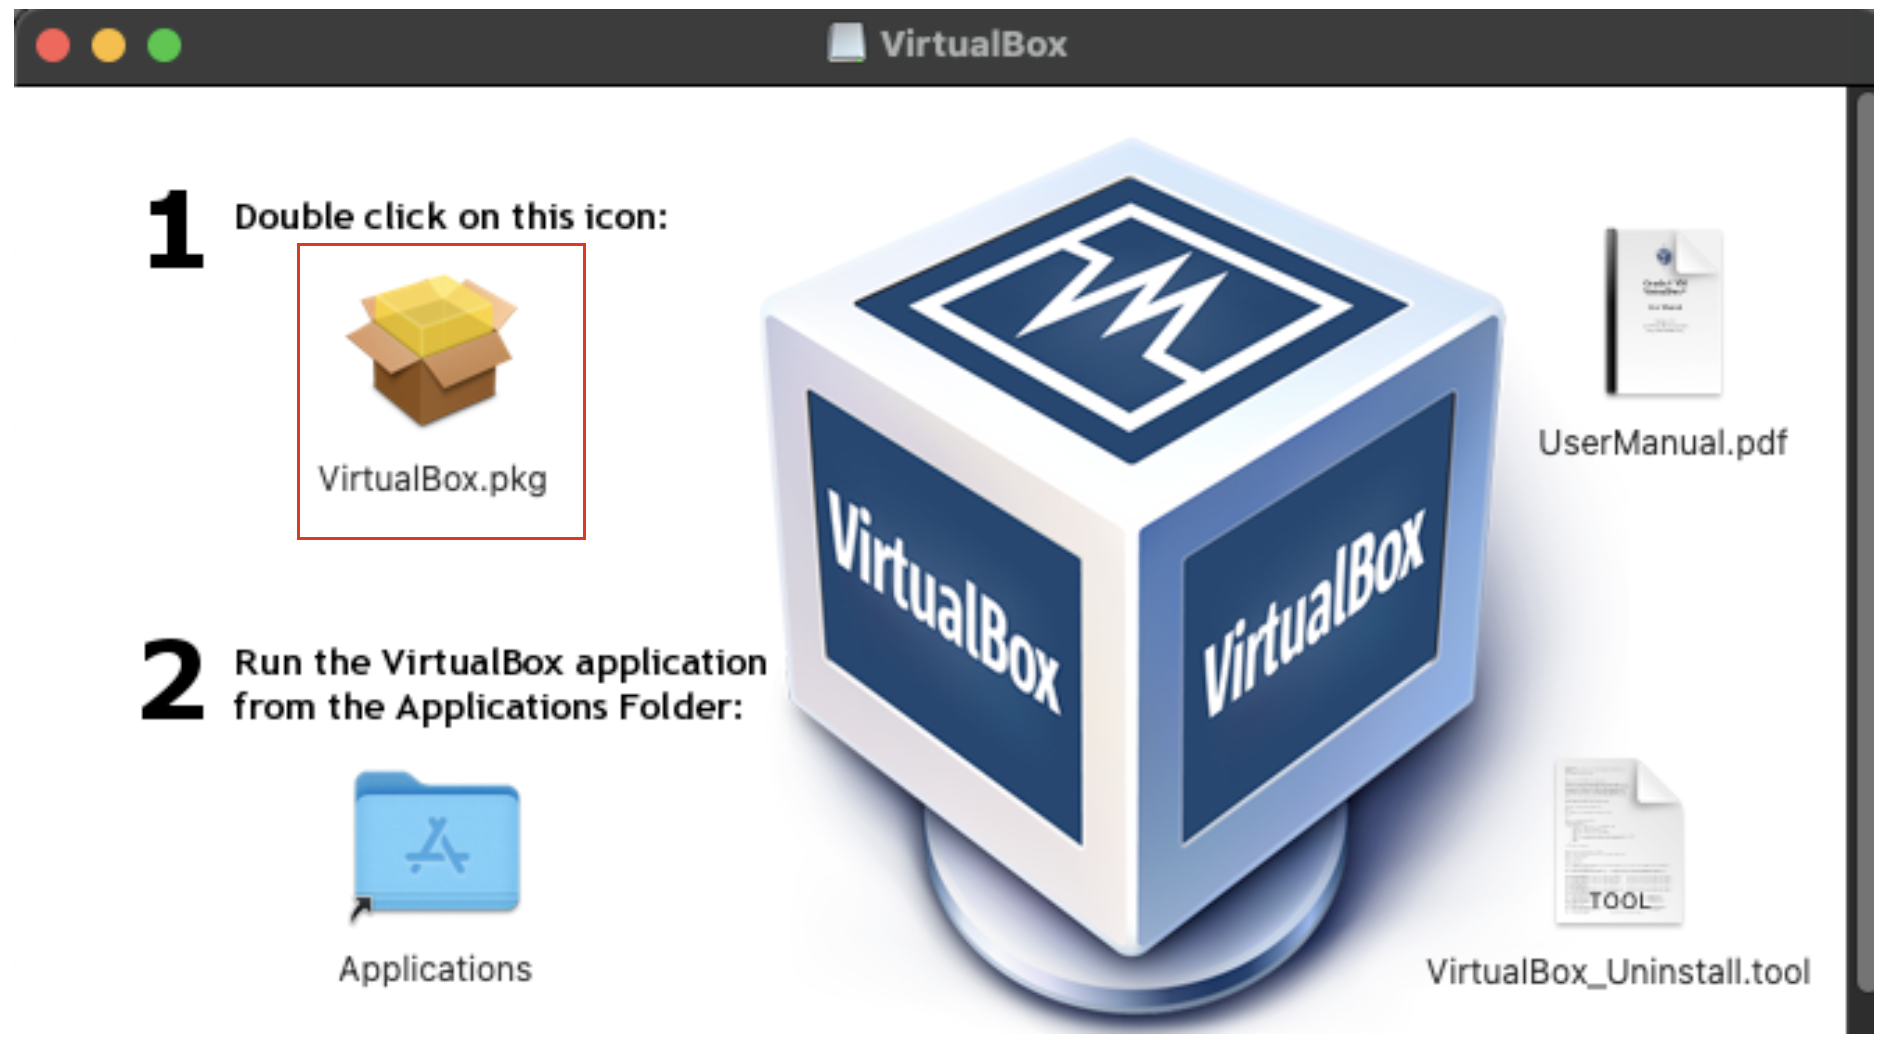
1.4 Double click on the VirtualBox package installer
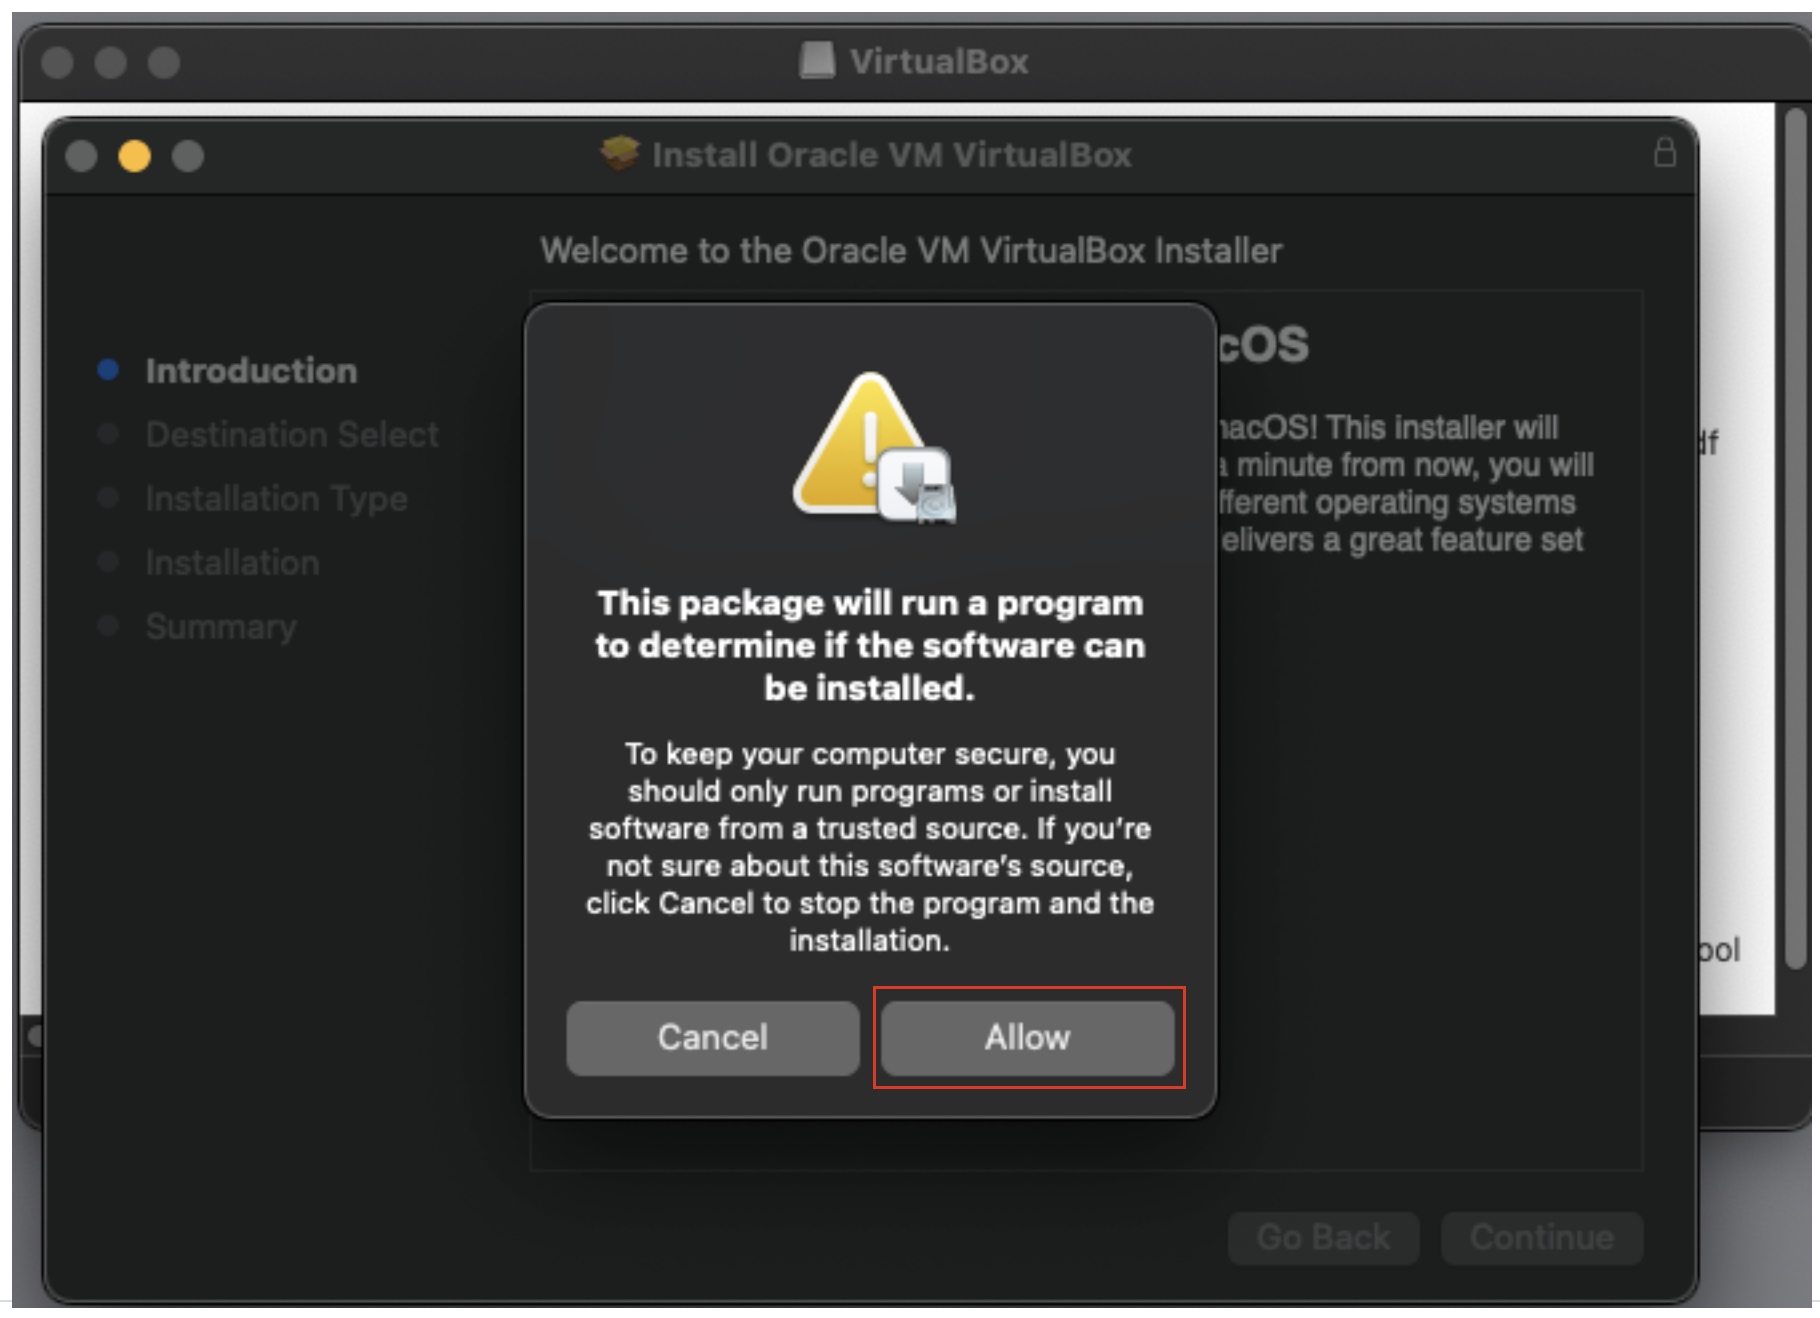
1.5 Give the installer permission to run scripts.
1.6 Allow the installer to continue.
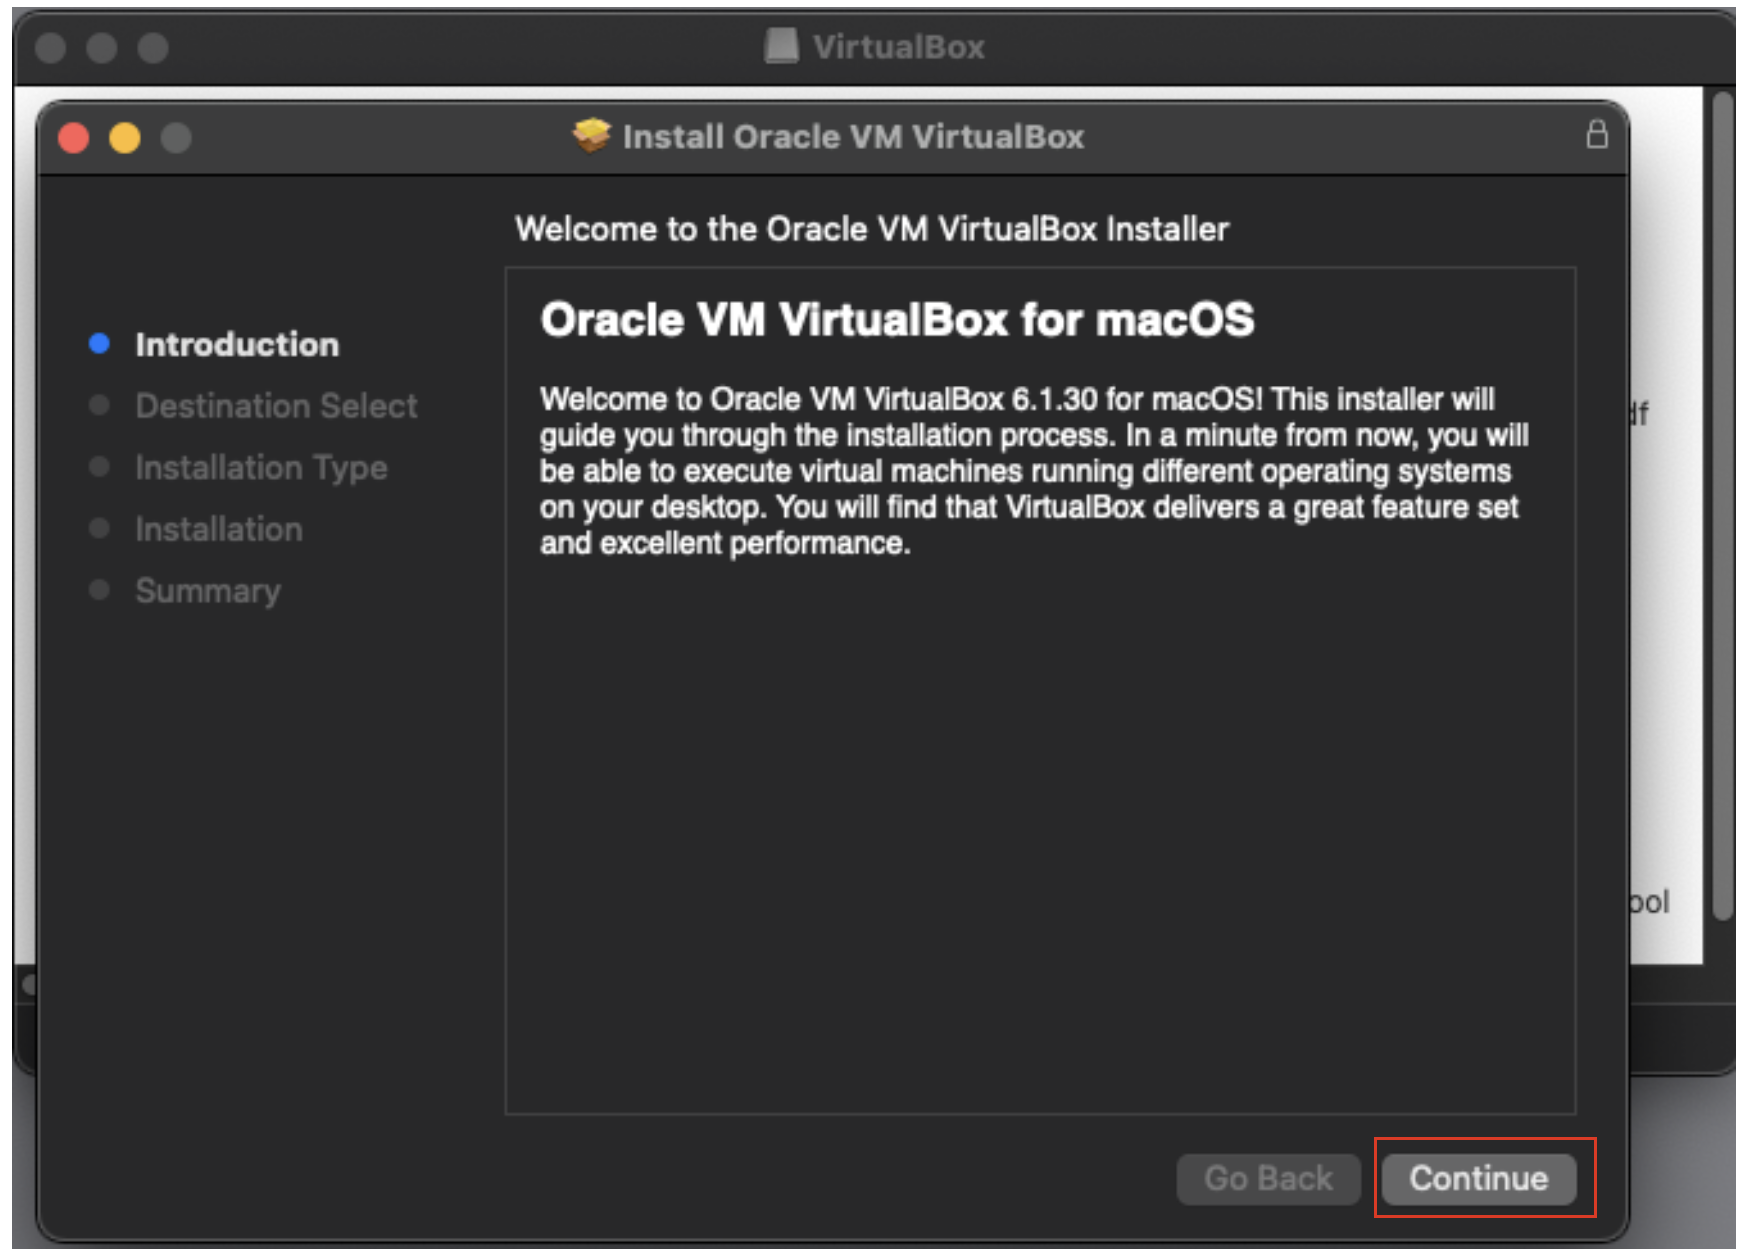
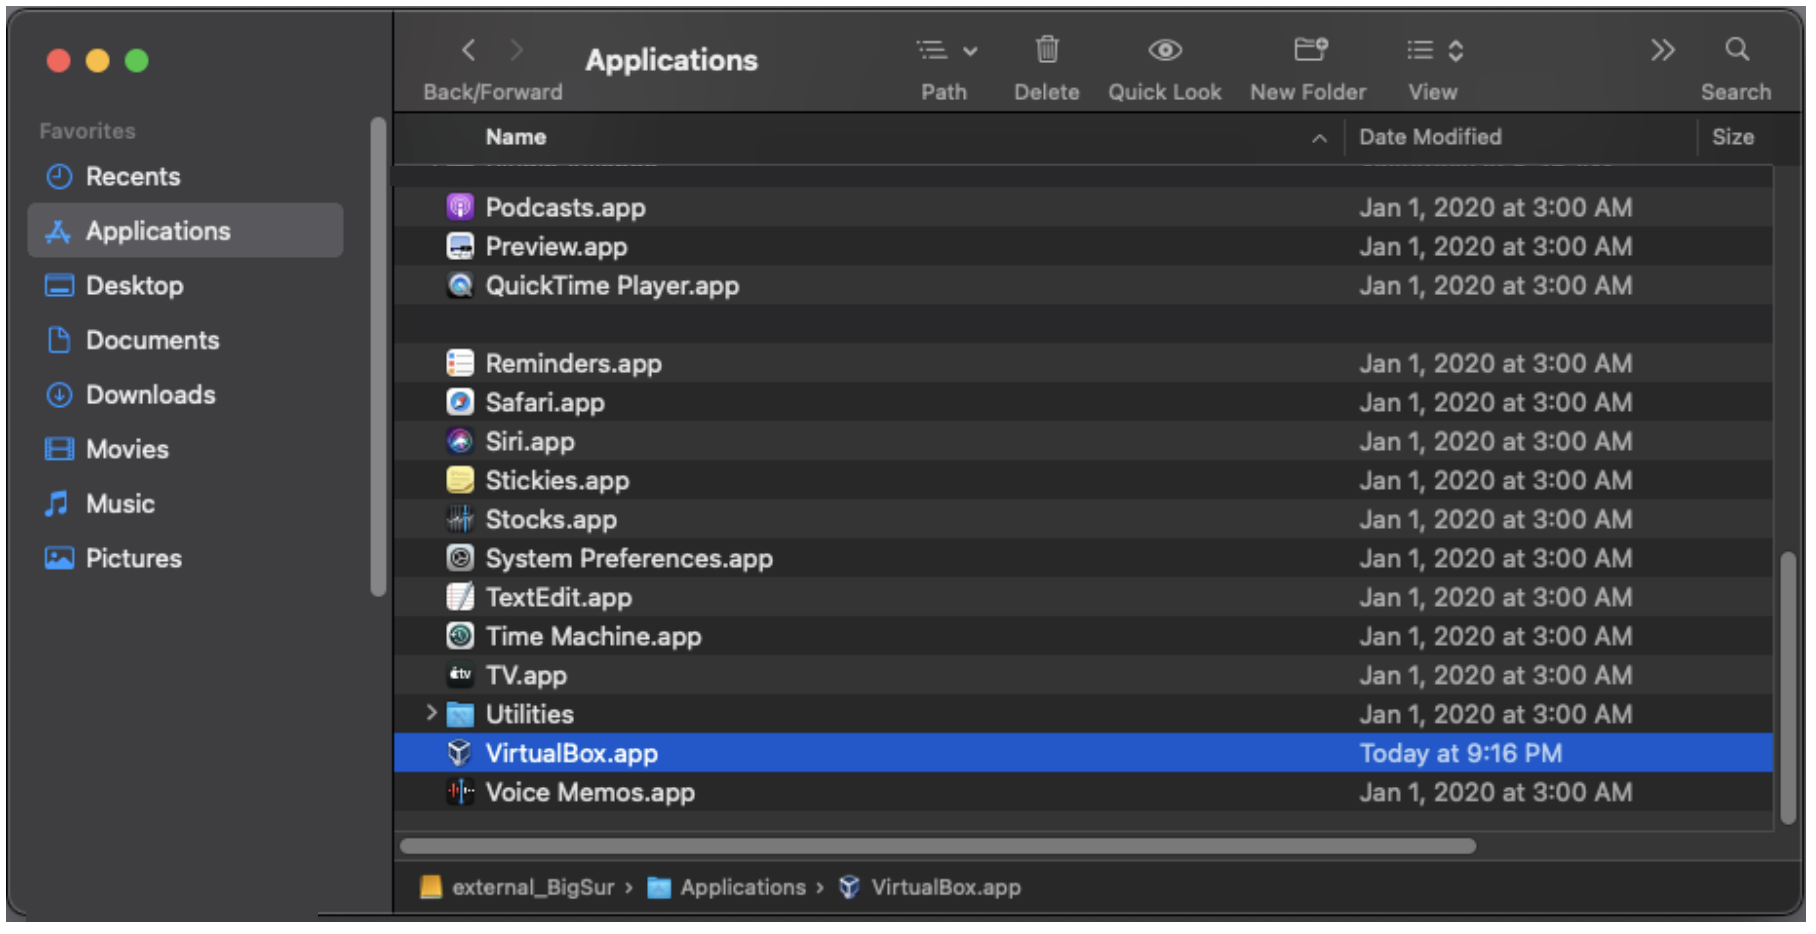
1.7 Pick a destination for the VirtualBox application. The default install location in the Applications folder should be fine (in the photo below, we are saving it to an external disk named “external_BigSur)”. Your hard drive will be named differently, e.g., Macintosh HD, etc.
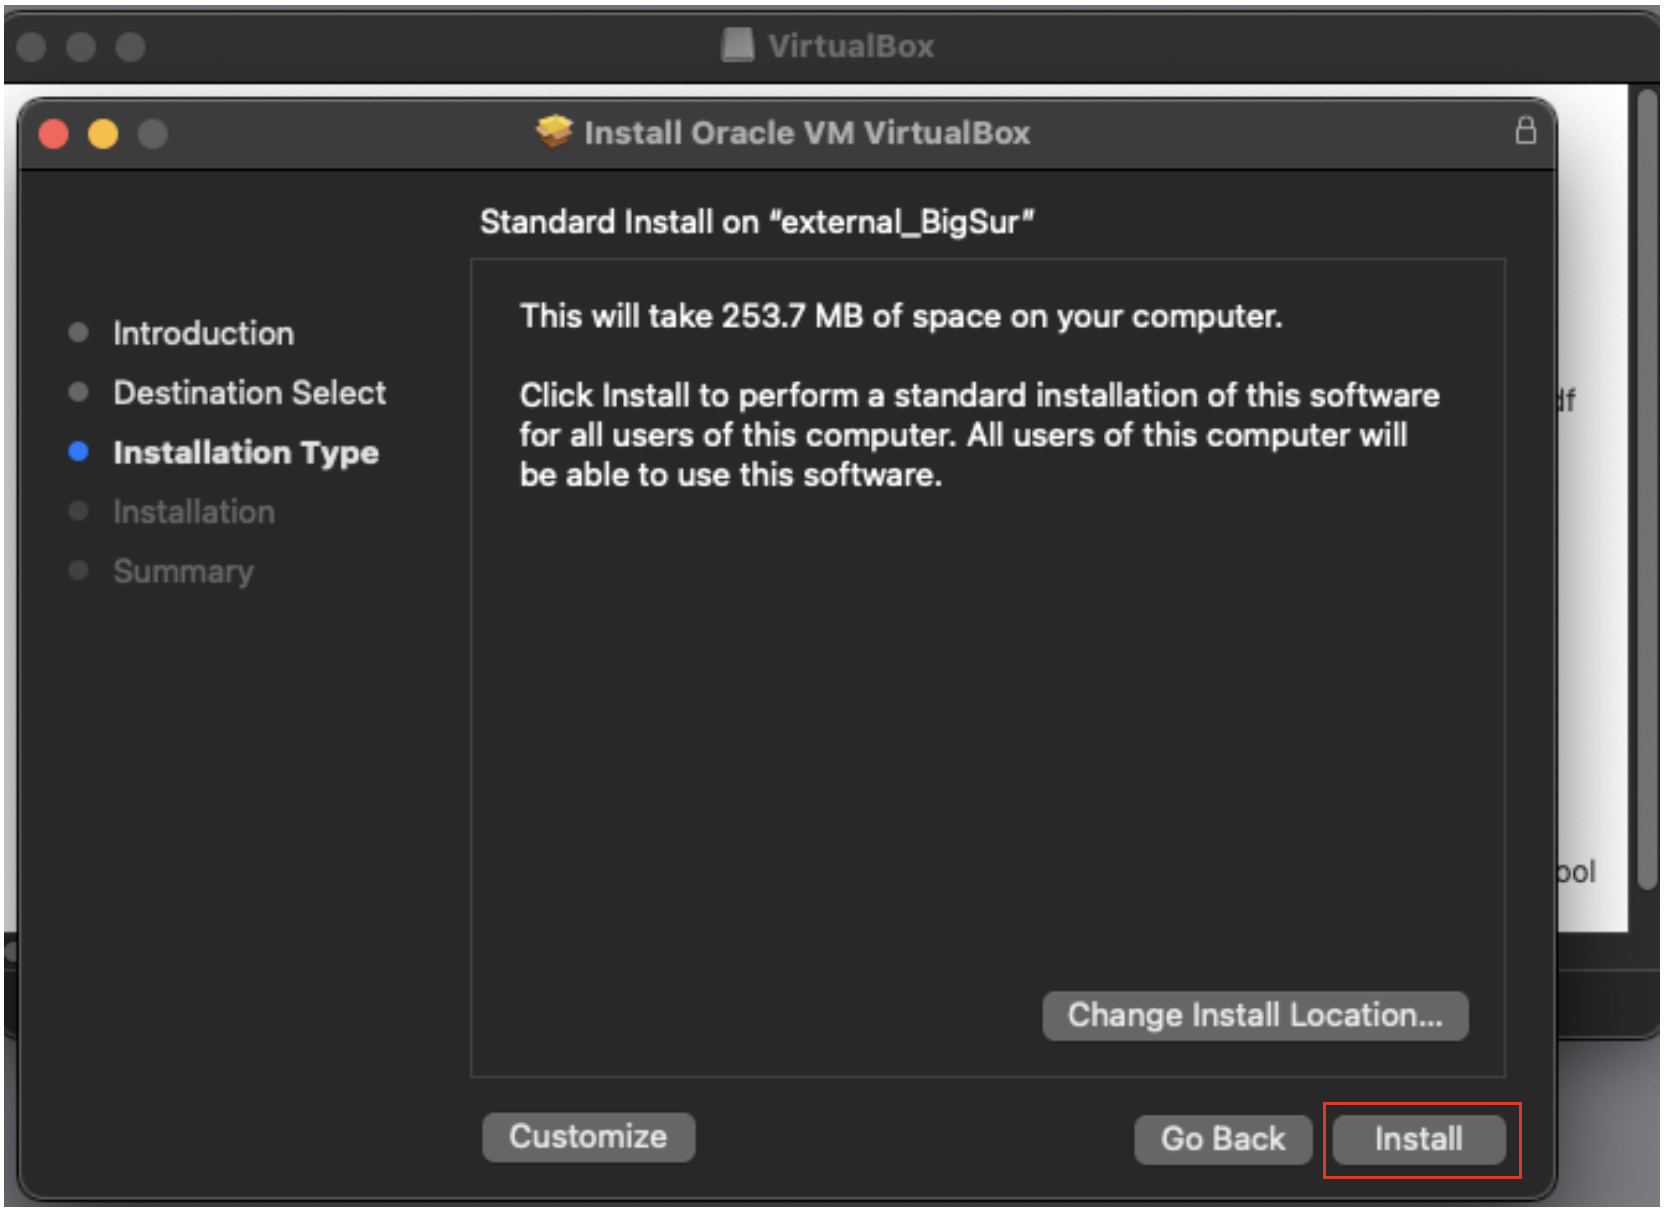
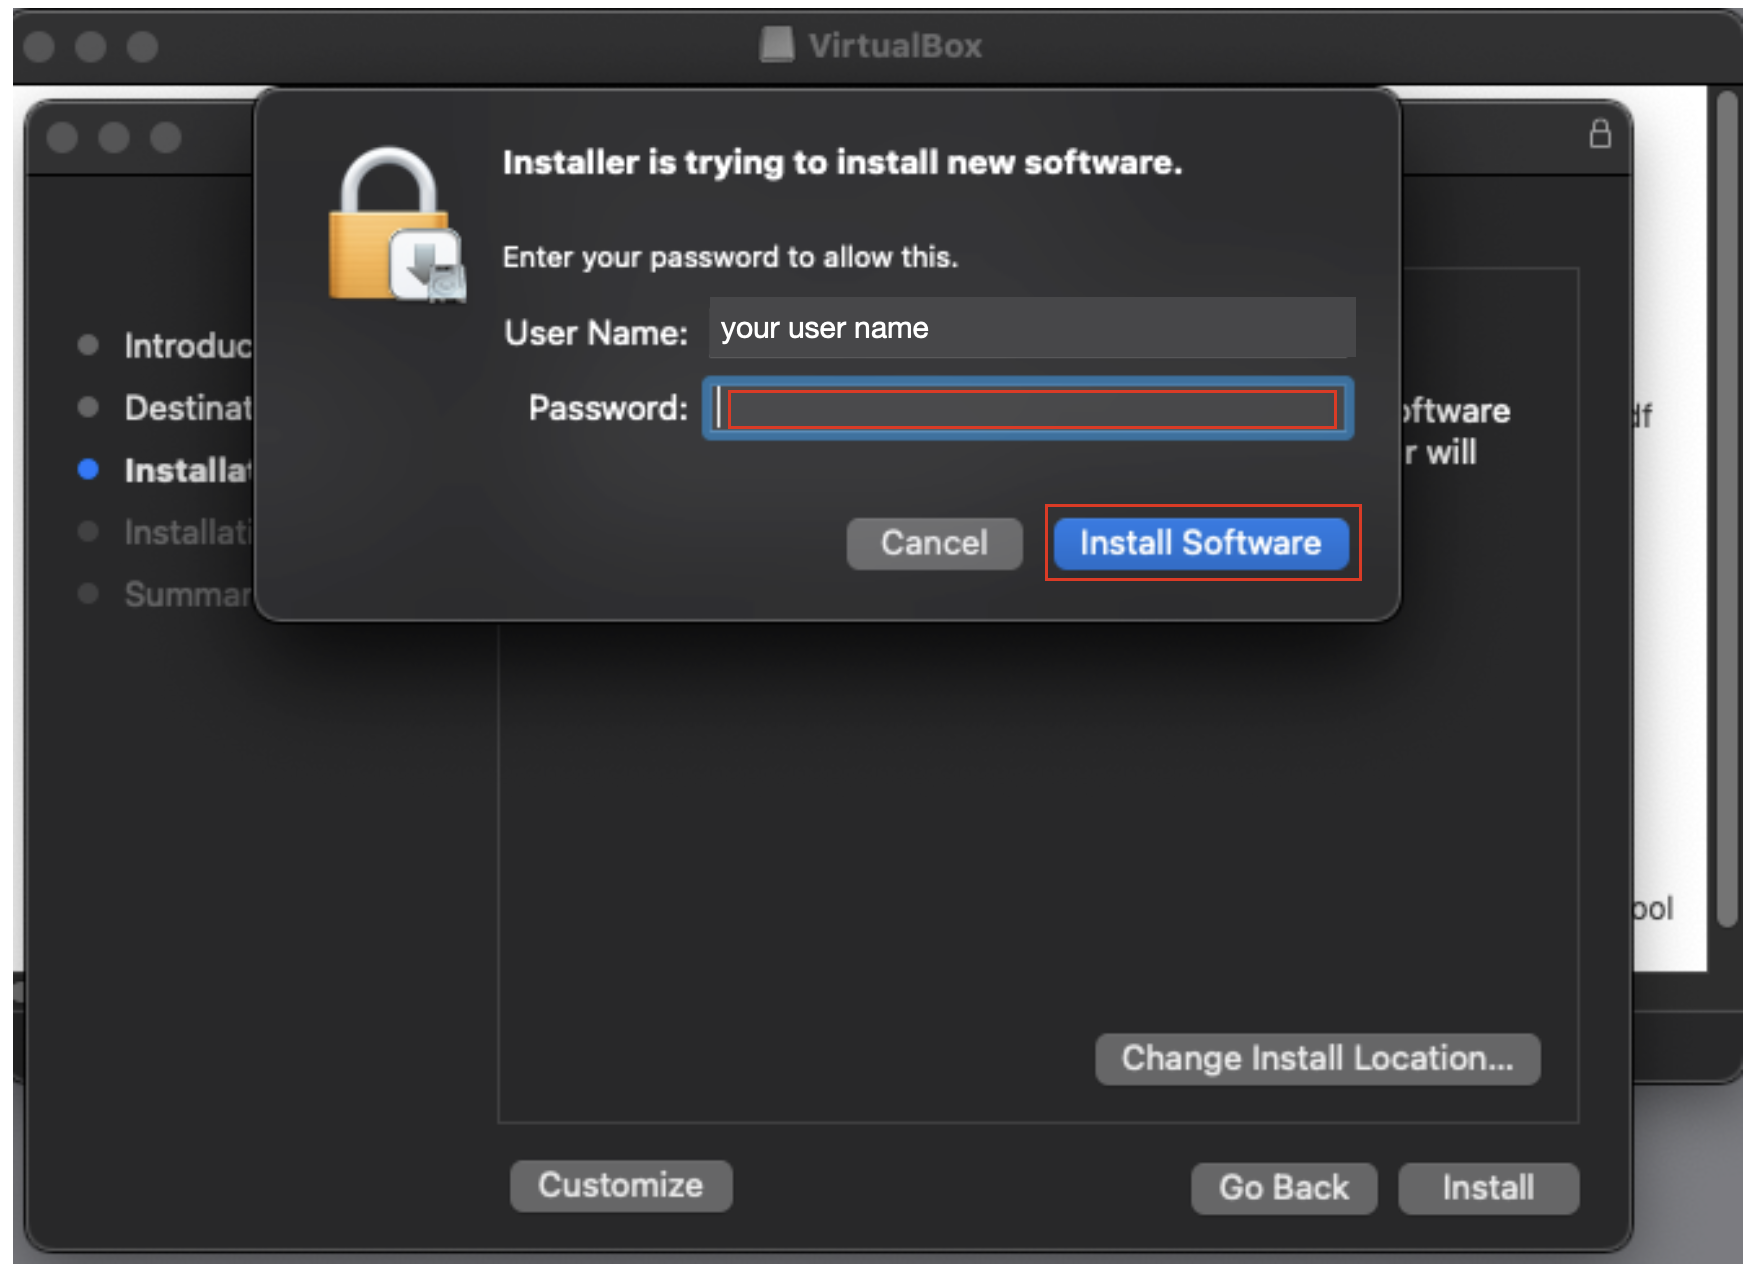
1.8 Authenticate using your login credentials to allow the installation.
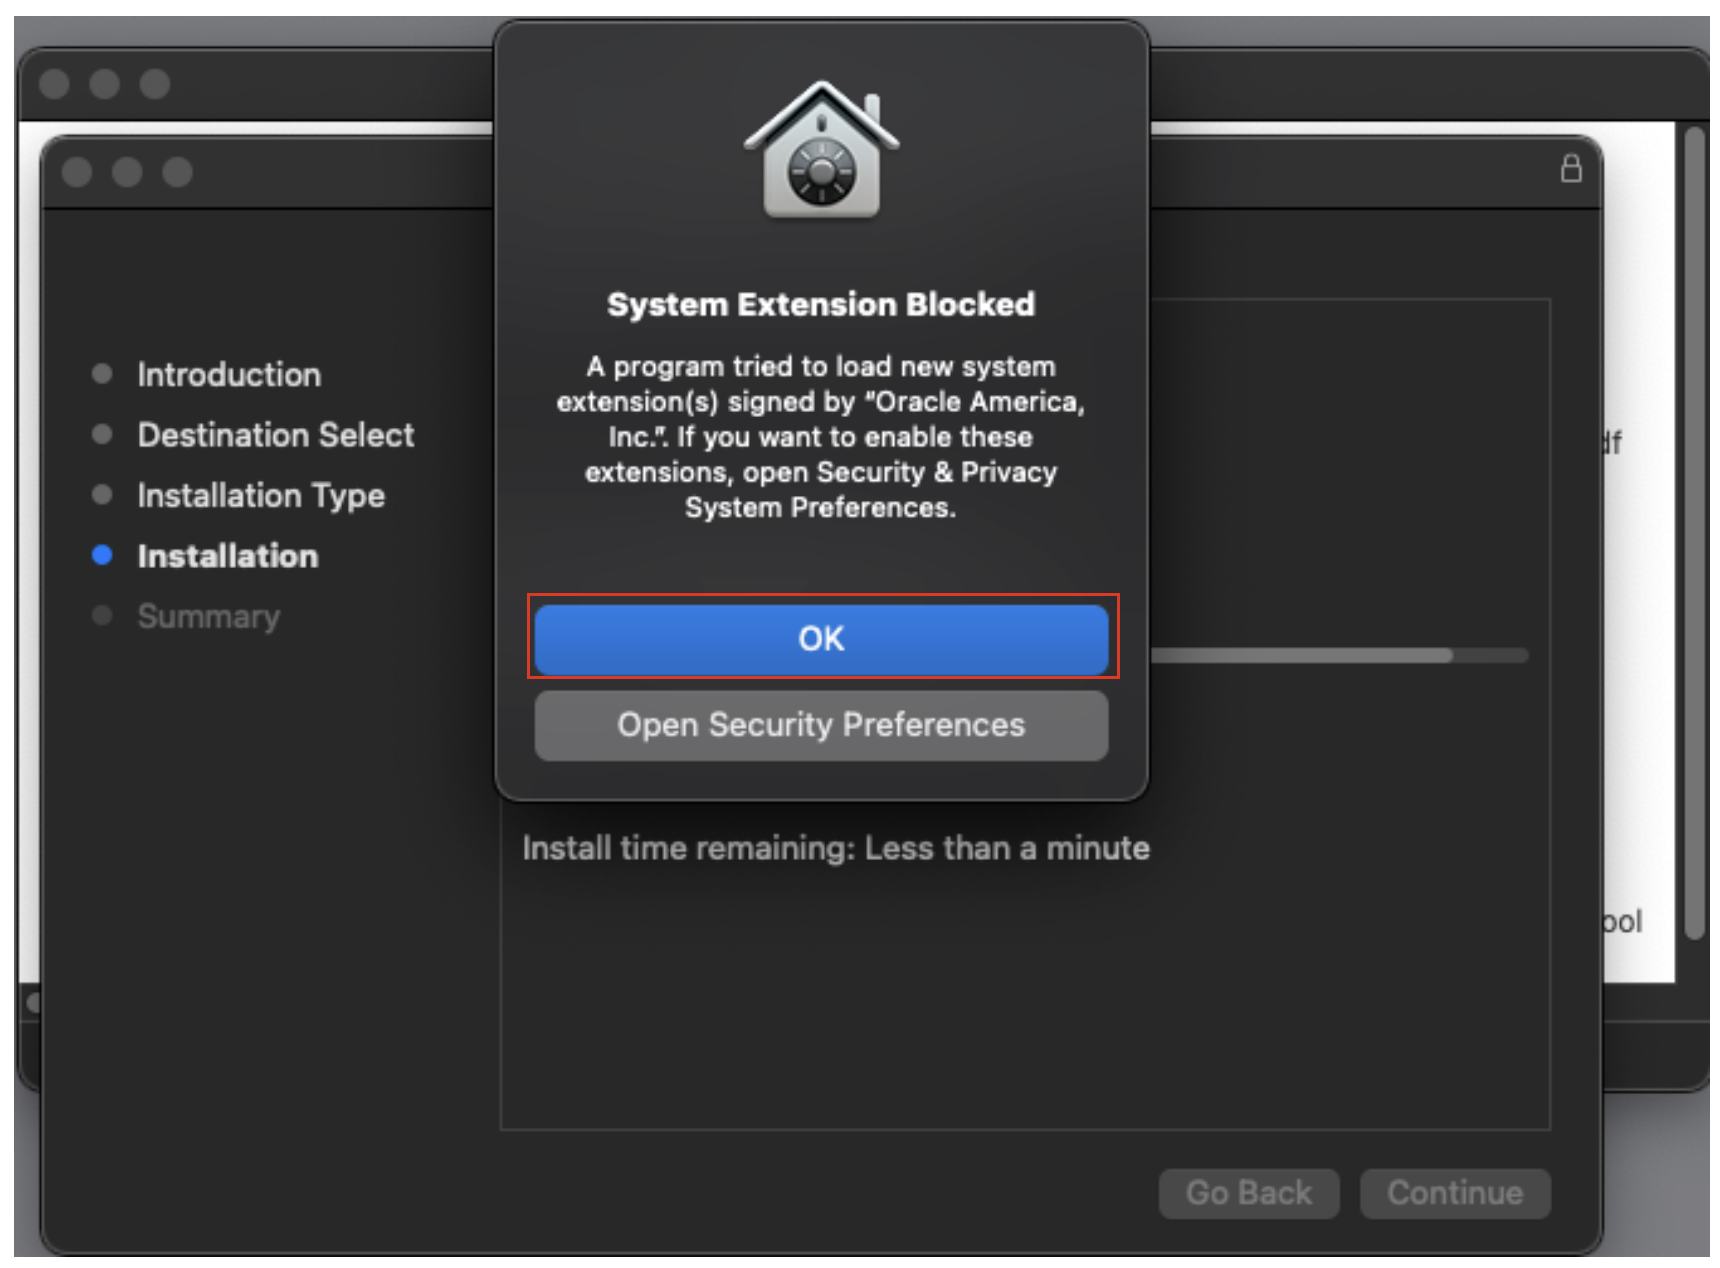
1.9 VirtualBox will issue a notification that the kernel extension it installed is currently blocked from running. Click OK. If this warning does not pop up for you, you will need to go to your System Preferences (under the Apple icon), then the Security and Privacy settings to follow the instructions in steps 10-11.
1.10 After the notification the install completed, go into the system security and privacy settings and authenticate with your login credentials.
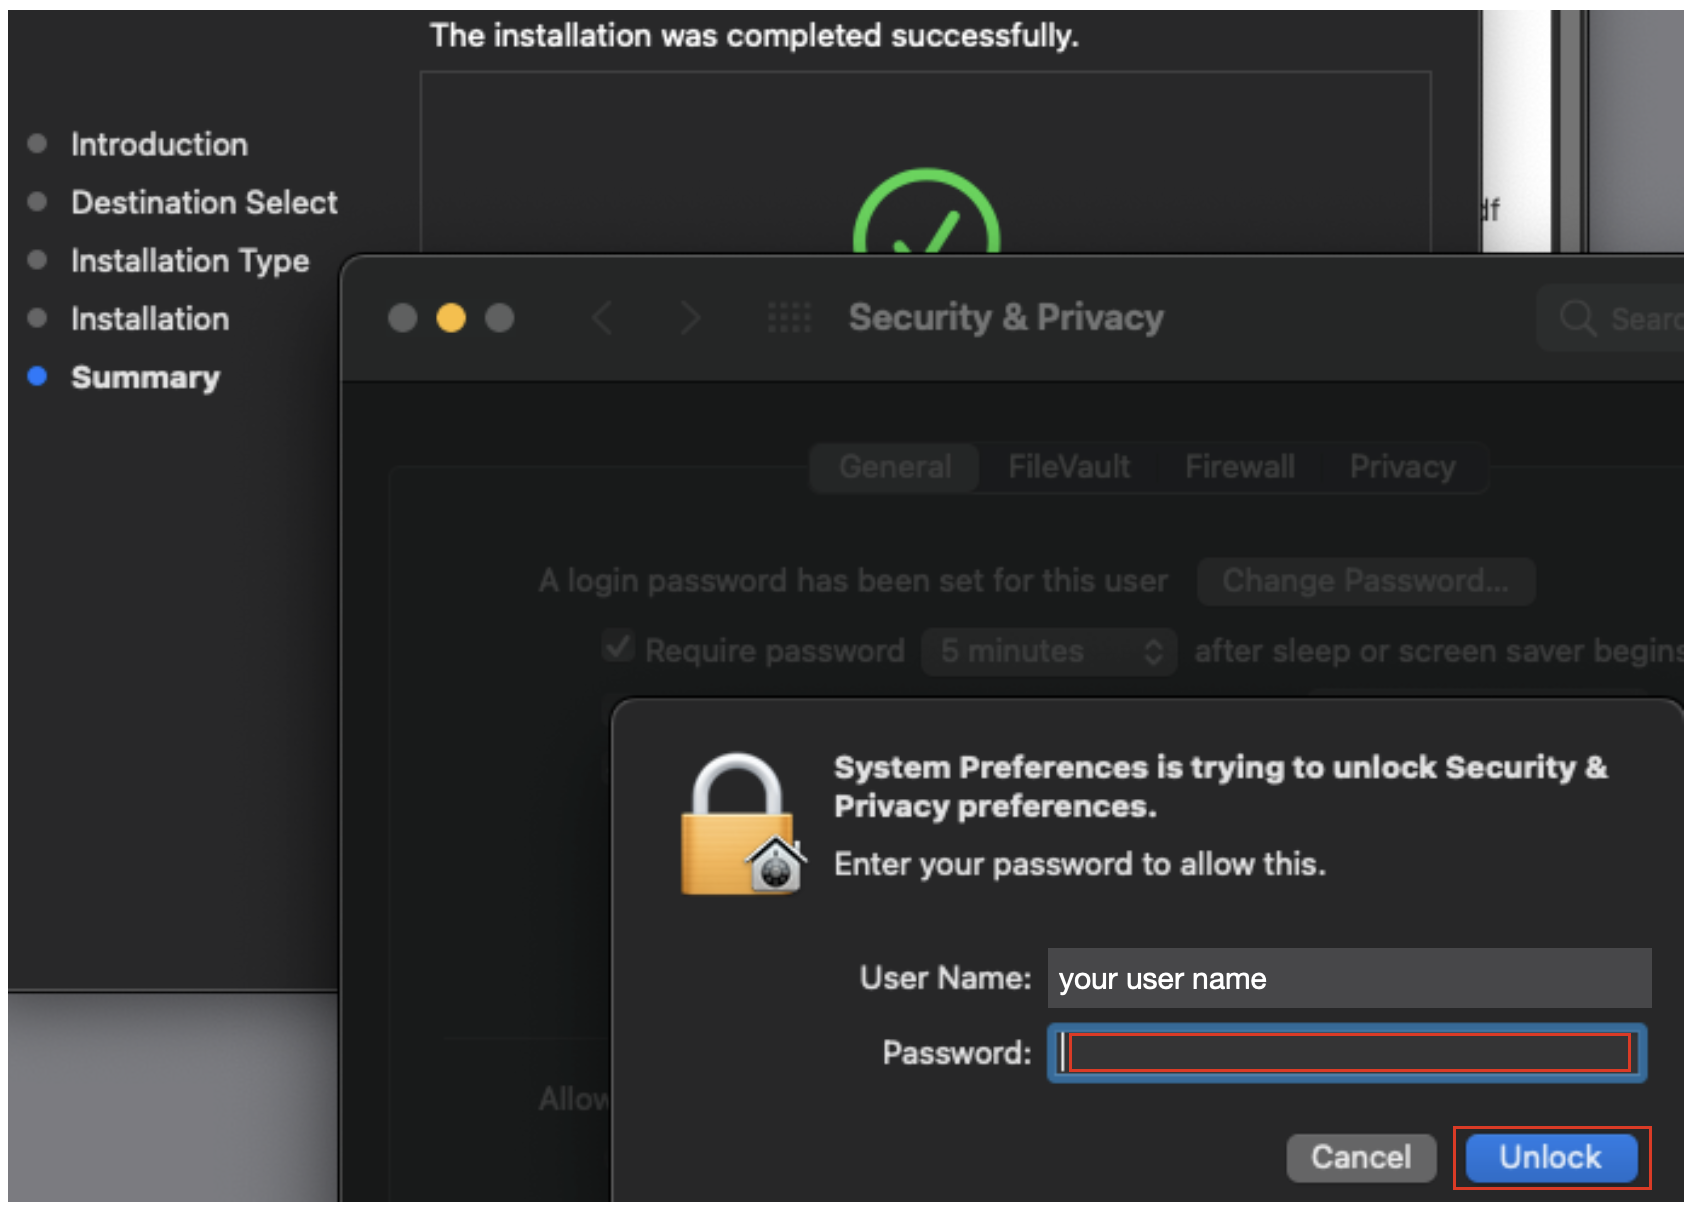
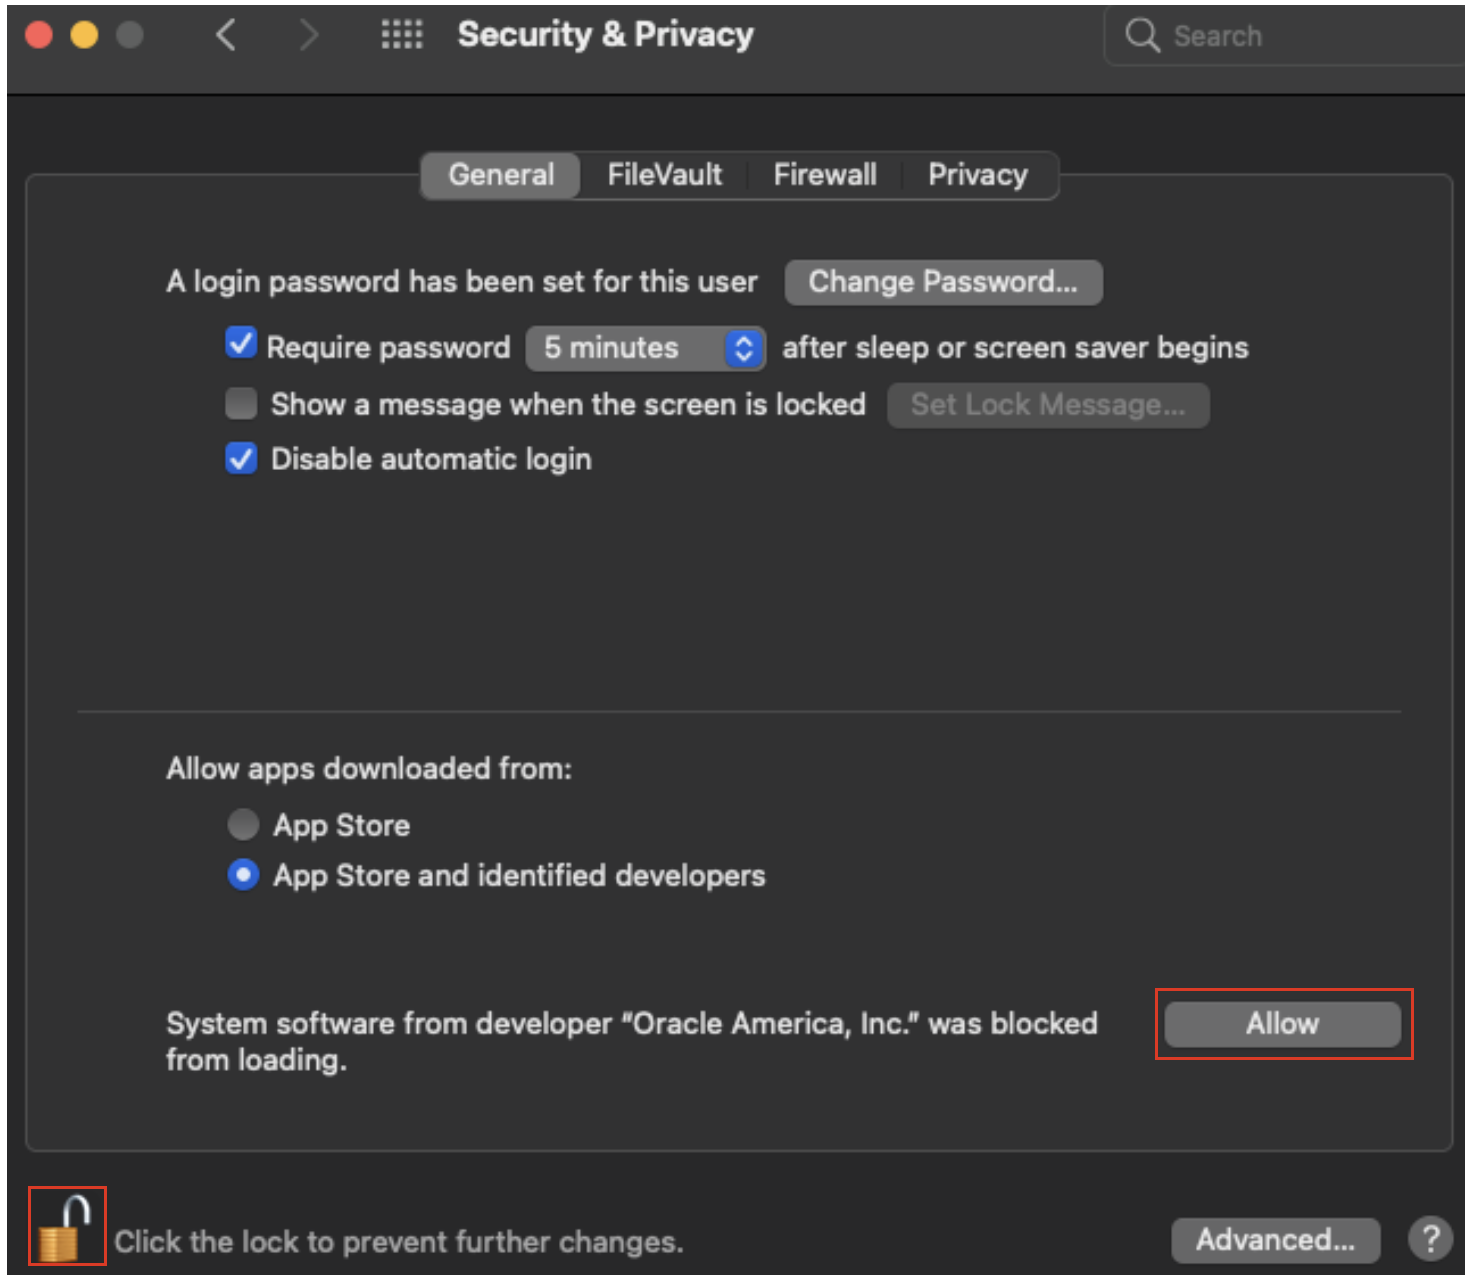
1.11 With the preferences unlocked, select allow to enable the VirtualBox extension to load.
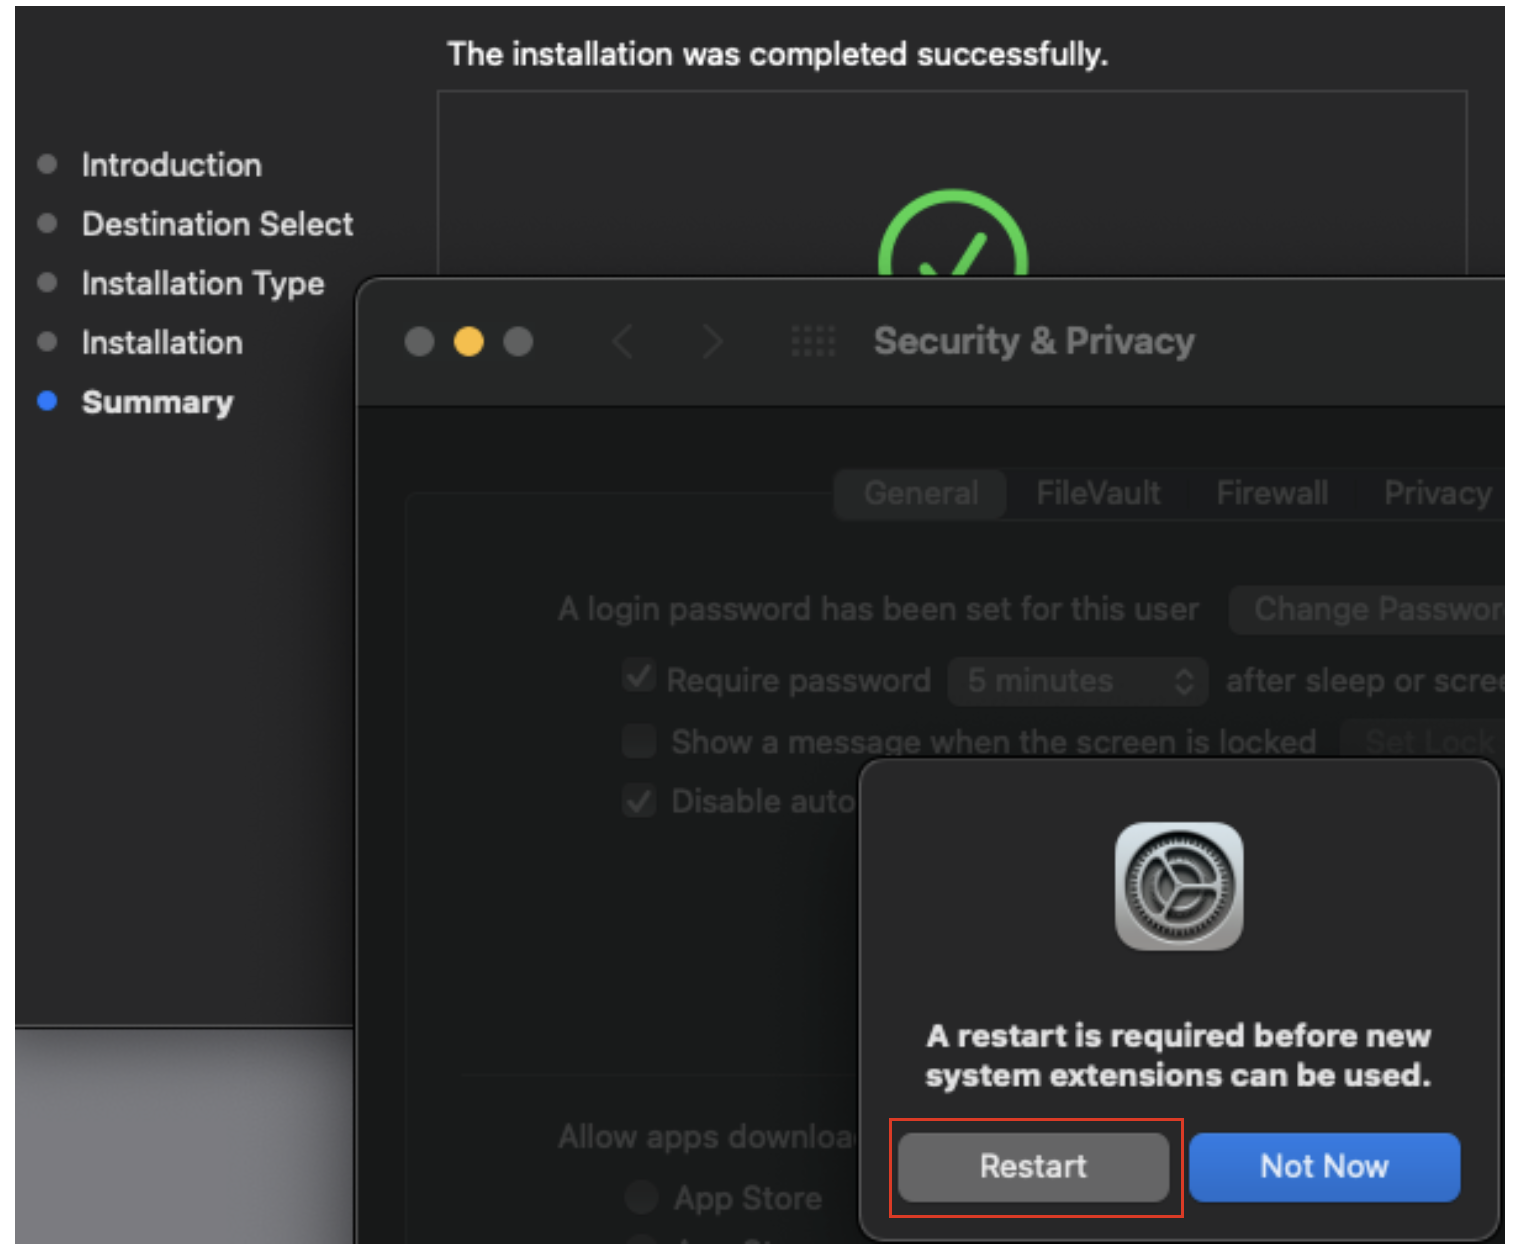
1.12 You may be prompted to restart the machine in order for the VirtualBox kernel extension to load and run. If so, select "Restart" when prompted.
1.13 Check the VirtualBox application appears in the Applications folder (or wherever you saved it).
1.14 You are now ready for the next step below, Unzip the Course Virtual Machine.
STEP #2
Verify the Download and Unzip the Course Virtual Machine
If you are participating in the Virtual FreeSurfer course, you will be provided with a link to download the Virtual Machine (VM) "Image" (a virtual computer set-up that will allow you to work with FreeSurfer and the course data + tutorials). This download will be a zipped/compressed file. The instructions below show you how to unzip/decompress the file.
2.1 Once it is provided by the course organizers, download & locate the compressed VM Image file (FS_7_3_2_course_ubuntu_18_04_06.ova.7z).
2.2 If you do not already have one, download software to unzip or decompress the VM Image file. It must be 7zip compatible archival software.
For Windows, Win-RAR can be used. Note: There is a free version for 40 days with no payment information necessary that can be used.
For Mac, the Unarchiver can be used. Note: Some Macs come with an unzipping app preinstalled, and this app has been known to cause issues (such as the password not being accepted). We recommend the one linked above, especially if you are having issues with the one that is preinstalled.
For Linux, try the package manager programs, e.g., yum, dnf, apt.
2.2.1 If your download went smoothly for the FS_7_3_2_course_ubuntu_18_04_06.ova.7z file, then you can skip this step. If the download was interrupted or paused, the file may be incomplete or corrupted. You can verify the download is complete with a "checksum" command that outputs a unique string of letters and characters based upon the file size. The commands below show how to run a checksum command on Windows, MacOS and Linux. The correct output from the command is 834c74d4b1cba3d912b9a4c924460dca. The command may take 5-10 minutes to complete. If you do not get the correct answer, then delete the file, download it again, and verify the checksum.
Windows - Open command prompt or the Windows PowerShell from the Start menu and cd to where you downloaded the file.
C:\Users\myname> cd Downloads
C:\Users\myname\Downloads>
C:\Users\myname\Downloads> certutil -hashfile FS_7_3_2_course_ubuntu_18_04_06.ova.7z MD5
MD5 hash of FS_7_3_2_course_ubuntu_18_04_06.ova.7z
834c74d4b1cba3d912b9a4c924460dca
CertUtil: -hashfile completed successfully.
MacOS - Double click on the Terminal.app application found under /Application/utilities to open a terminal window and cd to where you downloaded the file.
myname@This-Mac:-> cd
myname@This-Mac:-> cd Downloads
myname@This-Mac:-> md5 FS_7_3_2_course_ubuntu_18_04_06.ova.7z
MD5 (FS_7_3_2_course_ubuntu_18_04_06.ova.7z) = 834c74d4b1cba3d912b9a4c924460dca
Linux - Open a terminal window by right clicking on the linux desktop and selecting the entry for "Terminal" and cd to where you downloaded the file.
myname@machine:~$ cd
myname@machine:~$ cd Downloads
myname@machine:~$ md5sum FS_7_3_2_course_ubuntu_18_04_06.ova.7z
myname@machine:~$ 834c74d4b1cba3d912b9a4c924460dca FS_7_3_2_course_ubuntu_18_04_06.ova.7z
2.3 After you have successfully installed or located software to decompress the VM Image file, you will want to use it on the file downloaded in Step #1 of this section. Locate the compressed VM Image file (FS_7_3_2_course_ubuntu_18_04_06.ova.7z) and right click on it, choose "Open With", and choose the software you have for decompressing the file. Alternatively, you can potentially open the software first & navigate to the compressed file (i.e. click the "Extract to" button in Win-RAR).
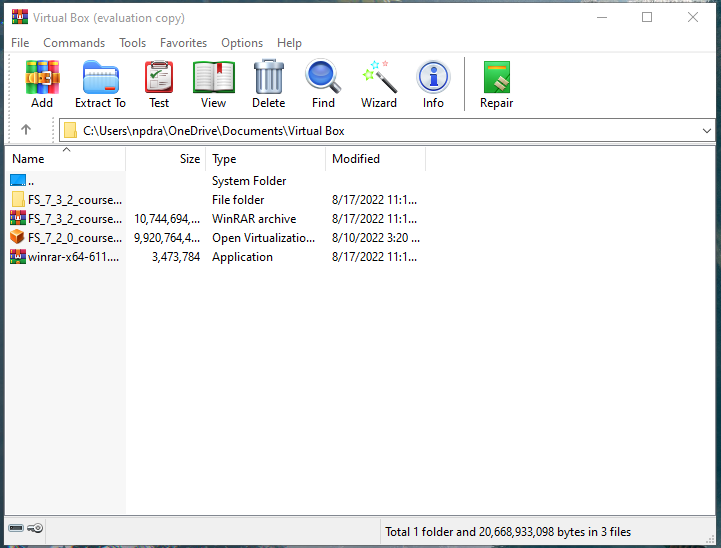
2.4 You will be prompted for a password. Enter the 7-zip archive password given to you from the course organizers. If the password doesn't work and you are working on Mac, please go back to step 2.2 and download our recommended program "Unarchiver", as other programs can cause password issues. If this step does not help, contact the course organizers.
Once entered, the file should start decompressing/unzipping. After this completes, there should be another VM Image file which ends with the .ova file extension (FS_7_3_2_course_ubuntu_18_04_06.ova). This .ova file is what you will open with VirtualBox in the next step.
2.5 You are now ready to set up your Virtual Machine using VirtualBox.
STEP #3
Setting up the Virtual Machine
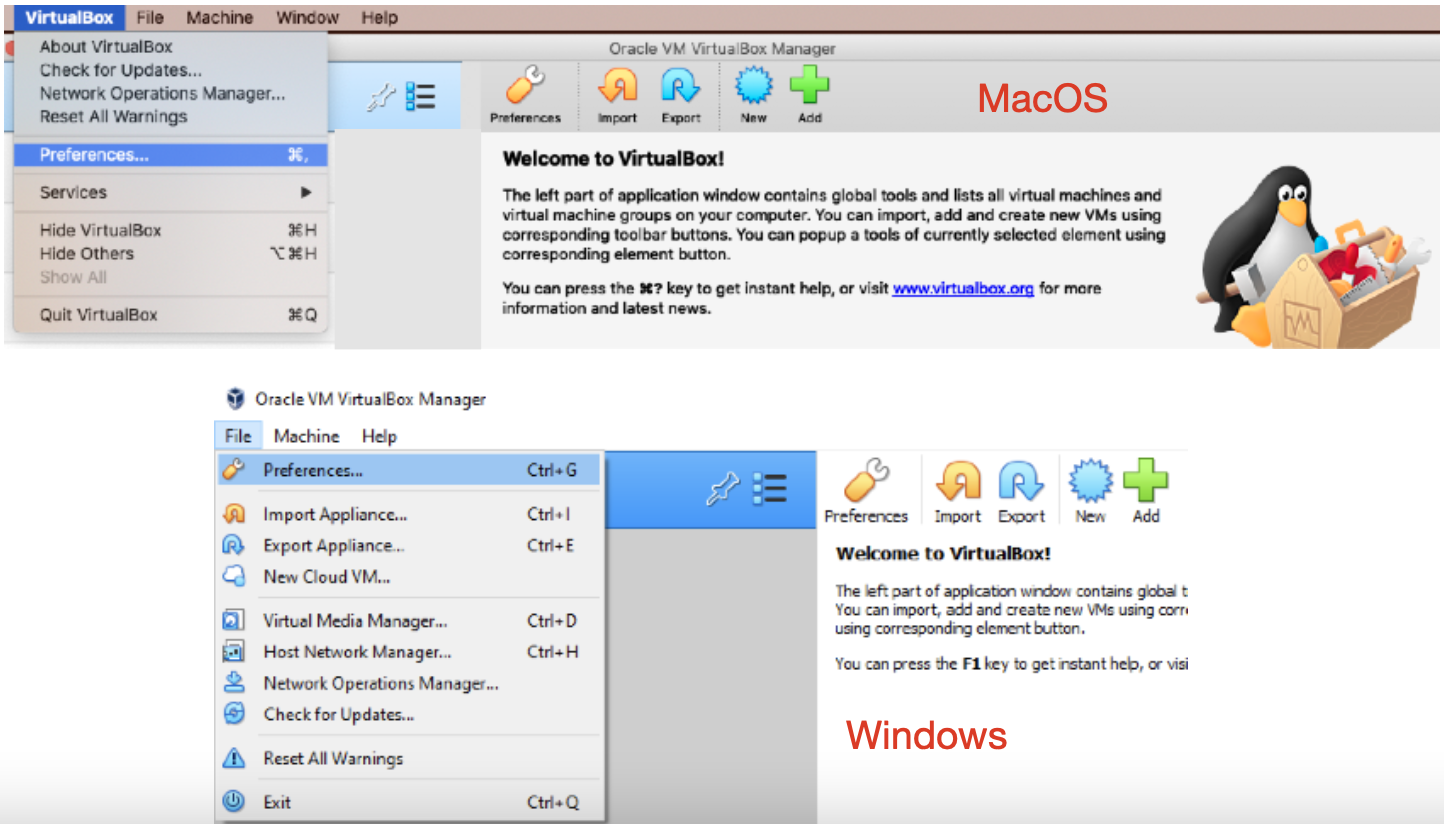
3.1 Open the VirtualBox application. If you just finished installing VirtualBox for the first time, then you will see no machine images are available to run on the left hand side of the GUI.

Select “Preferences” from the VirtualBox application pull down menu.
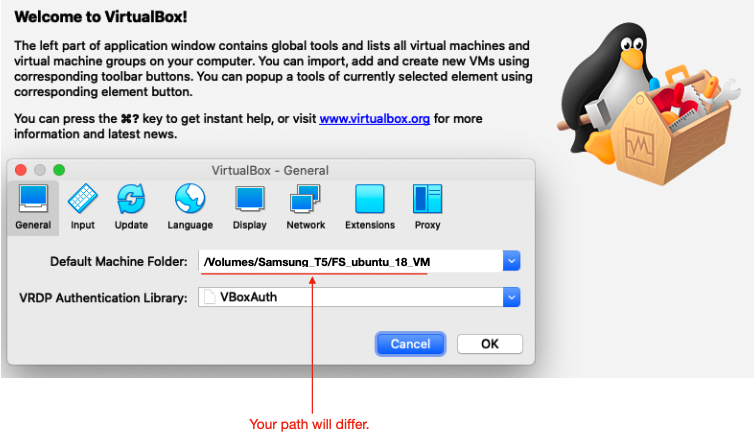
3.2 Create a DEFAULT MACHINE FOLDER path/location on an (external or internal) drive where you have at least 30G of free disk space for VirtualBox to store the virtual machine. In the example below, the path under /Volumes/... was manually created on a different drive than the boot drive in order to enhance performance. External drives w/o a USB 3.0 or faster connection are not recommended.
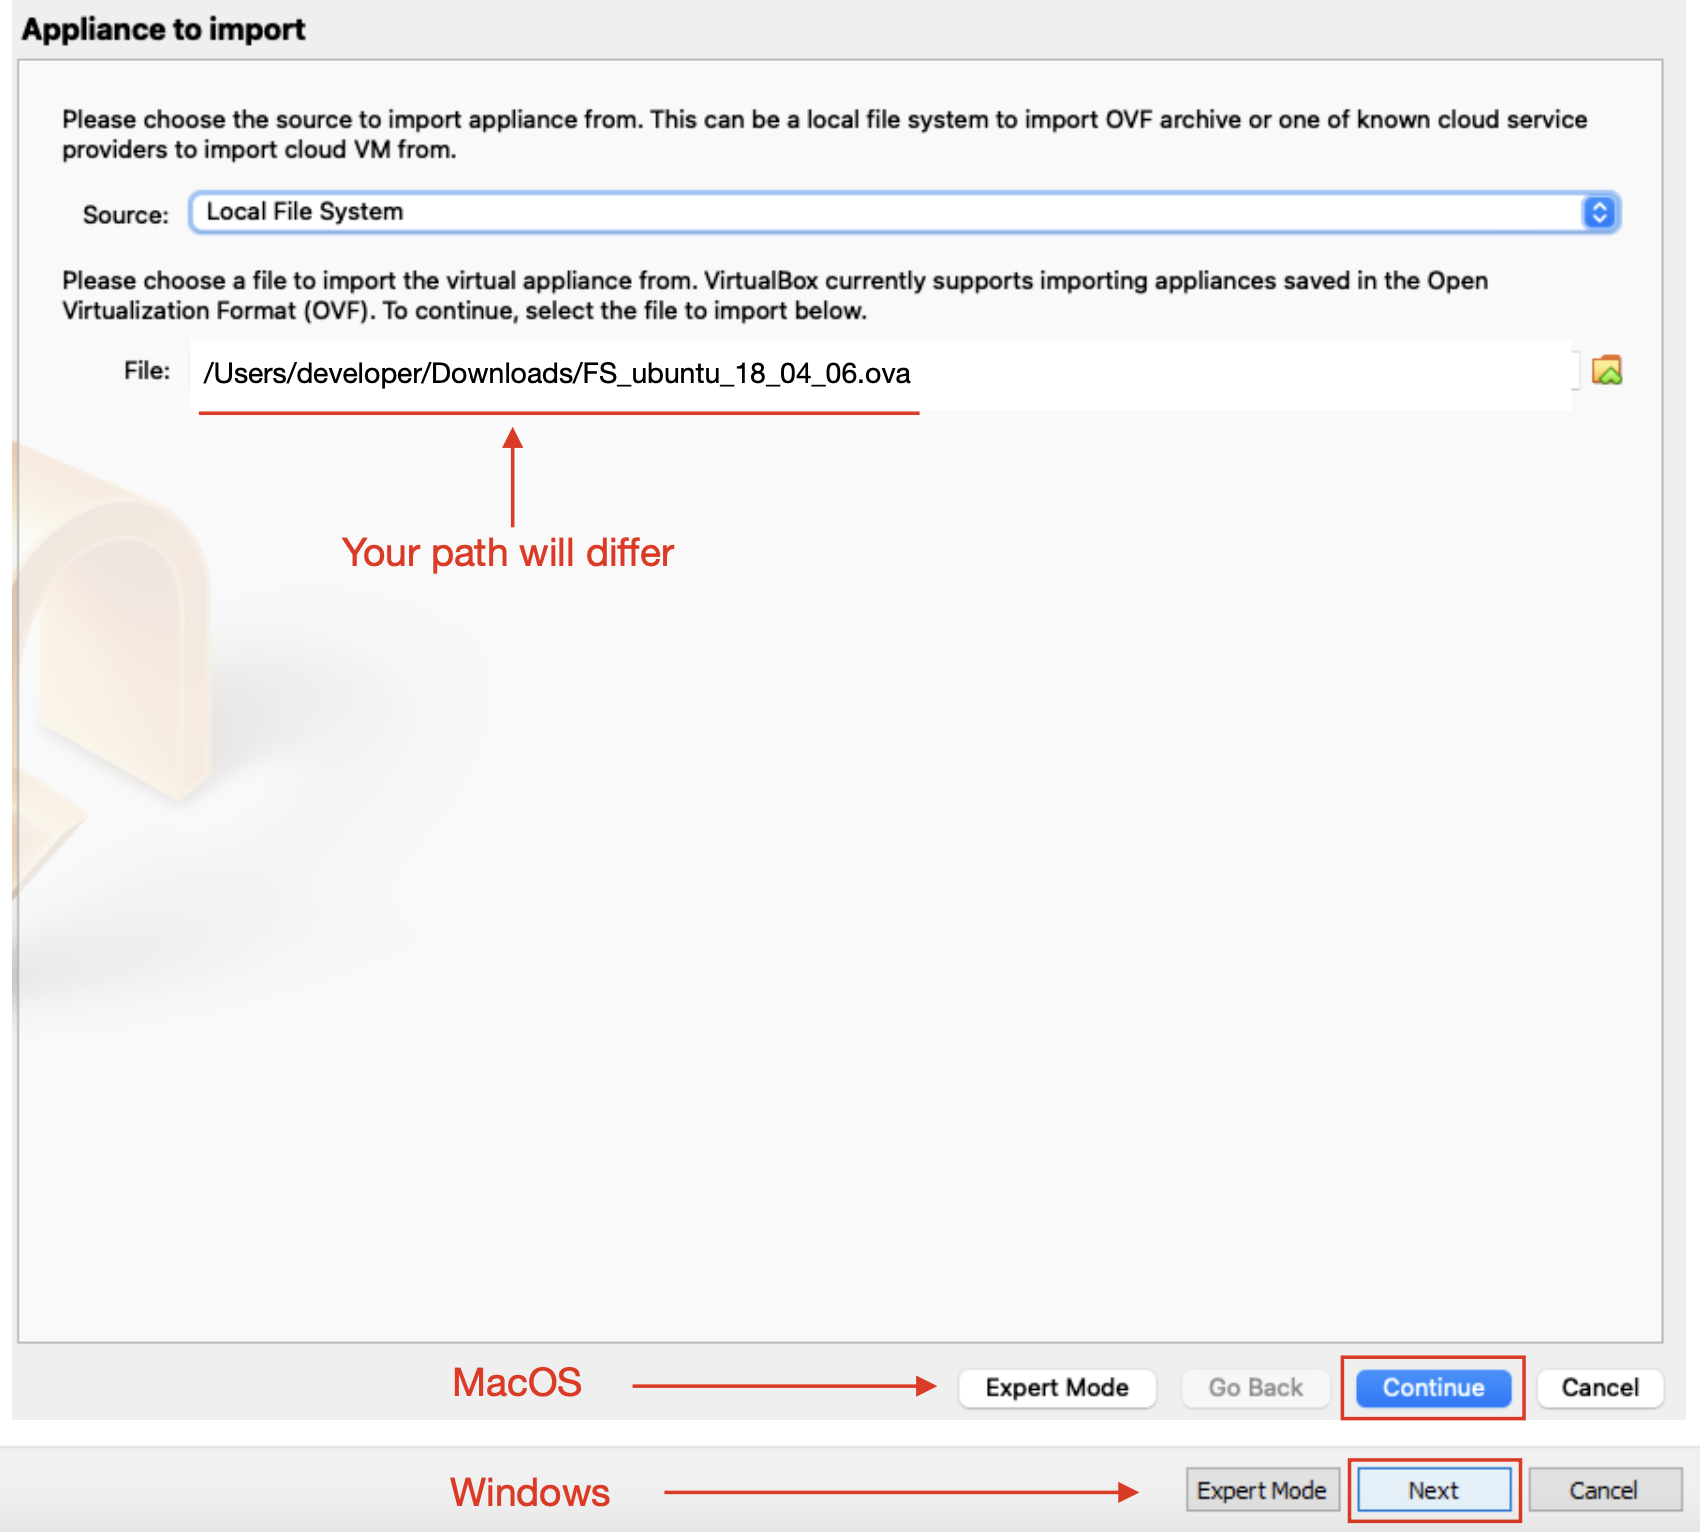
3.3 An appliance file will be used to create an Ubuntu Linux image to run. From the “File” pull down menu select “Import appliance”.

Use the “Choose” icon to navigate to the decompressed VM Image file (FS_7_3_2_course_ubuntu_18_04_06.ova). The file name in the example below may be different than the one given to you by the course organizers.
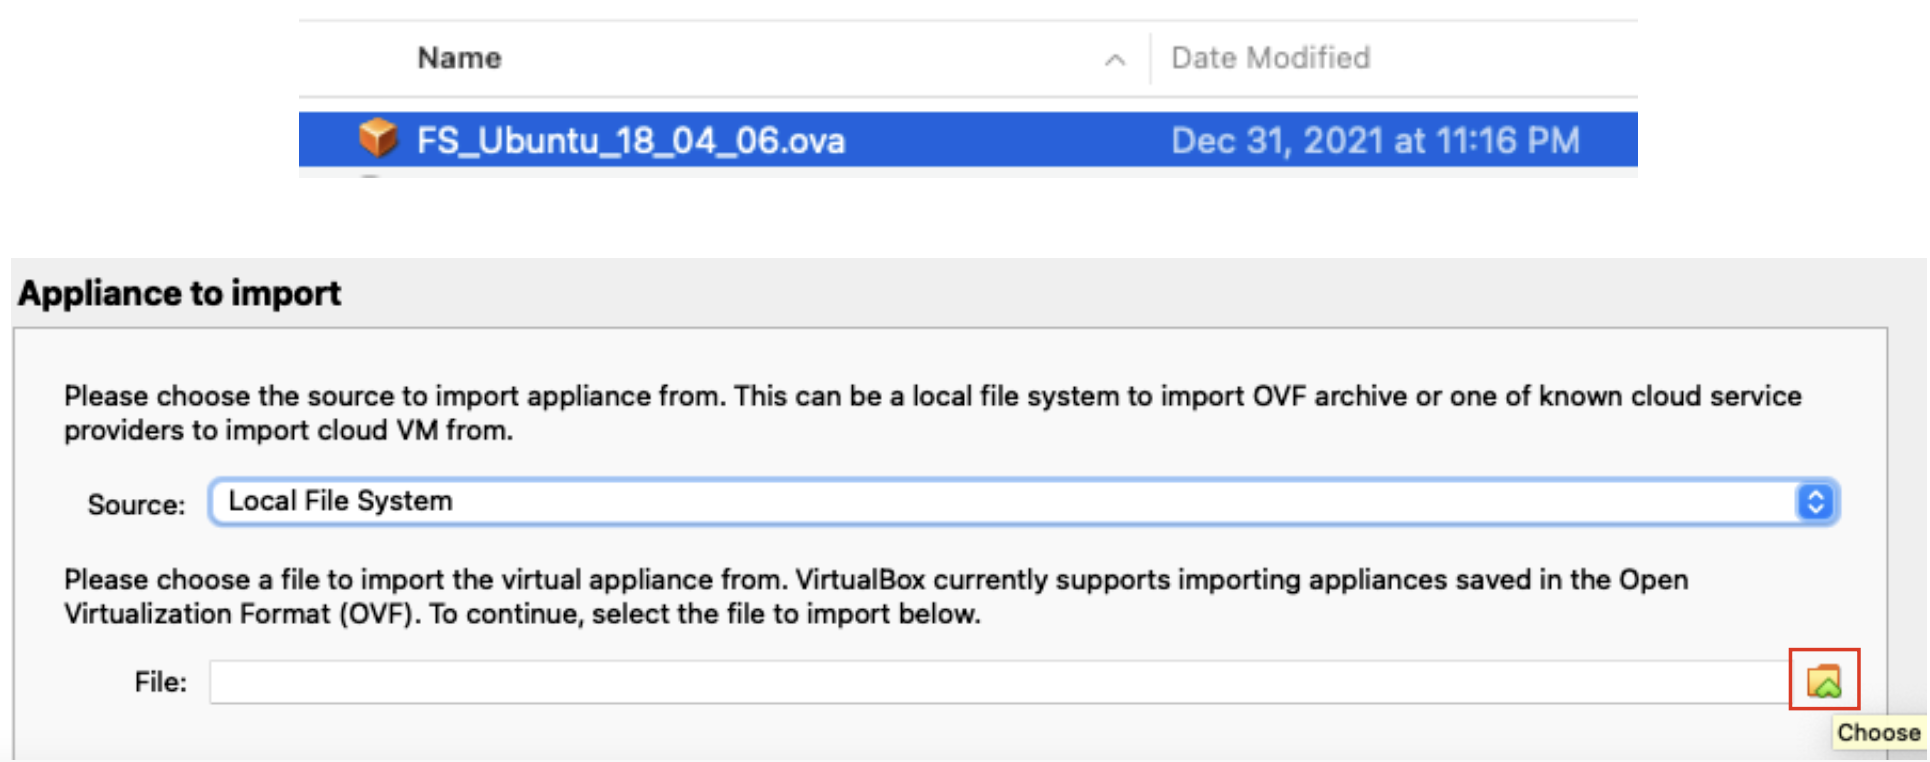
3.4 Once the path/filename of the appliance file is listed in the “File” field, then select “Continue” or "Next".
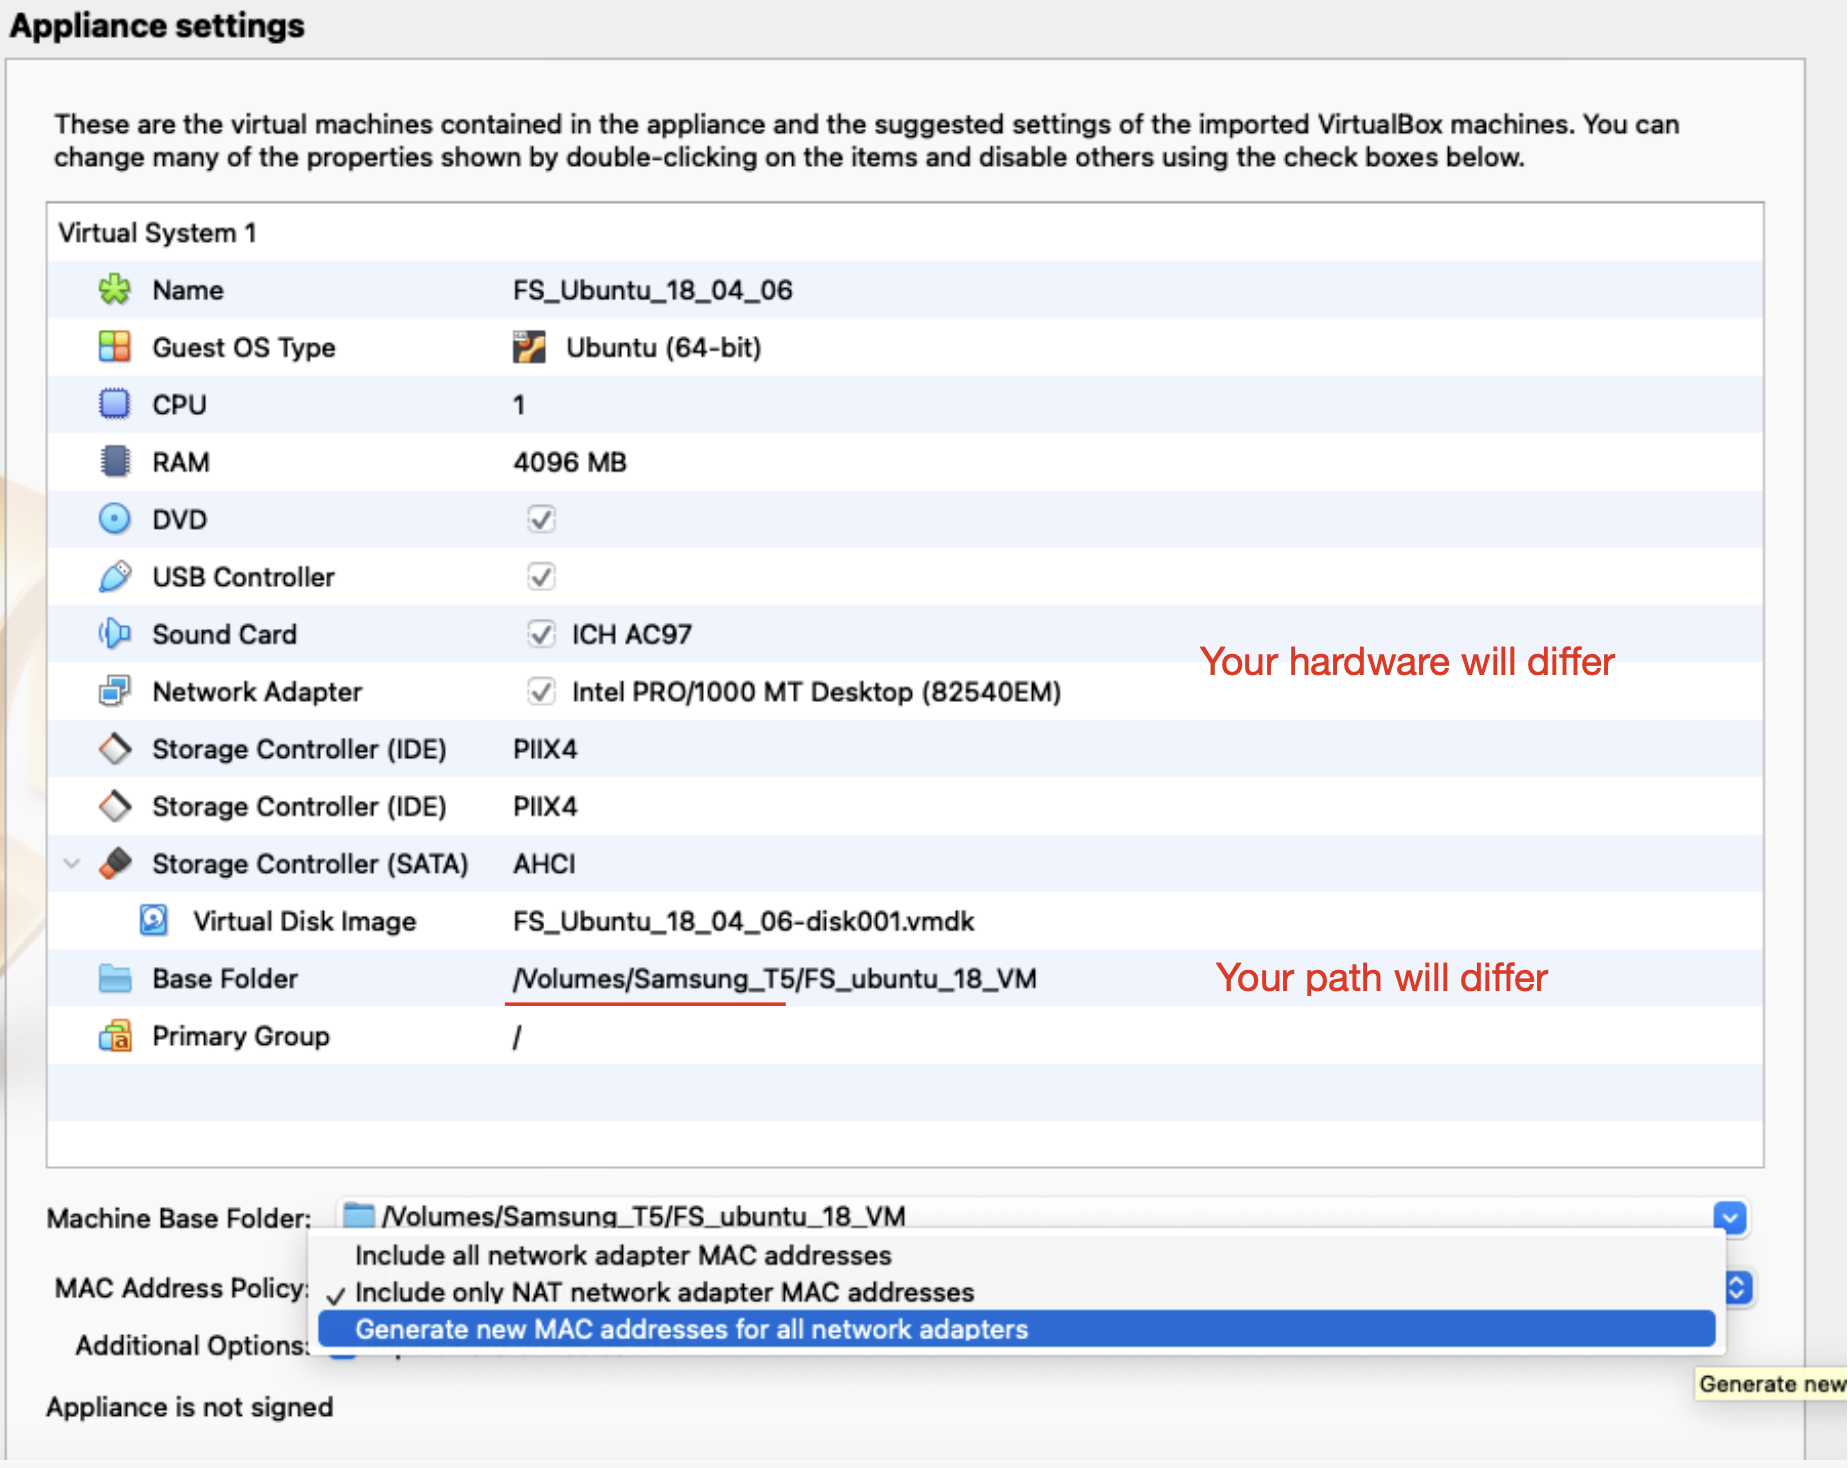
3.5 You will be presented with a window showing the current settings for the virtual appliance. Change the entry for “MAC address policy” to be “Generate new MAC addresses for all network adapters”.
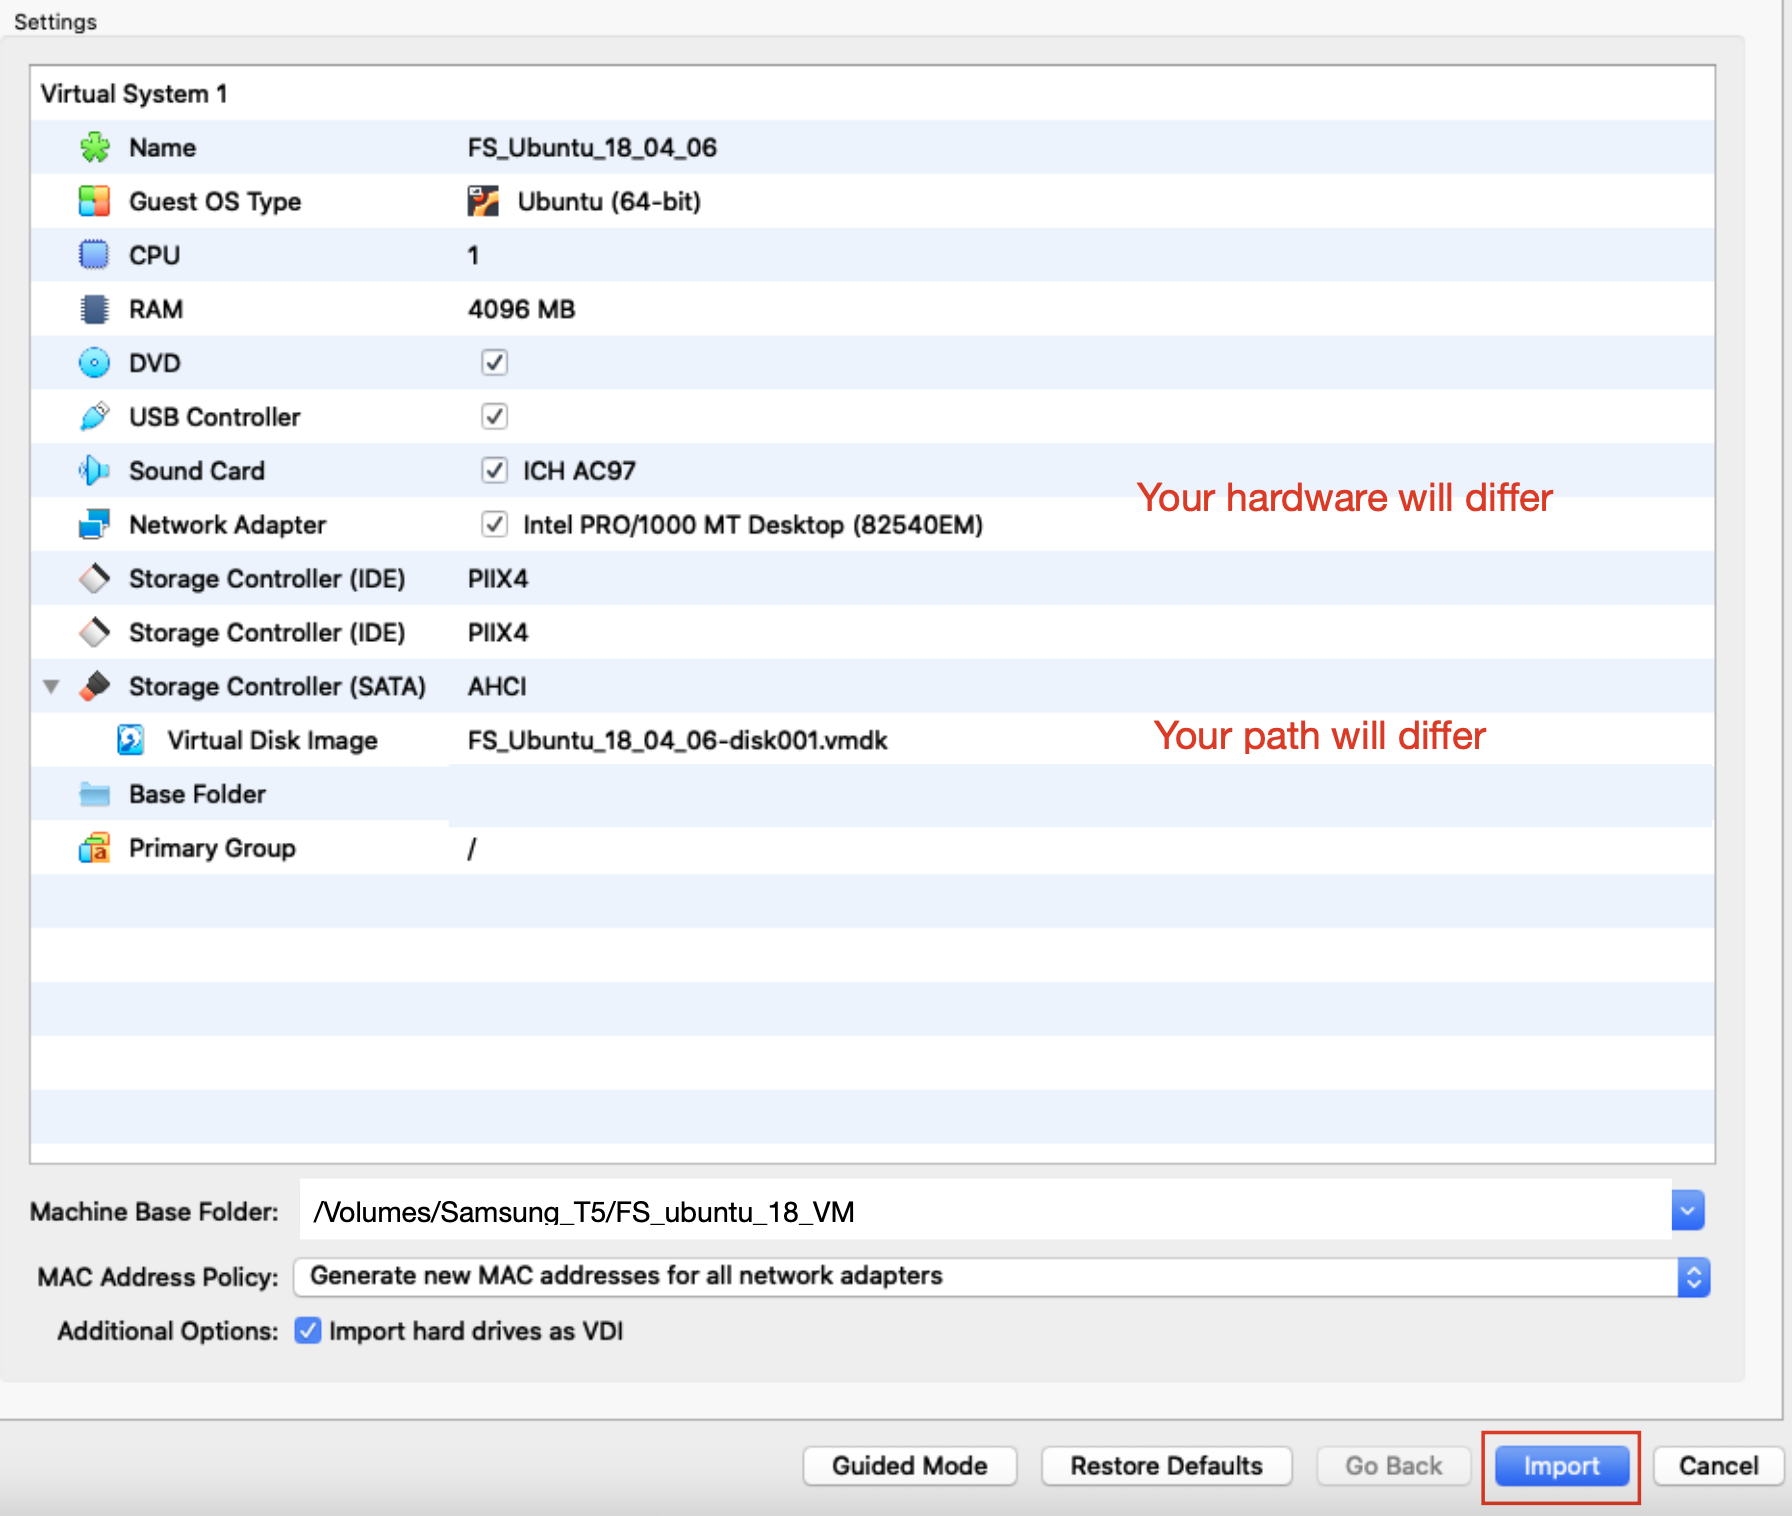
3.6 Select “Import” to create the virtual machine.
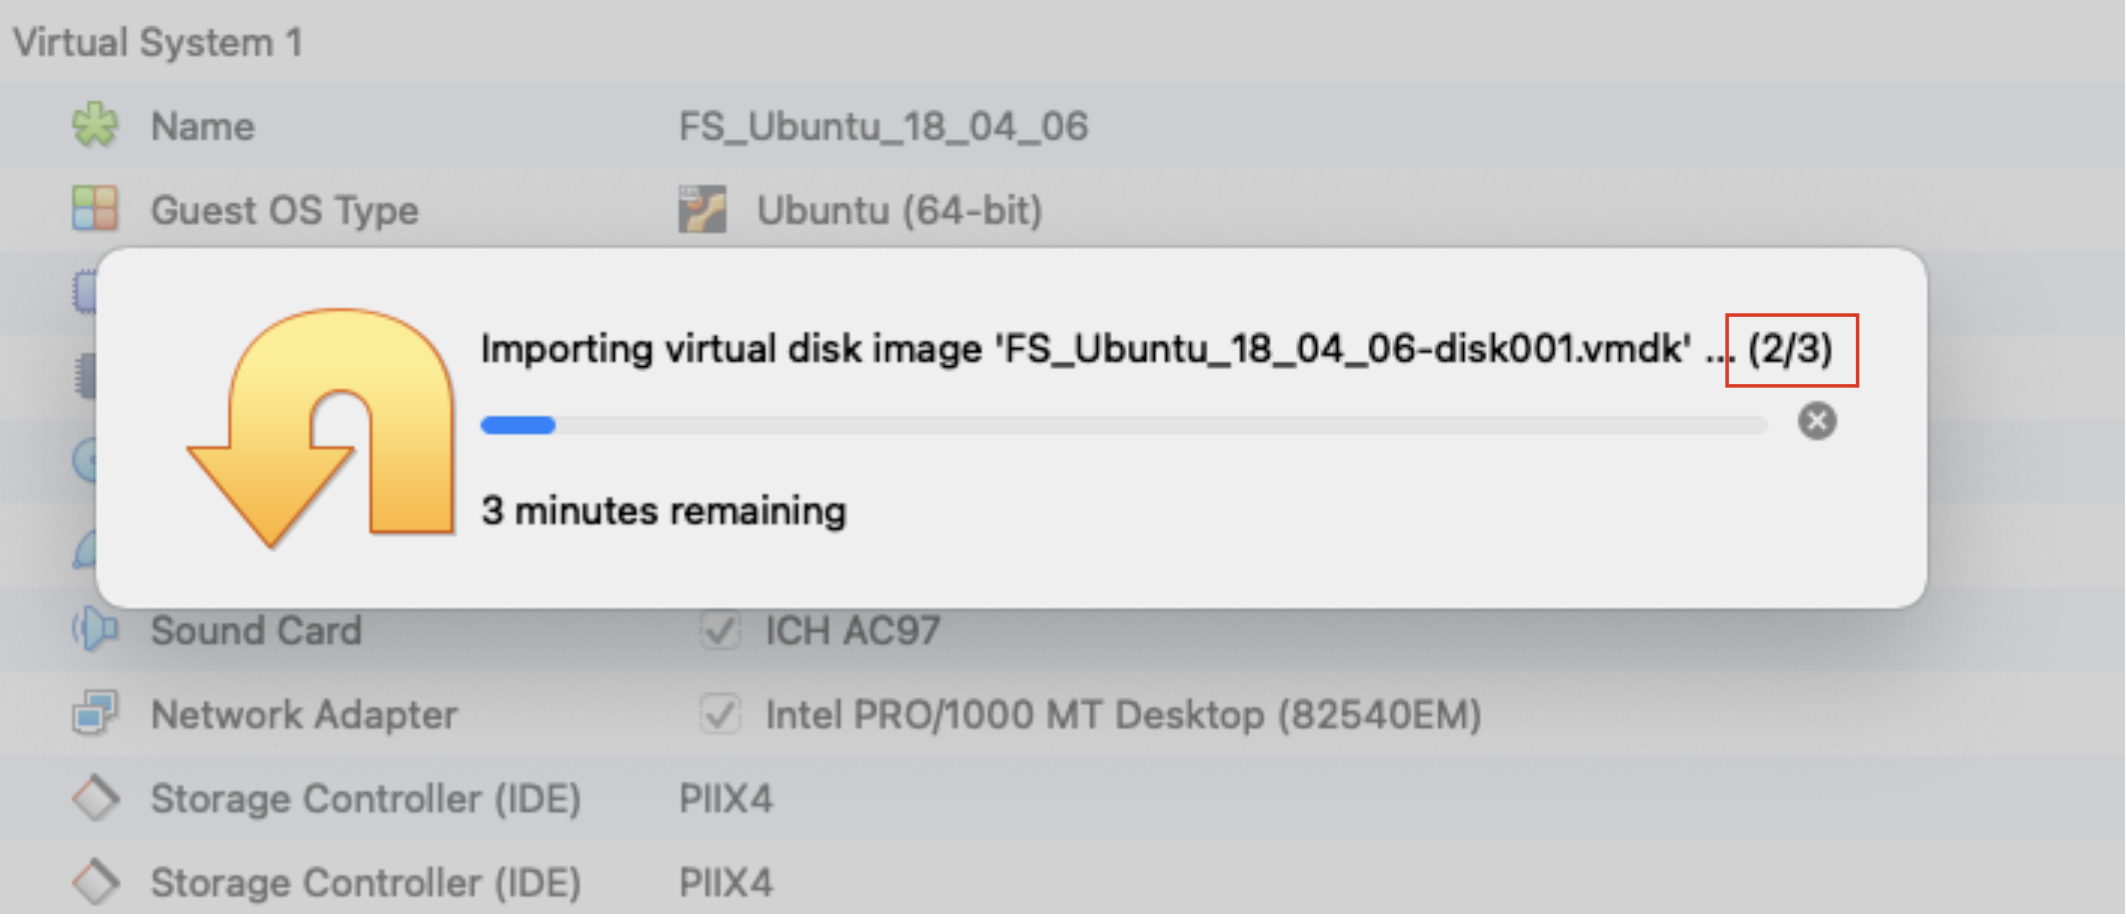
3.7 Wait for all steps in the import process to finish.
3.8 There should now be an entry for the virtual machine on the left hand side of the GUI with the current virtual machine configuration displayed on the opposite side.
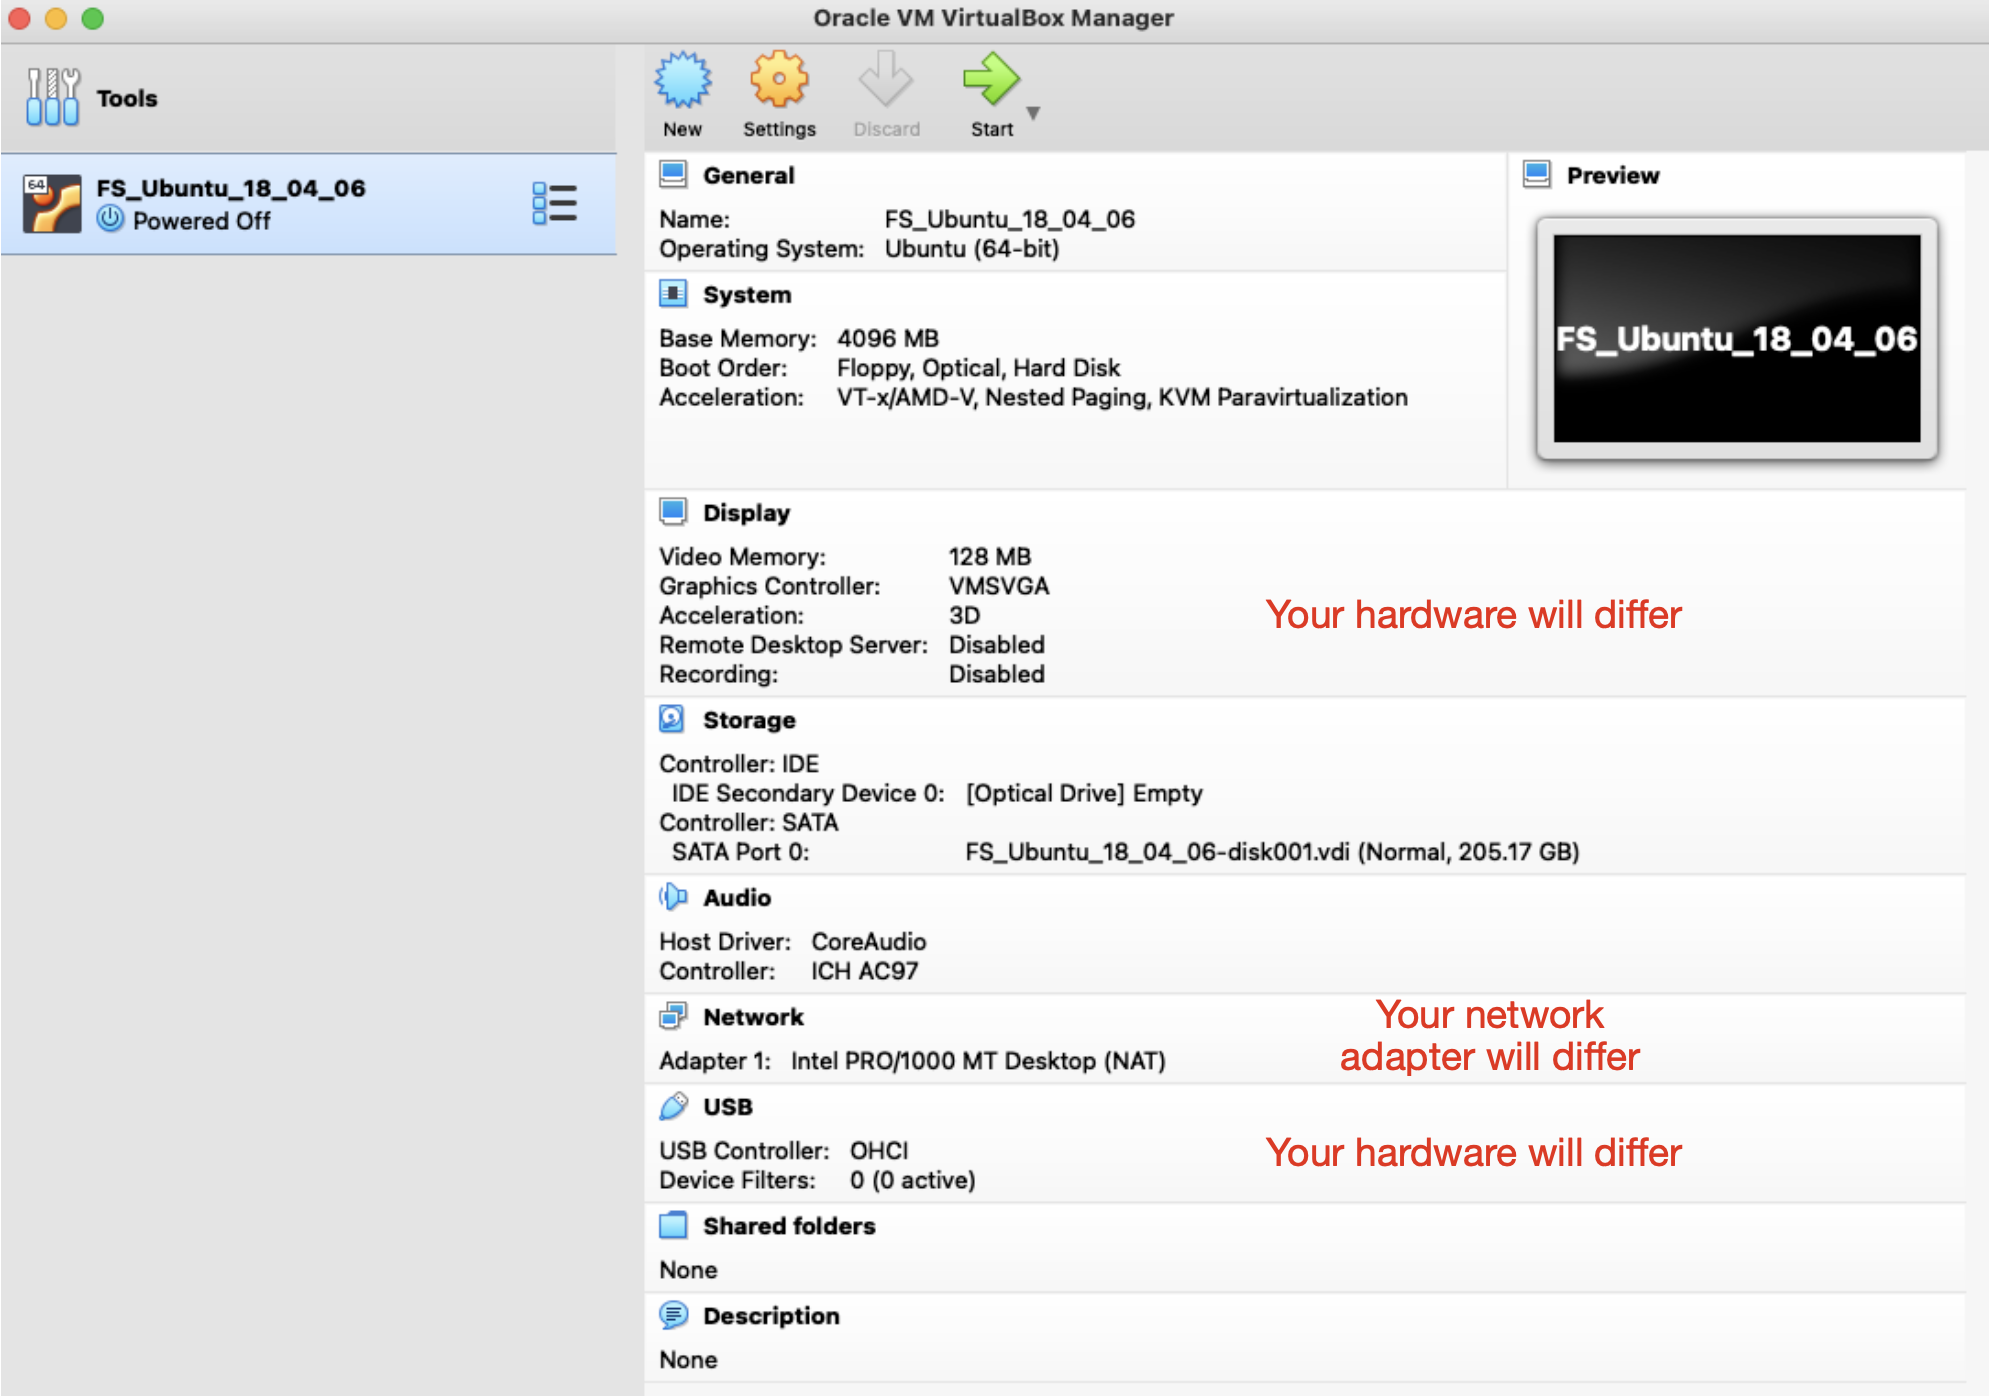
3.9 Start the virtual machine by clicking on the “Start” icon in the VirtualBox application.

The Ubuntu boot menu should appear with the 1st choice, “Ubuntu”, highlighted. Hit return or wait for it to automatically boot.
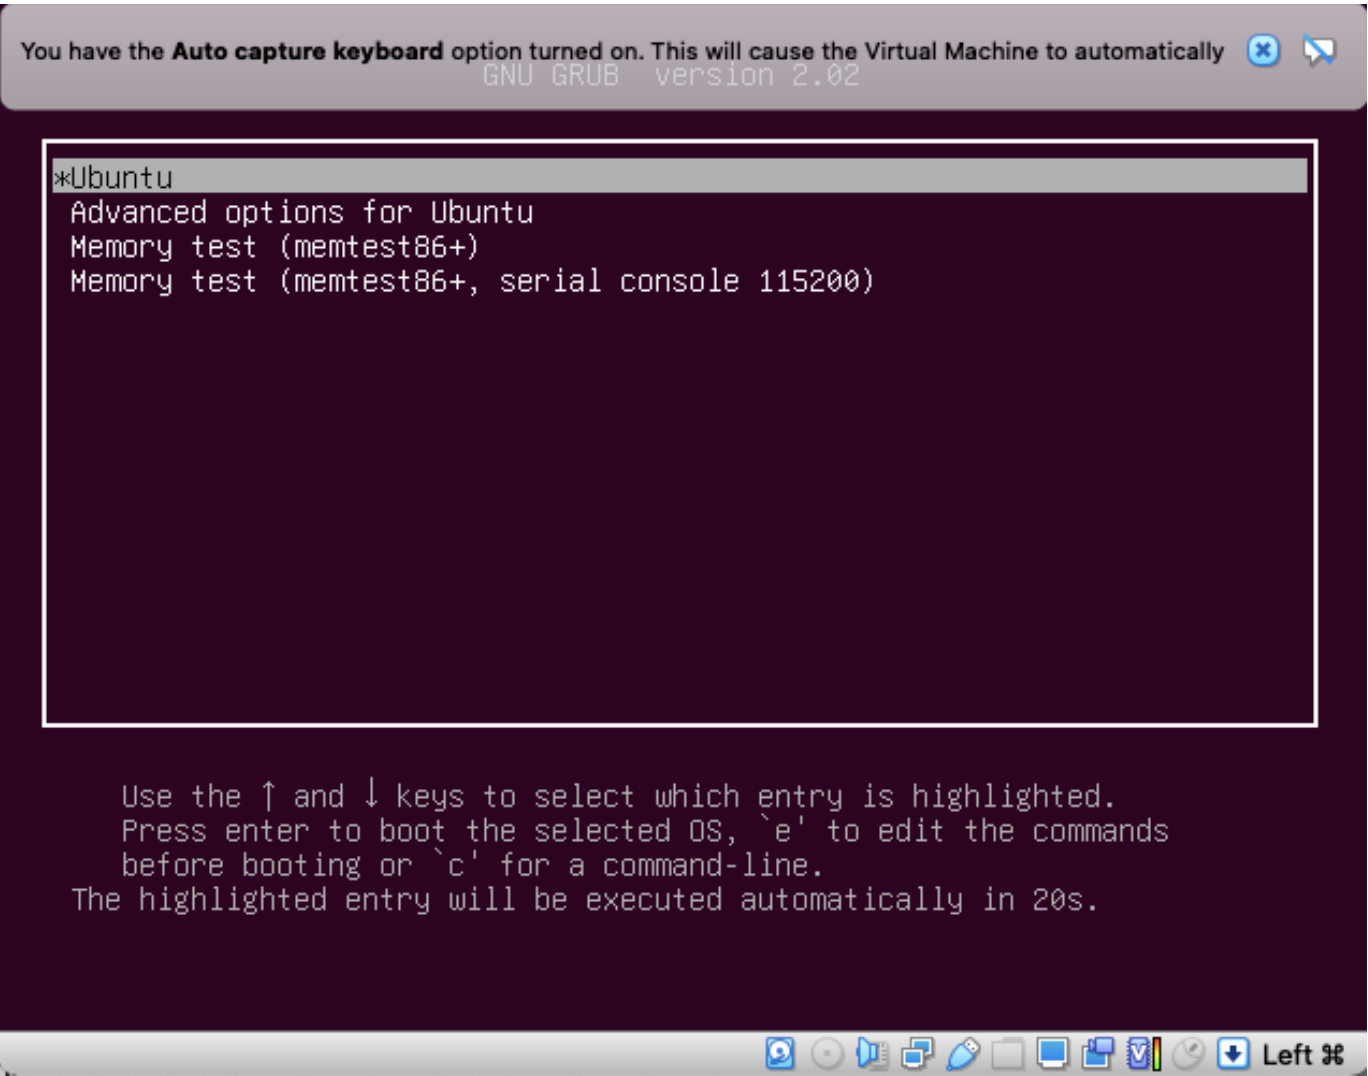
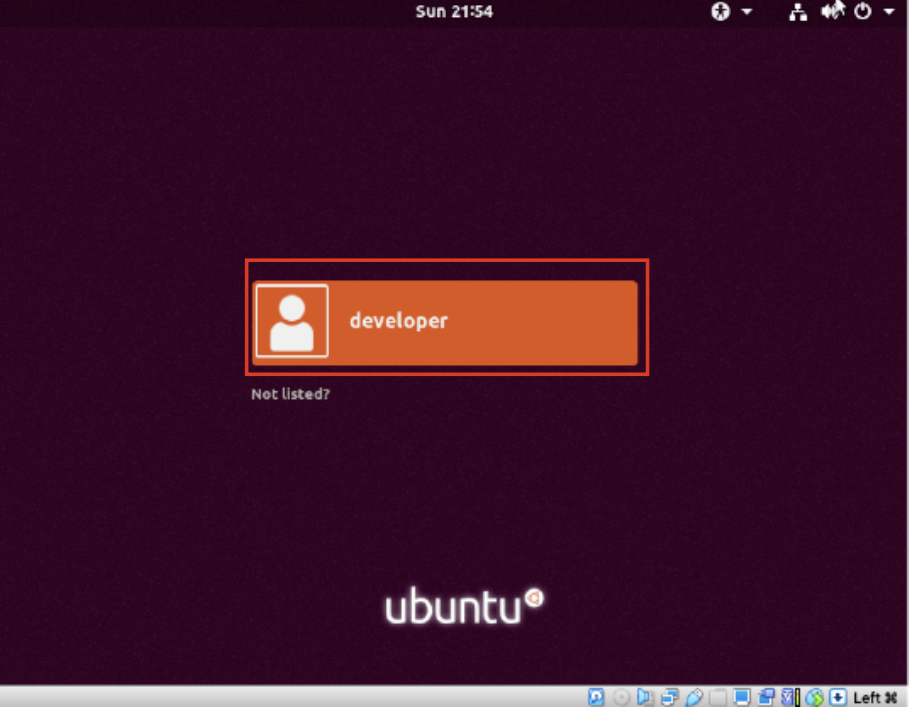
3.10 If the virtual machine fails to boot contact the FreeSurfer team. Otherwise, click on the user “developer” to log in. Enter the VM login password that was provided to you by the course organizers.
Enter the password.
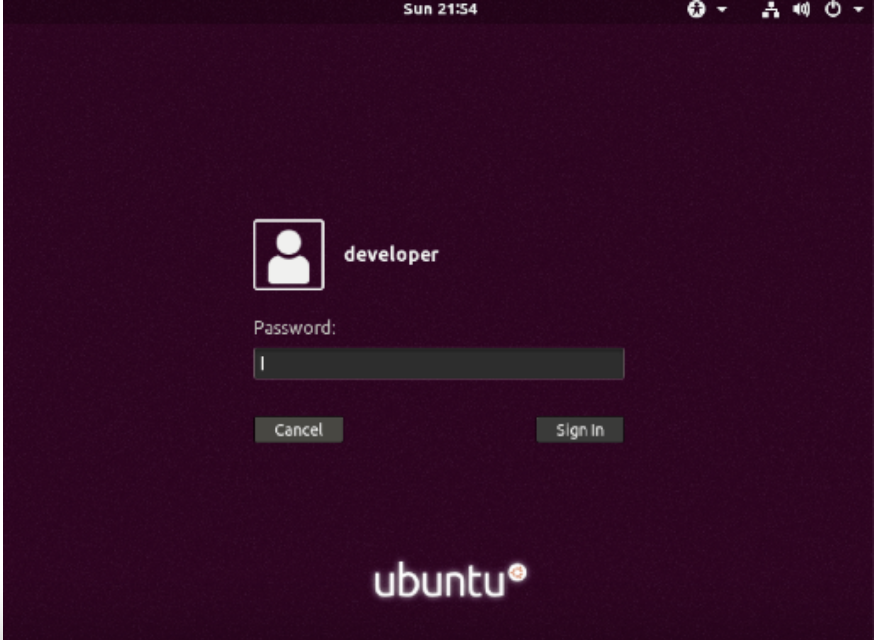
3.11 A blank desktop should appear after you login.
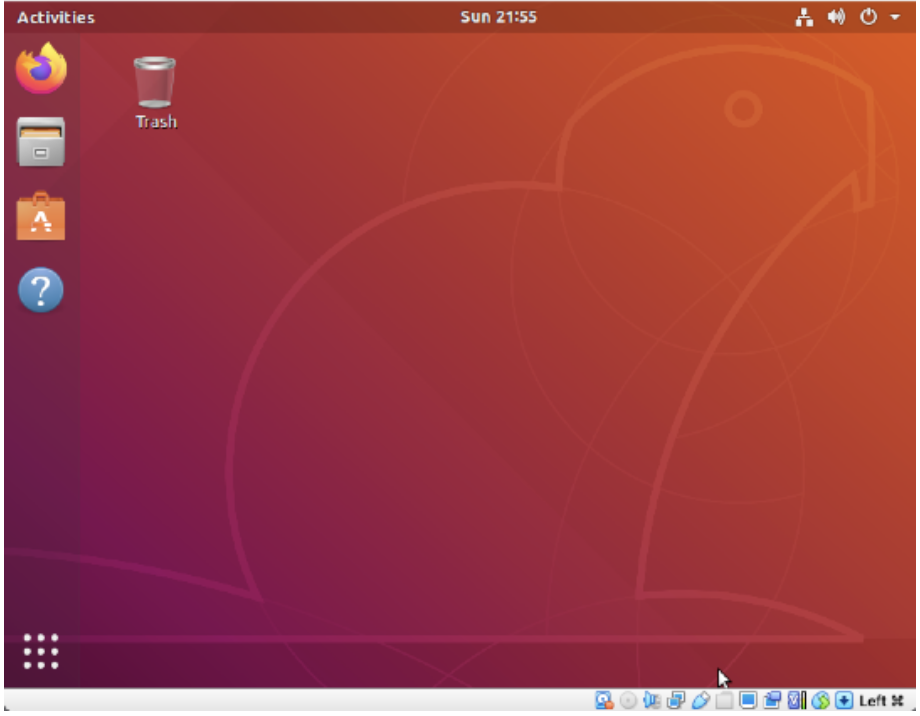
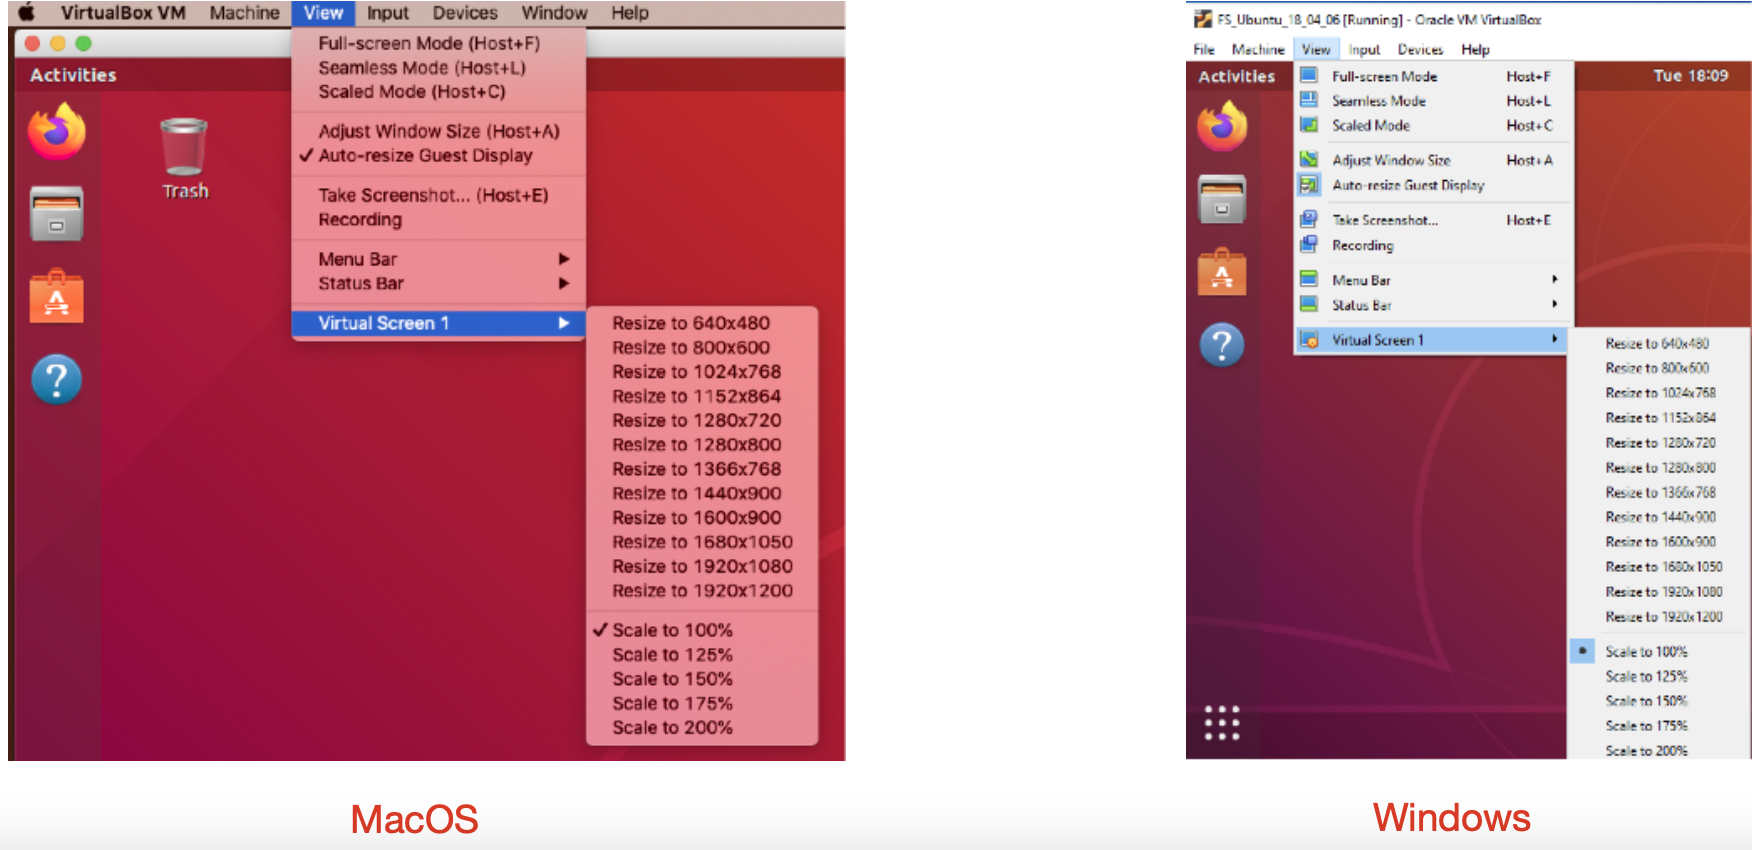
3.12 For steps 12-14, we will show you how to change settings and interact with the VM. Some extensions have been installed in the VM to make it easier to work with. These will allow: (1) bi-directional cut and paste between the host machine and the Ubuntu linux window; (2) drag and dropping files between the host machine and the Ubuntu linux window; and (3) resizing the Ubuntu linux window. Change these settings while the VM is running. If they do not work for you, you can still participate in the course (but do let the course organizers know).

Try selecting a specific “Resize to ...” dimension available in the pull down menu. With Auto-resize set, it works on some hosts to manually resize the Ubuntu linux window by dragging on a corner to enlarge it. But this may not work with some host graphics hardware if the window is re-sized to non-standard dimensions. Re-sizing only takes effect after you login.
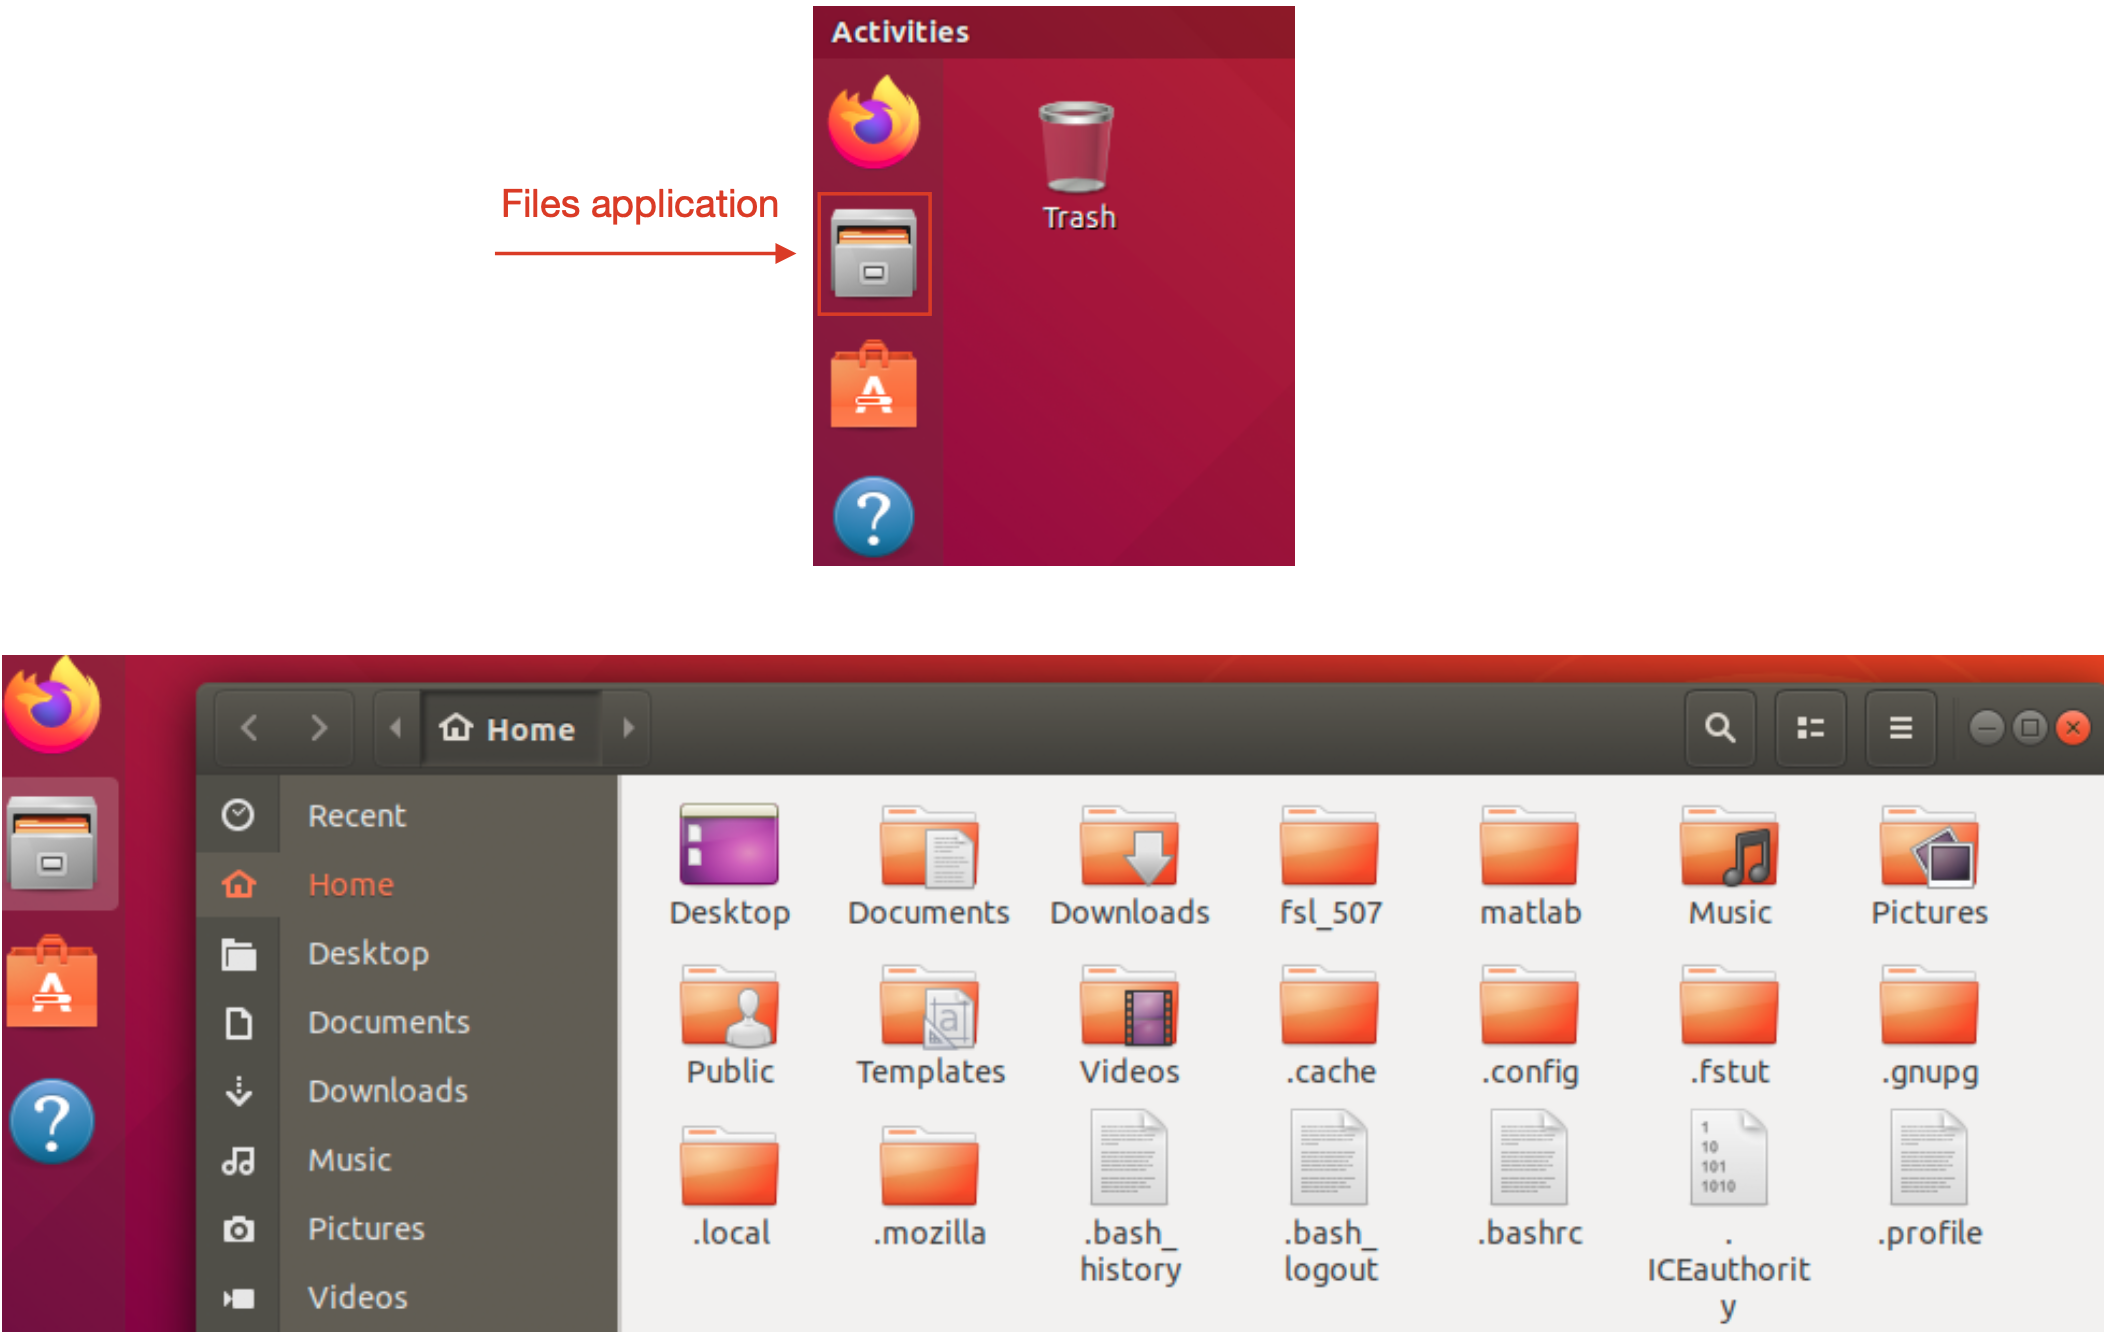
3.13 To drag and drop files from the host machine into the VM, first single click on the file cabinet icon on the left hand side of the desktop in the Ubuntu linux window. This will open the Ubuntu “Files” application which is the equivalent of the “Finder” (MacOS) or “Explorer” (Windows) in Linux. It will display the files in the home directory for user "developer".
3.14 You can (single click and drag) a file from the host machine, e.g., from MacOS Finder, Windows Explorer) window, into the Files application in the Ubuntu desktop. You will see the name of the file while dragging as the mouse hovers over the Files window. Note that permissions may prevent drag and drop from working on Windows.
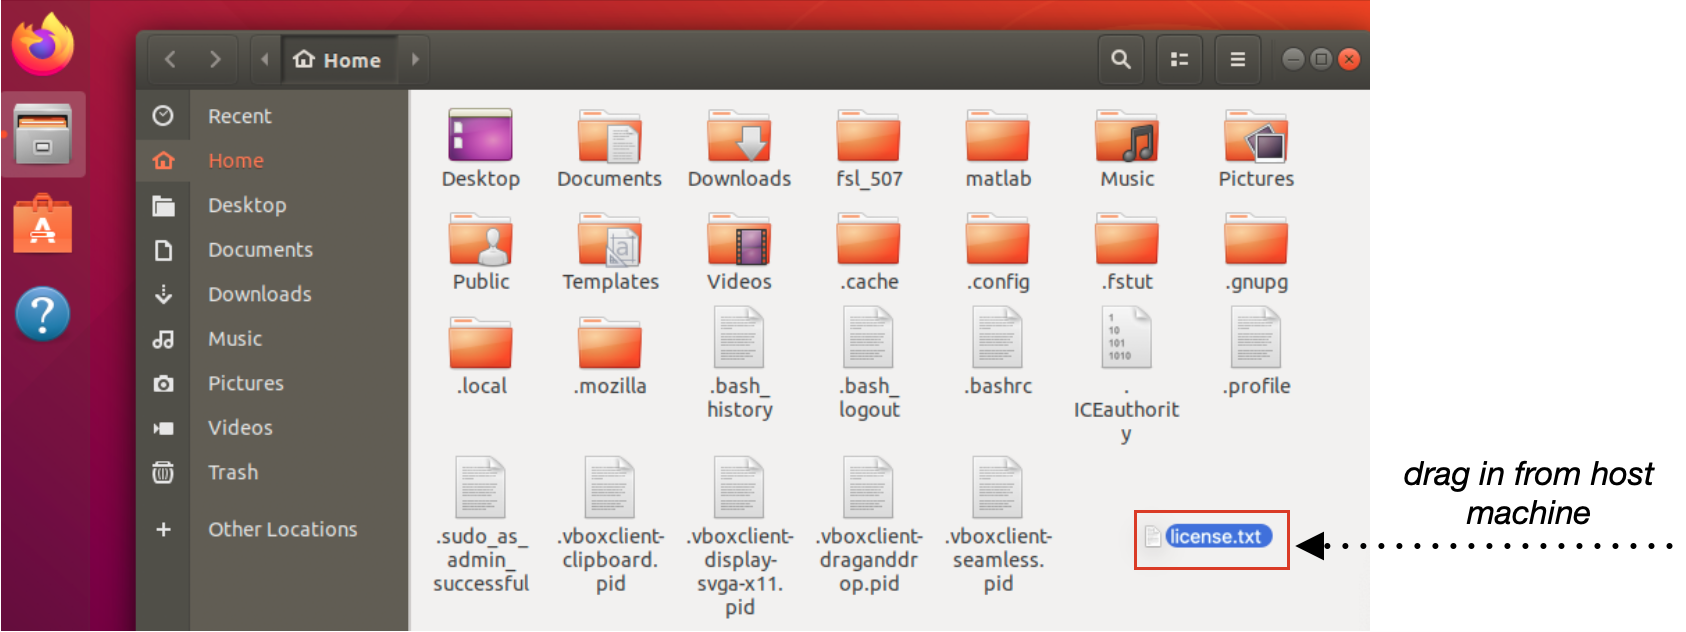
When you release the mouse the file (in the example below, "license.txt") appears in the Files window. This is simply an example for illustration purposes. You do not need to add a license file to the VM to take part in the course. However, when the course is over, the license will expire and this method would allow you to add a permanent license file. Also, this method will allow you to put data onto the VM from your computer, if you wish.

3.15
Right click with the mouse on the desktop and select “Open Terminal”.
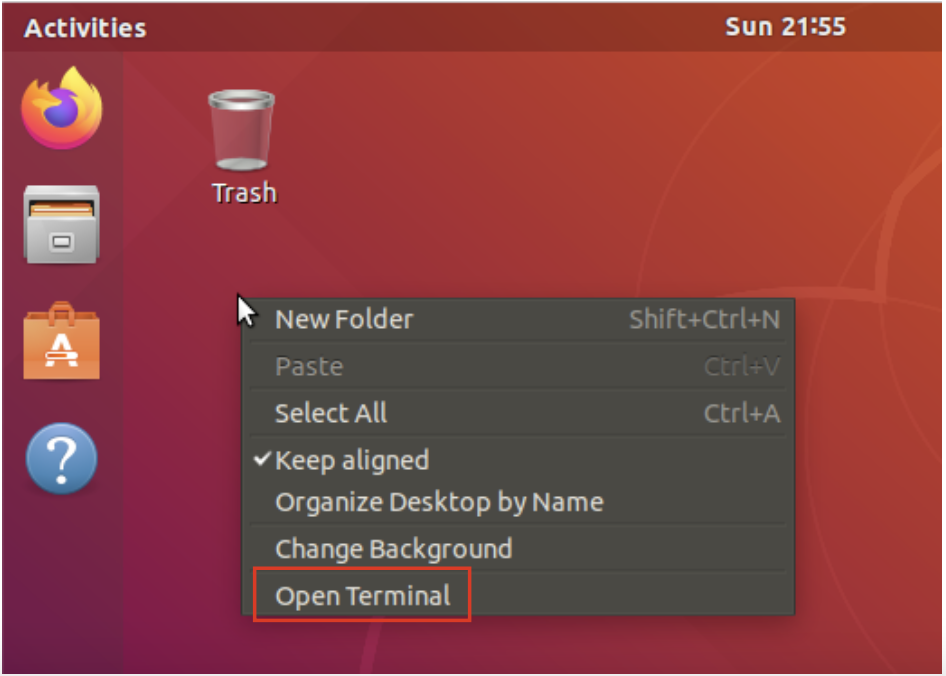
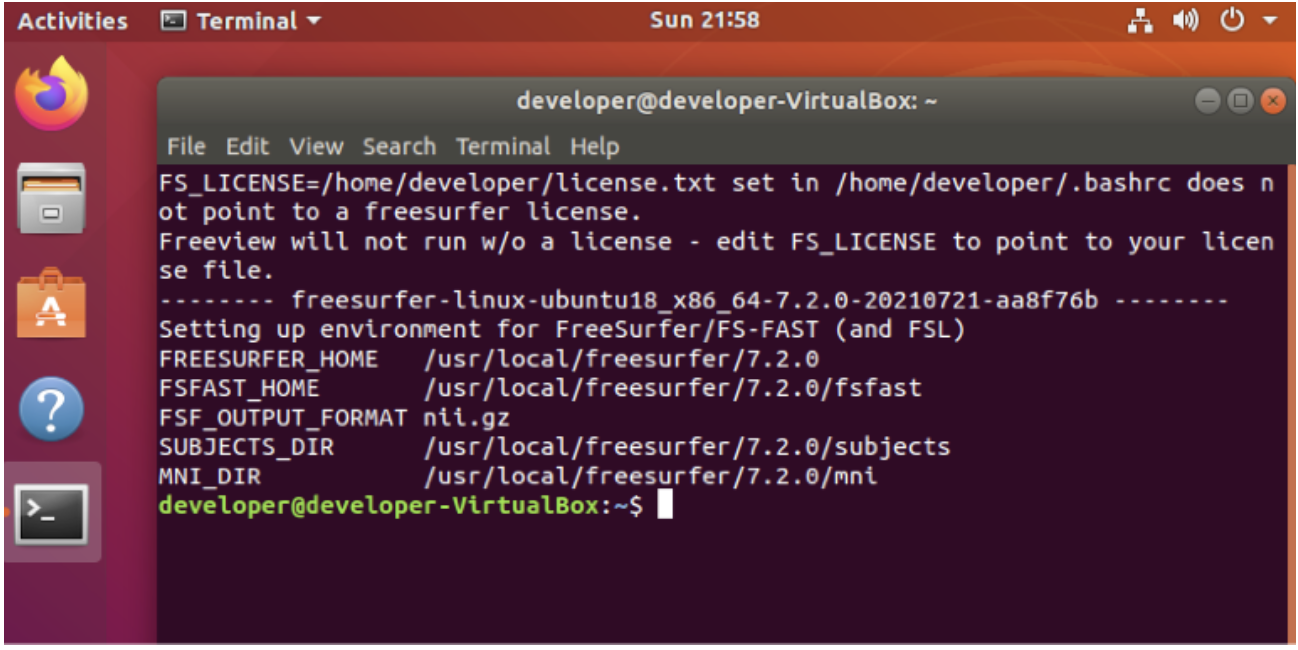
A new terminal window should appear with some FreeSurfer variables set. If there is a warning at the top that indicates there is no FreeSurfer license, you may not have the correct VM Image File - contact the course organizers to fix this. In the example image below, no license was found.
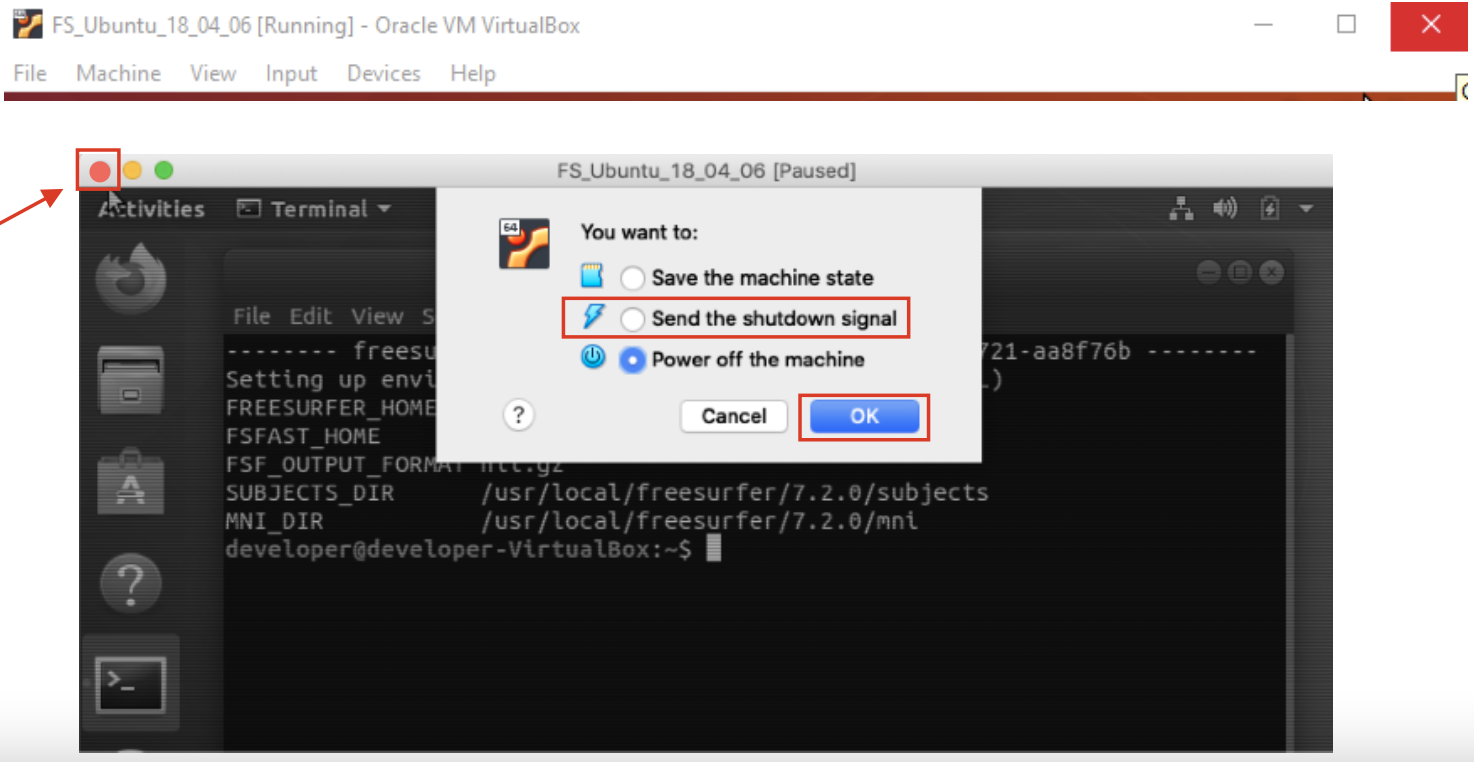
3.16 Power off the virtual machine by closing the VirtualBox Ubuntu window. On Mac OS this is the red circle in upper left hand corner of the window. On Windows this is the X in the upper right hand corner of the window. Check the entry for “Power Off”
3.17 Now that you have verified the VM runs as is “out of the box”, some changes should be made to the VM to better run FreeSurfer. With the VM still powered off, click on the “Settings” icon as the top of the VirtualBox window.

Click on the “System” icon to display the amount of RAM or “Base Memory” the VM can use from the host machine.
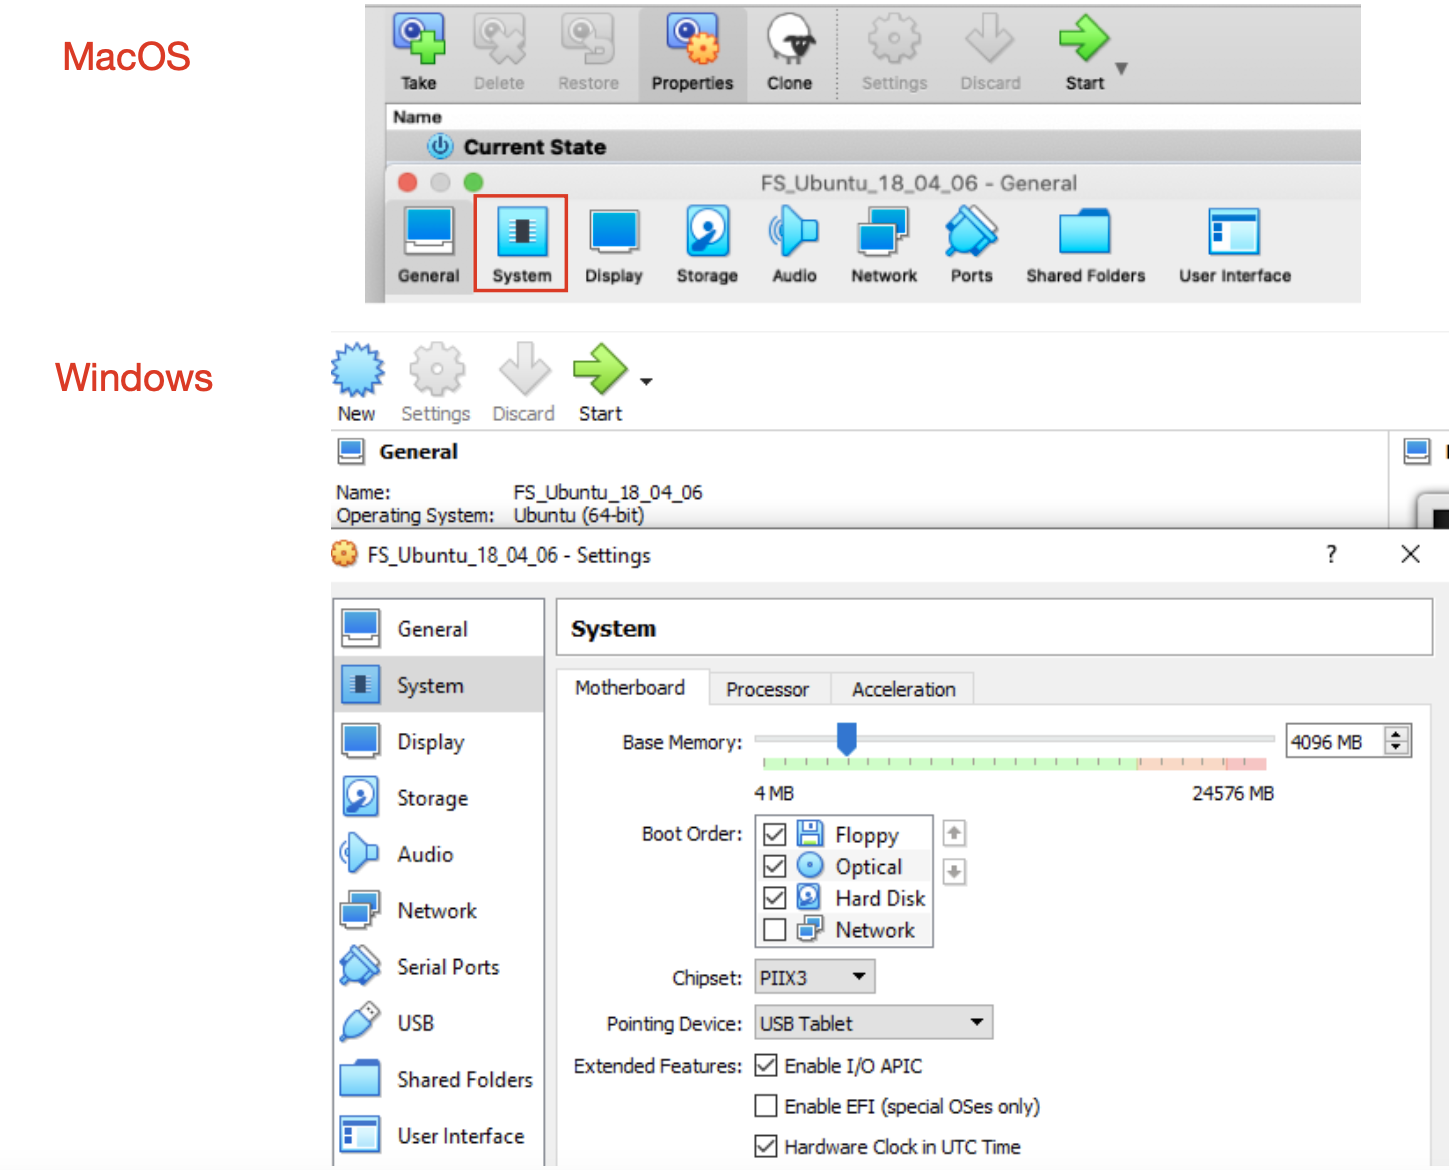
3.18 The VM has only ~4GB of RAM “out of the box”. To the right hand side of the slider under the red part of the bar, you see the maximum amount of RAM available to the VM.

The recommendation is to allocate 8-12GB of RAM to the VM for running FreeSurfer. If the total RAM listed for your machine is 16GB, then increase the RAM to 8GB before running Freesurfer. A rule of thumb is not to allocate more than 1/2 of the available host RAM to the VM. In the example below, the machine shows a total of 32GB of RAM (32,768 MB) and we have moved the slider so that VM can use 8GB (8,192 MB), in the first example, and 12GB (12,241 MB) in the second example.

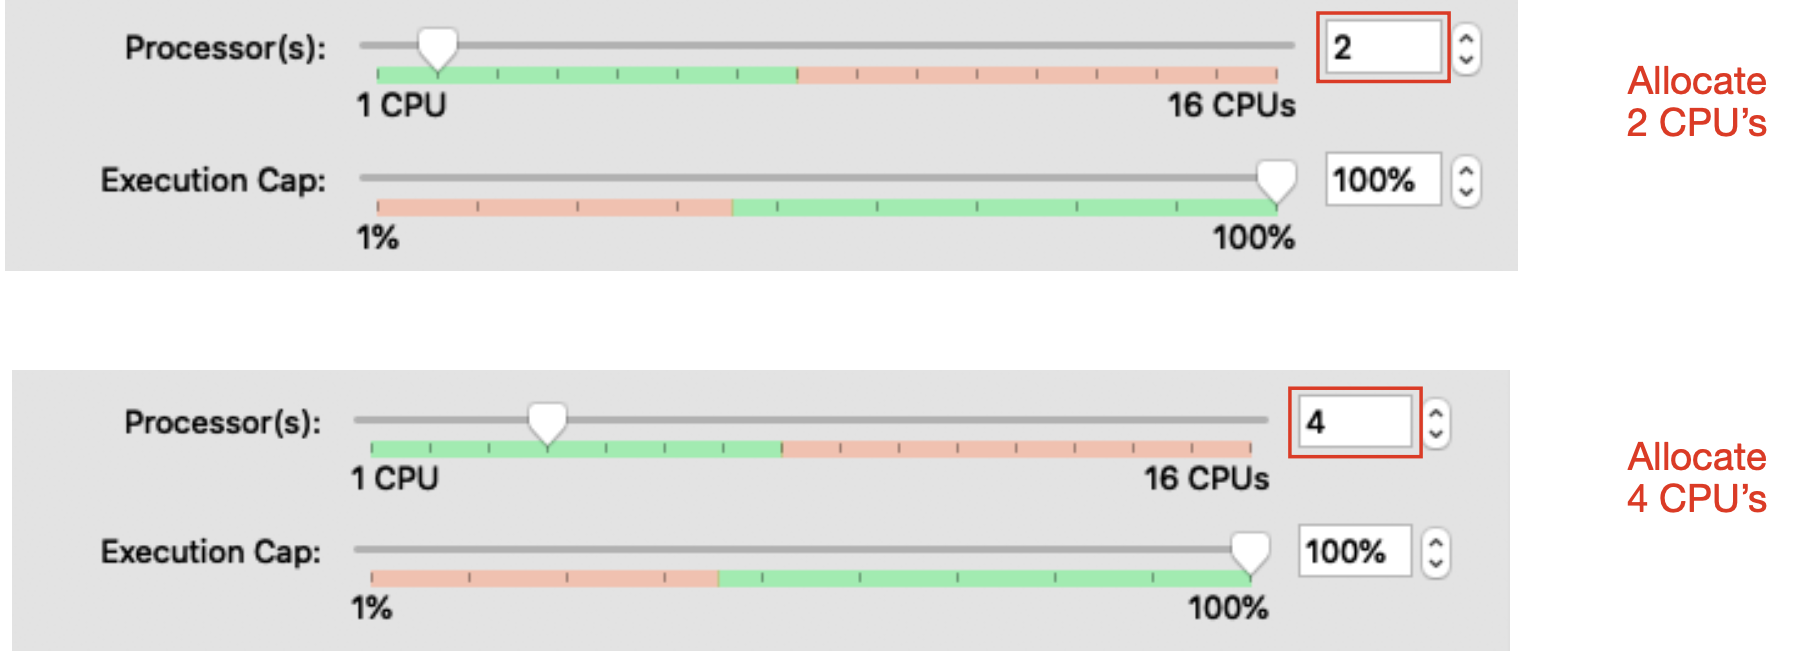
3.19 Performance can similarly be improved by increasing the number of CPUs or cores allocated to the VM. Click on the “Processor” tab next to the “Motherboard” tab. The VM has 1 CPU allocated “out of the box”. To the right hand side of the slider under the red part of the bar, you see the maximum amount of CPUs available to the VM.

The recommendation is to allocate 2-4 CPUs to the VM for running FreeSurfer. If the total CPUs available are 2, then allocate 2 CPUs to the VM and try not to run other CPU intensive programs on the host. A rule of thumb is not to allocate more than 1/2 of the available CPU’s from the host to the VM. The “Execution Cap” is fine as is at 100%. Click "OK" to save changes.
3.20 There is one more setting we recommend that you change, that being turning 3D Acceleration off in the Display settings by unchecking the box shown bellow.
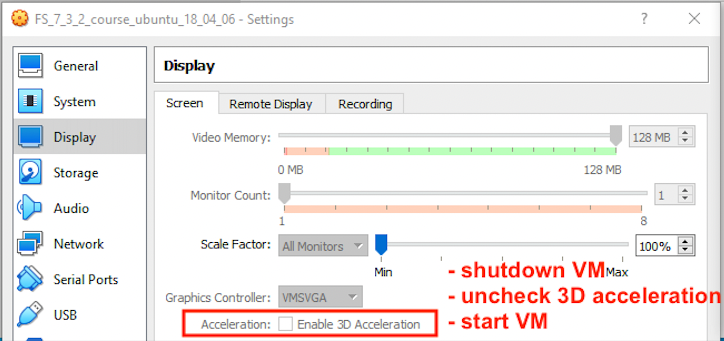
3D can help some programs, however users have encountered bugs, especially on older systems, where 3D acceleration can stall and crash programs running on it. We recommend you turn off this setting, and if you experience visual bugs such as smearing, 3D images not displaying, or crashes when you try to open FreeView, we recommend you check to see if this is turned on, as it being turned on could be the issue.
3.21 Now you are ready to download and set up the Tutorial Data (described in the next section), and test your system's functionality.
STEP #4
Getting the Tutorial Data
4.1 Now that the VirtualBox is installed and the FreeSurfer VirtualMachine is properly set up on it, you can add the course tutorial data to the VM. It is at this point that you will need another 14GB of space for the data on the disk where the VirtualBox resides. If you do not have this, you will need to setup a new copy of the VM on a disk partition or external disk with more space. Alternately, you can clone your existing VM to another disk partition with more space. (See the VirtualBox documentation on how to clone a VM). If you need help with any of these actions, feel free to reach out to the course organizers.
4.2 Open a new terminal window (right click and choose "Open Terminal") and type (or copy and paste) the following command into it, then hit Enter:
setup_tutorial_data
The download of the tutorial data should begin (indicated by various words scrolling by on the terminal window) and will take 20-30 minutes to complete depending upon your network connection. If you type the wrong thing and want to stop it, holding the Ctrl button and the 'c' button will cancel anything you type or are running.
4.3 See the “eta” estimate to the right hand side of the progress bar for the “estimated time of arrival”.
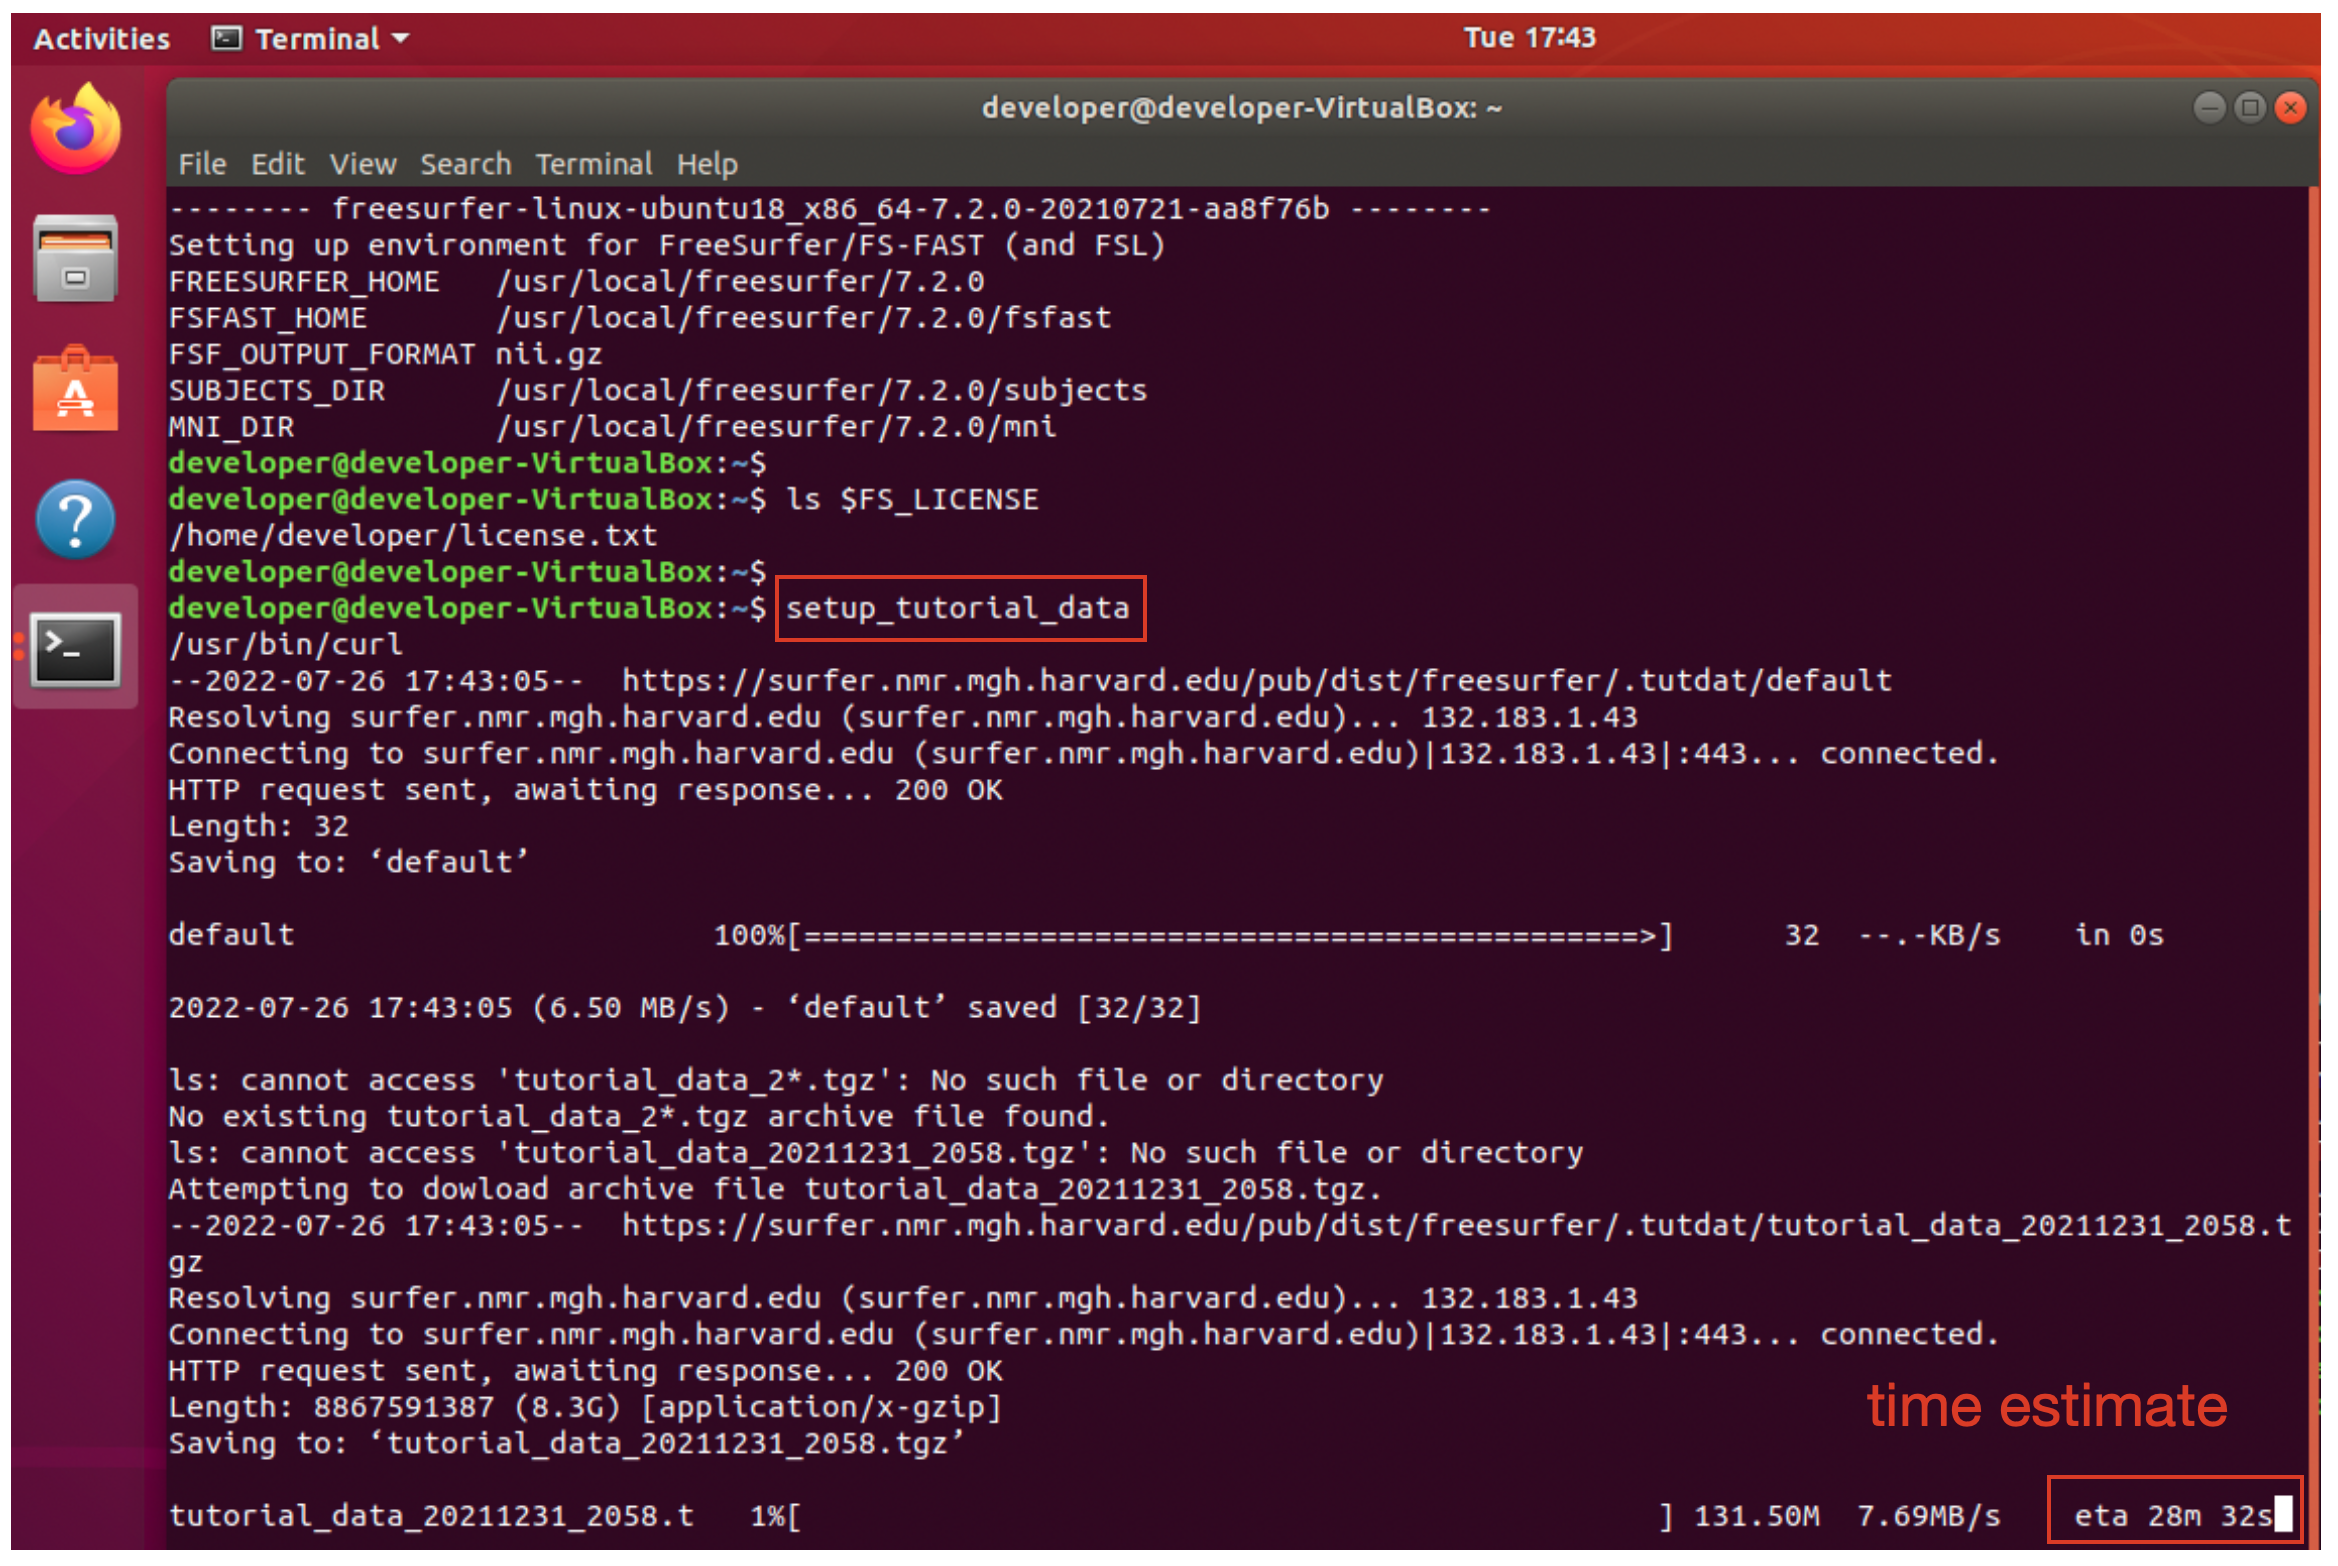
4.4 Example terminal output is shown below for the completed download of the tutorial data. Note the archive name, tutorial_data_20211231_2058, may be different if the data has changed.

4.5 When you are sure the download has completed, close the current terminal window by clicking on the red X in the upper right hand corner of the toolbar.

Open a new terminal window and check the last line of output is “Environment has been set for tutorial data”. If that phrase is not there, contact the course organizers.
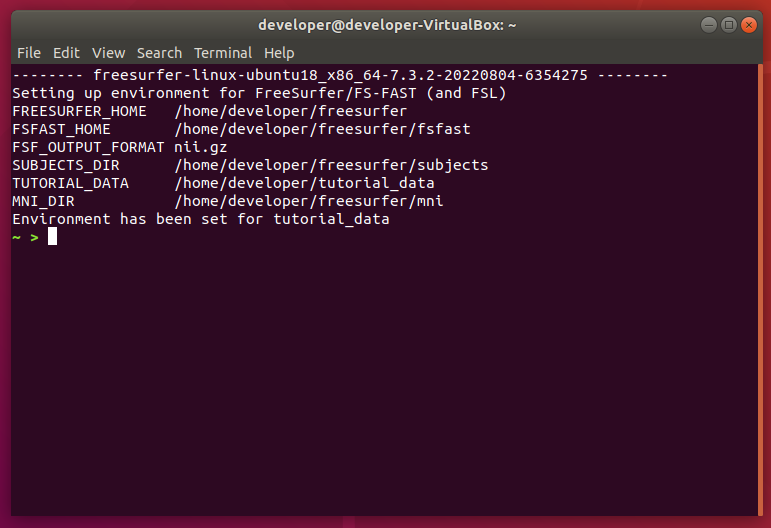
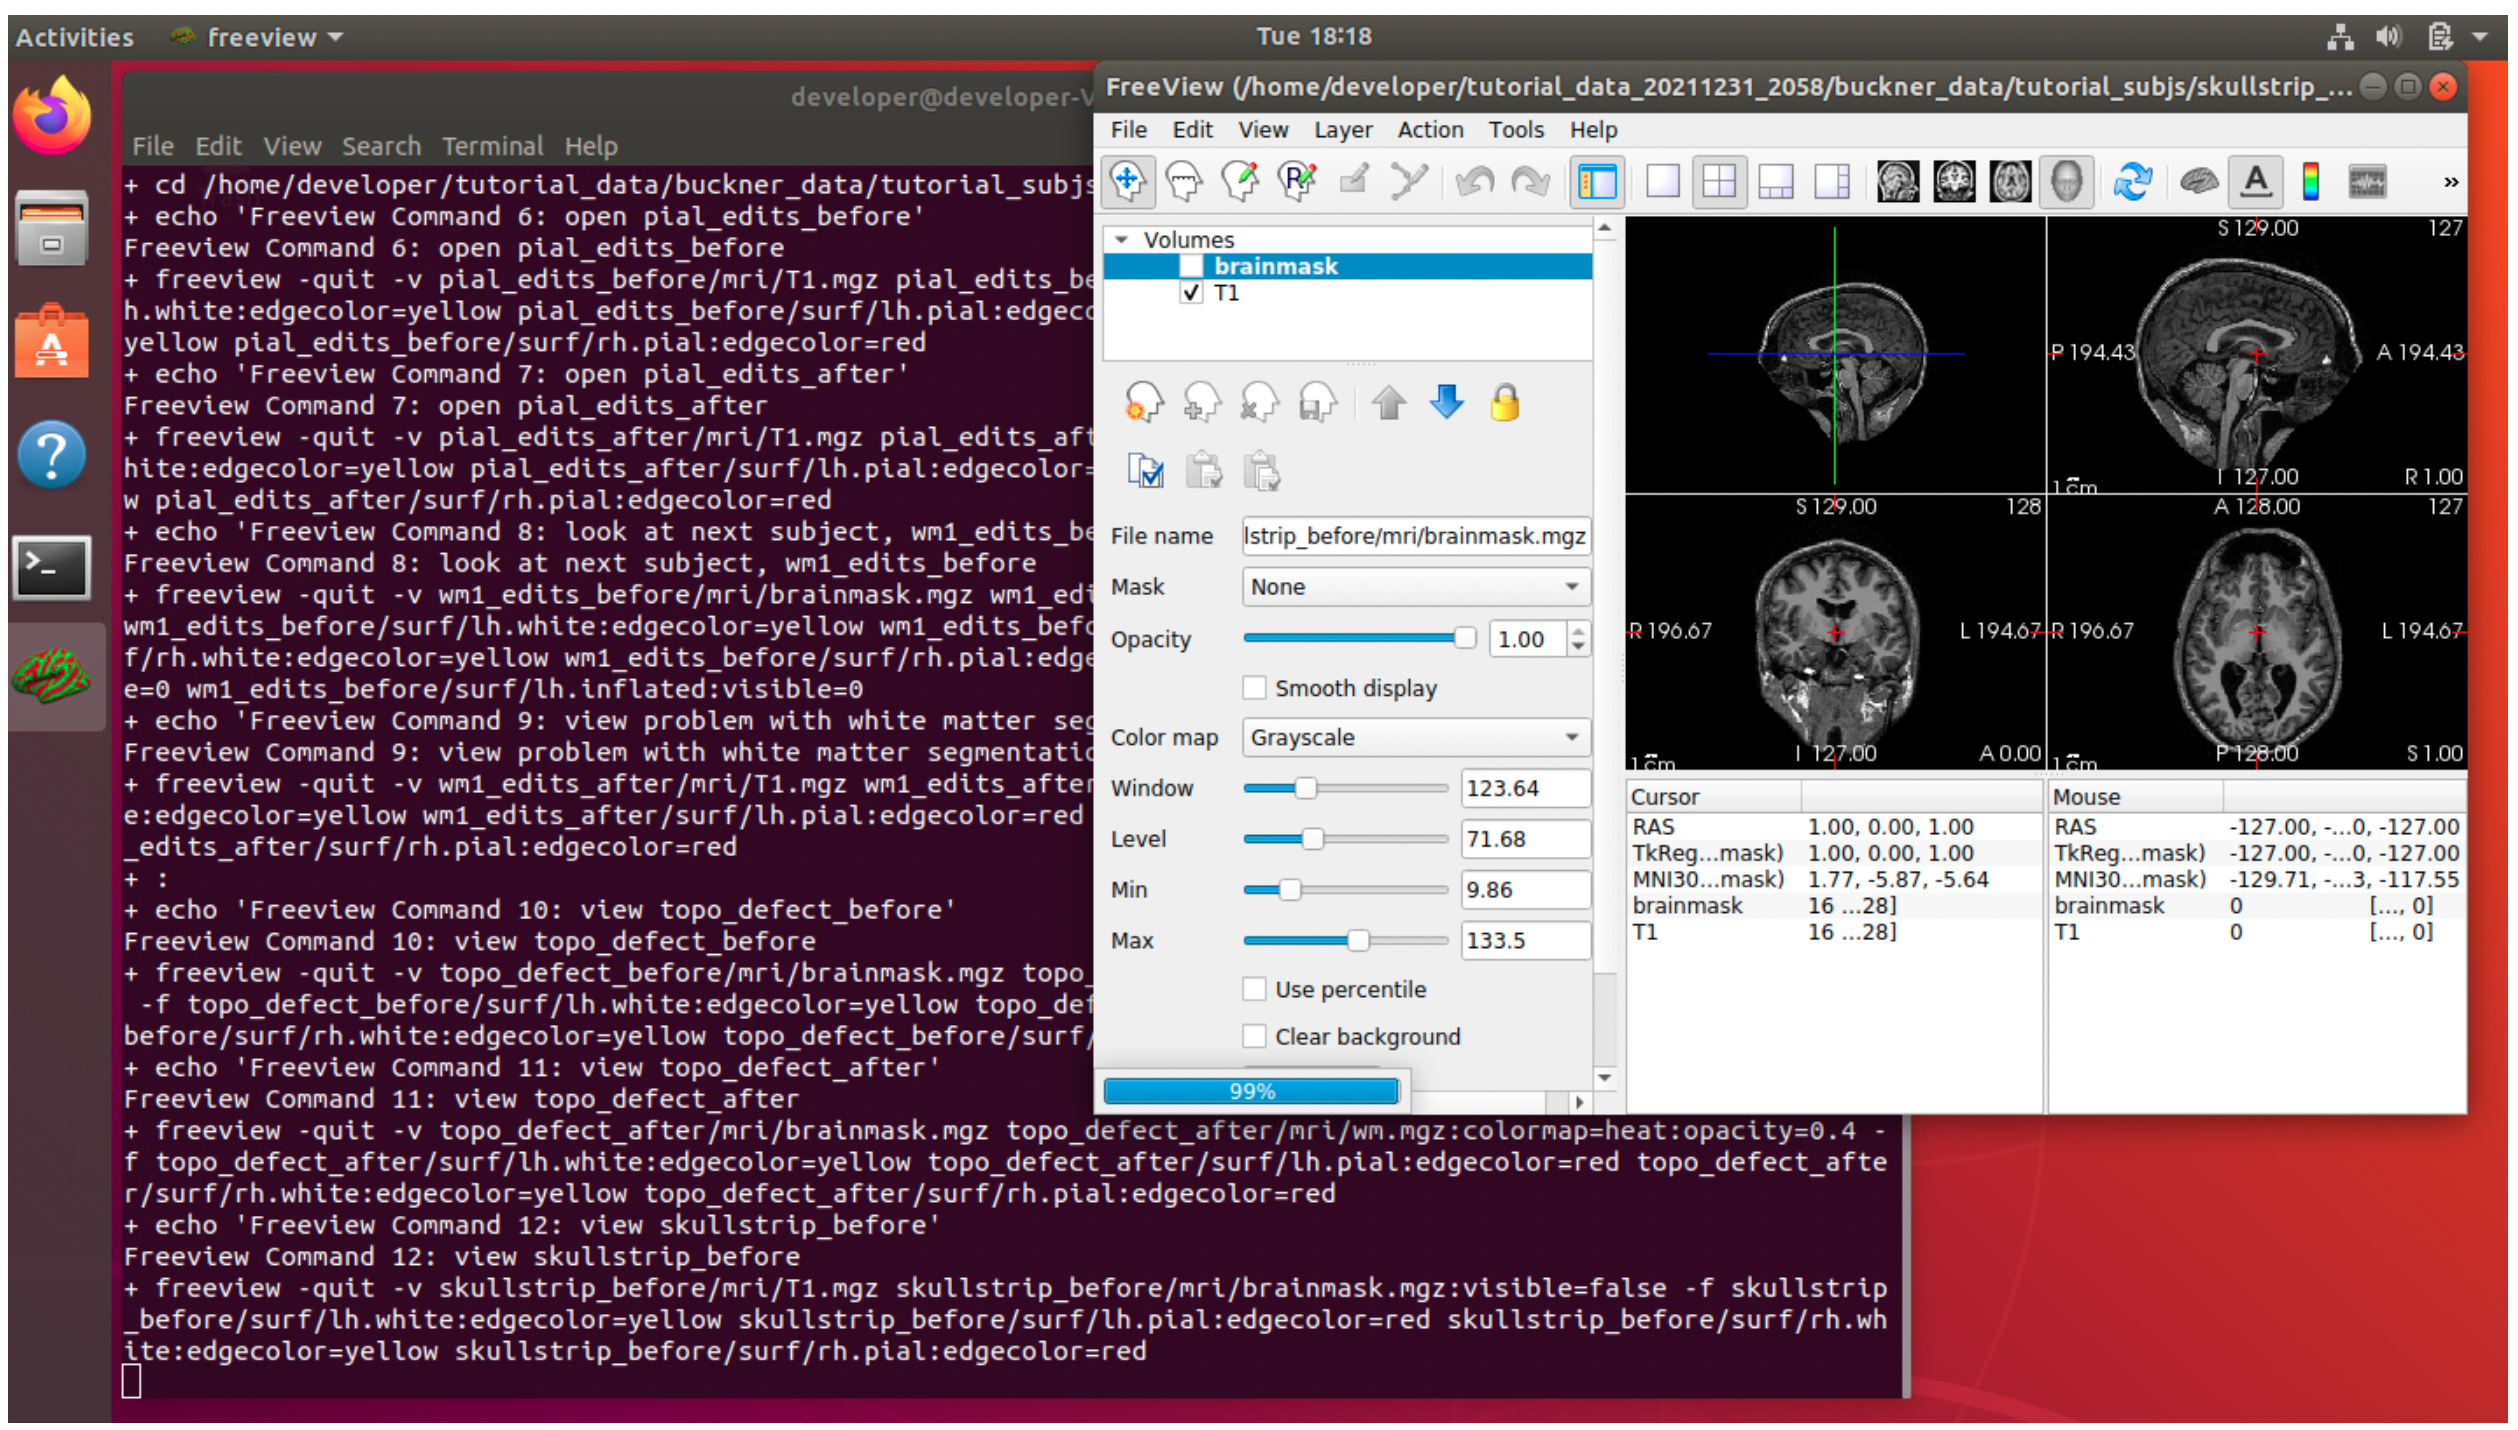
4.6 You will now run a command to test if your setup can successfully run all the tutorial commands. The test may take 20-30 minutes on a typical machine so you will need to leave your computer on to complete the test. You will see 80+ FreeView commands run and the FreeView GUI will automatically open and close. Do not manually close the FreeView window or interrupt the test. Type (or copy and paste) the following command into the terminal window:
test_tutorial_data
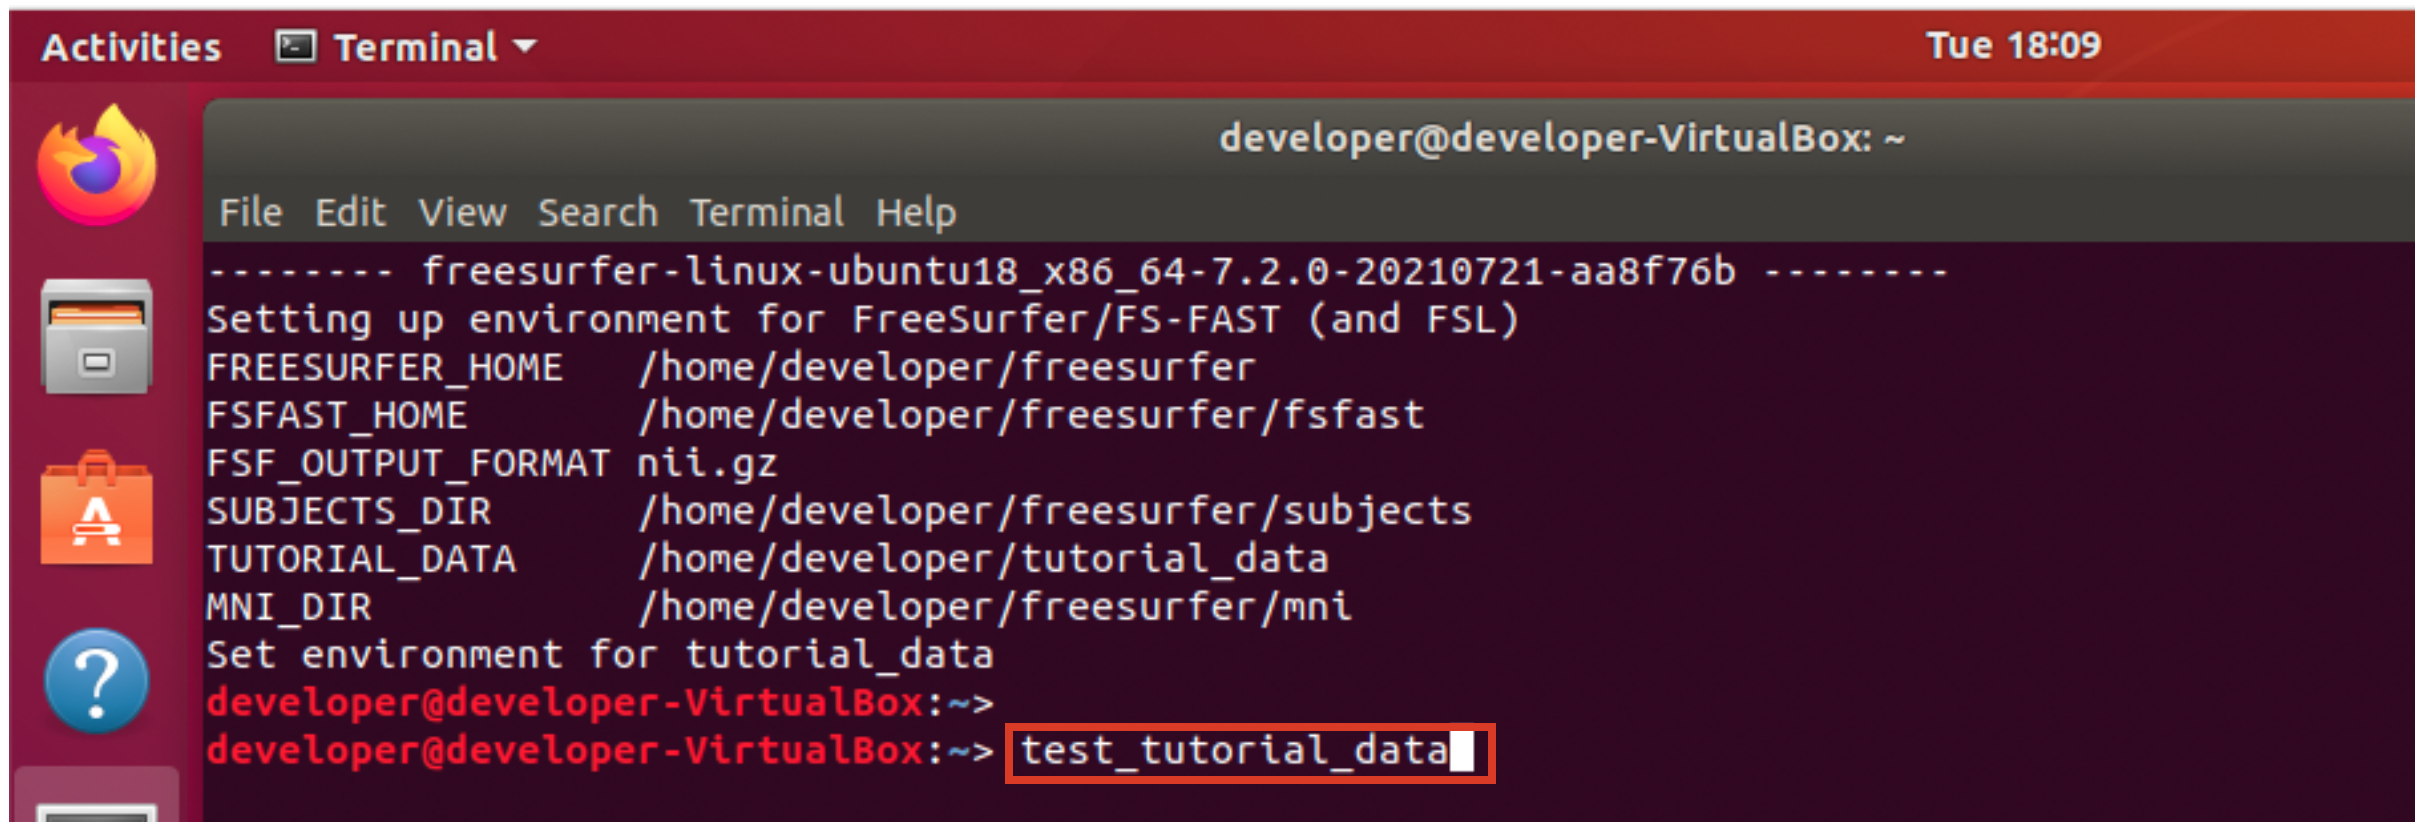
4.7 Example test output while running …
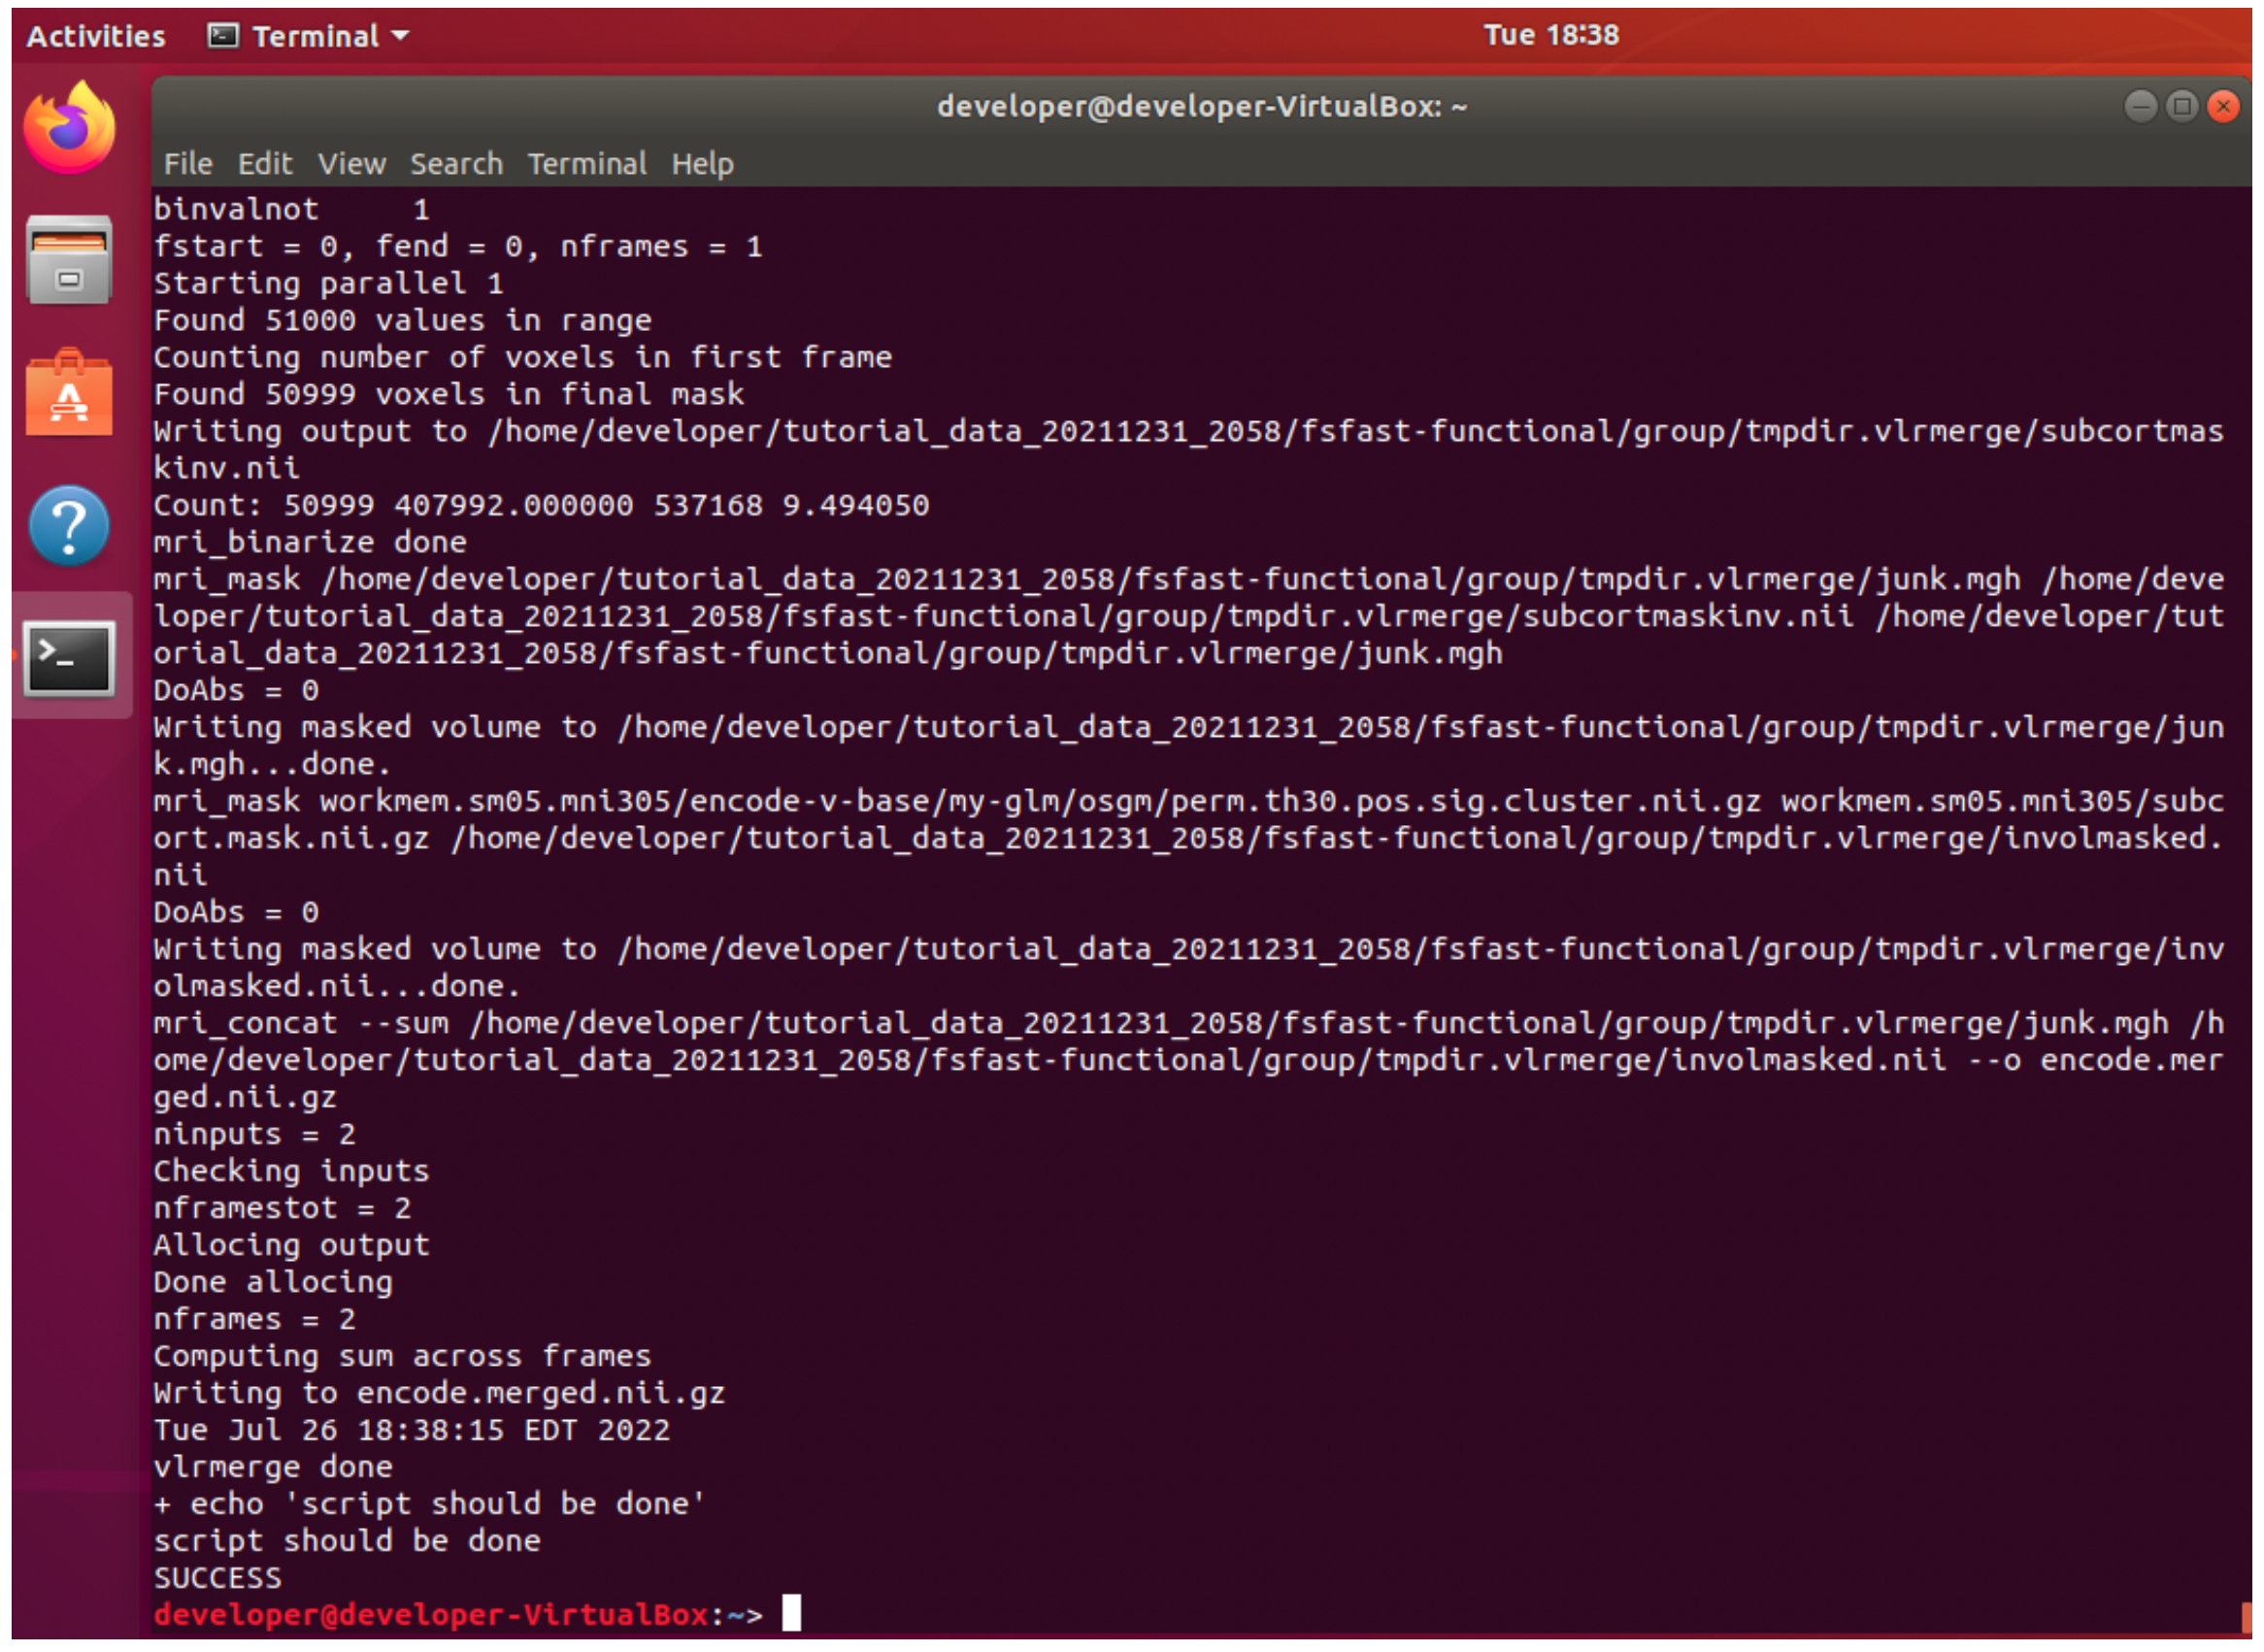
4.8 Check the test ends by displaying “SUCCESS”. Take a screenshot of the terminal window with the SUCCESS message & date to send to the course organizers (fscourse@nmr.mgh.harvard.edu) and confirm your computer works with the installation. If you do not get the SUCCESS message, e.g., the test exits prematurely or exits with an error, then reach out to the FreeSurfer team (fscourse@nmr.mgh.harvard.edu) with information on what messages you saw and the type of computer you are using. Successful output for the end of the test is shown below.
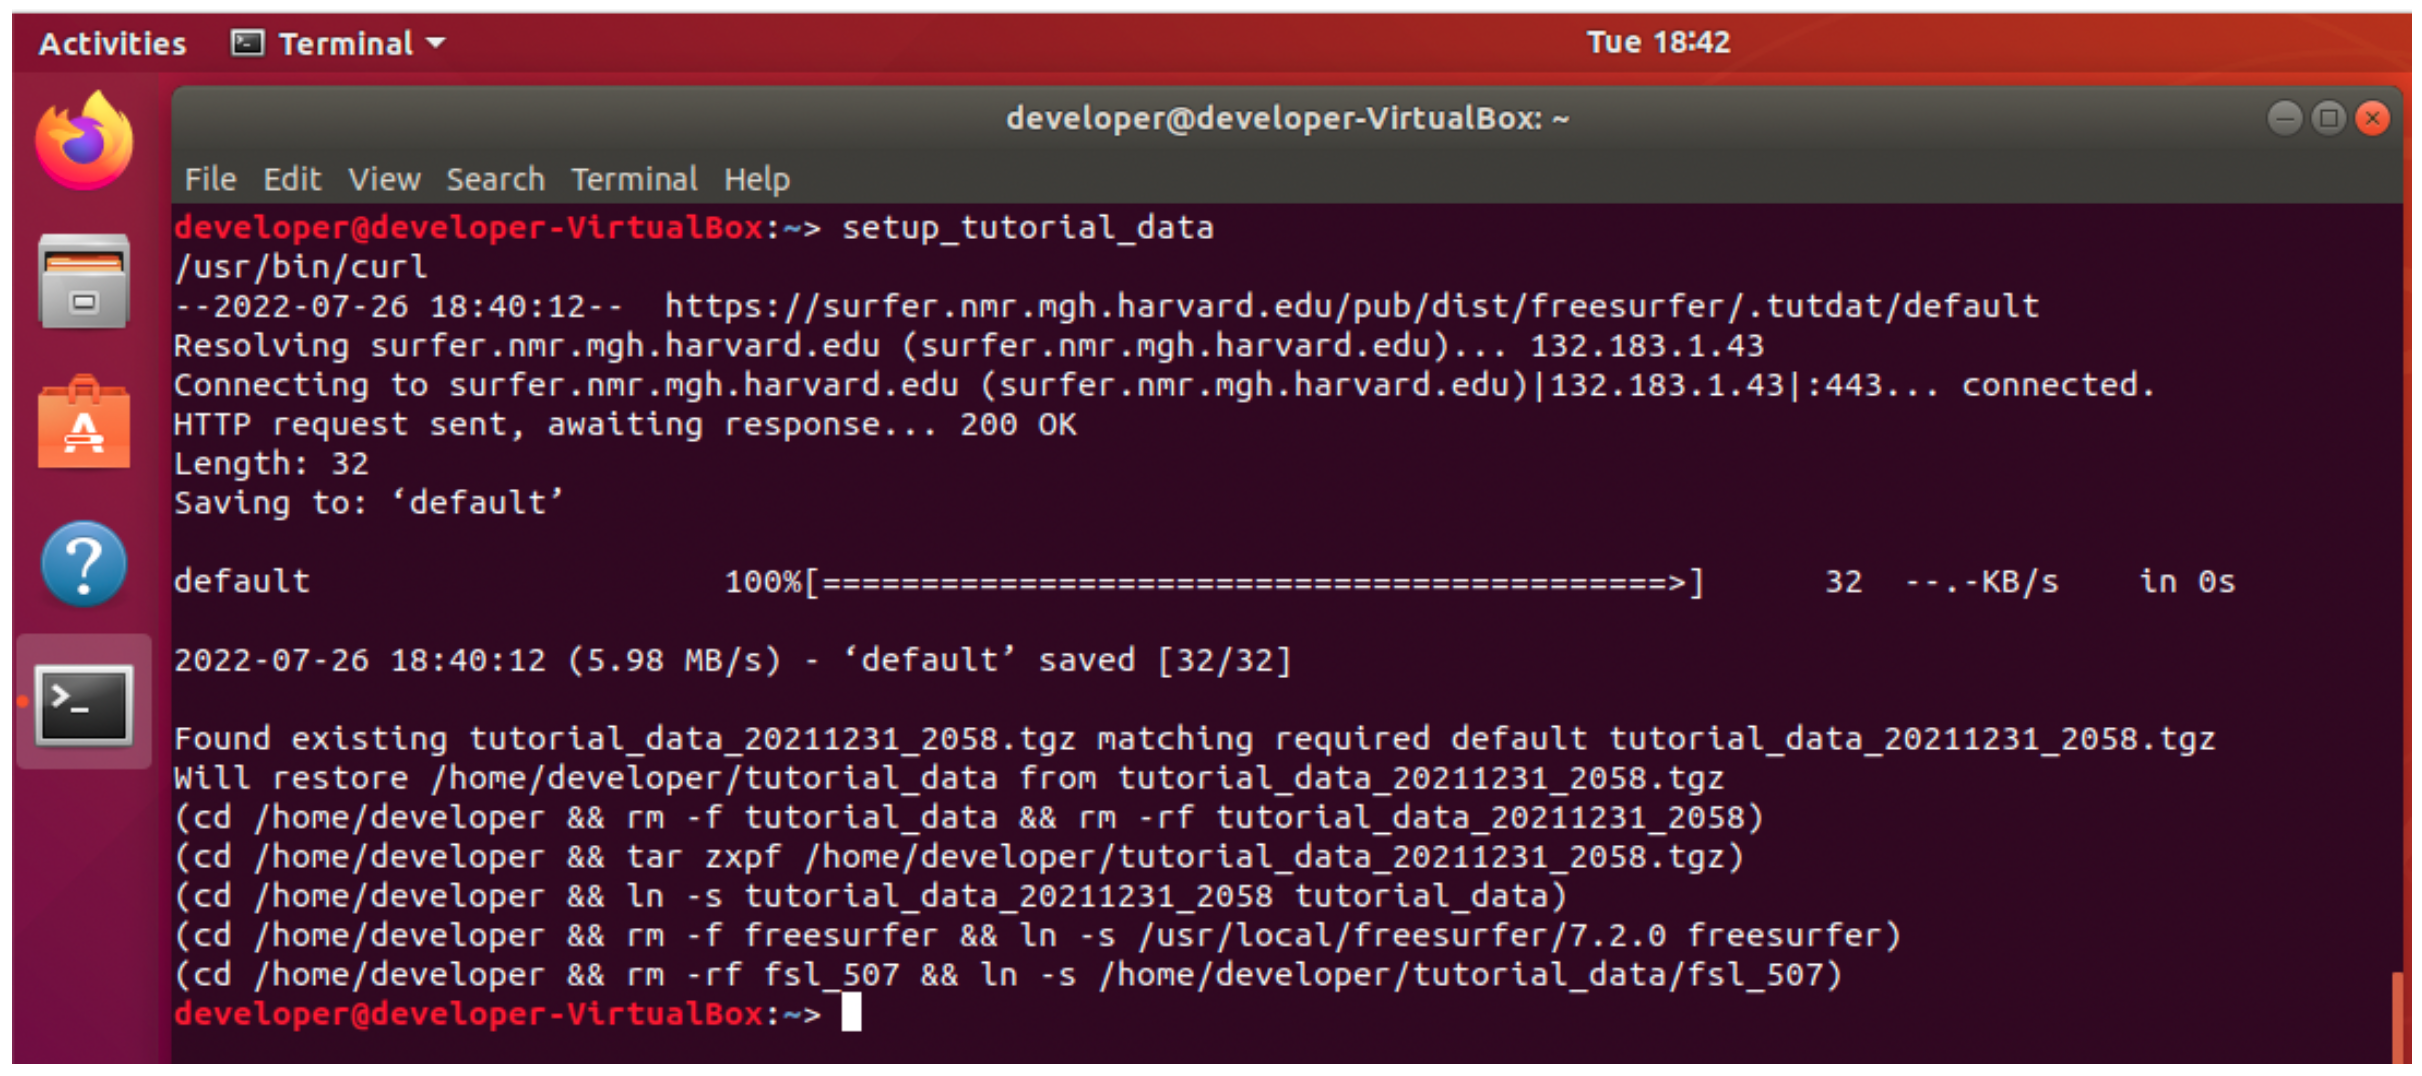
4.9 Lastly, run the setup_tutorial_data command again to reset the tutorial data to a clean state (with no commands run on it):
setup_tutorial_data
When the command finishes you should be able to run the tutorial commands from scratch during the course tutorials. Make sure any new terminal windows opened report “Environment has been set for tutorial data””.
You are now prepared for the course!
