Fixing a bad skull strip
To follow this exercise exactly be sure you've downloaded the tutorial data set before you begin. If you choose not to download the data set you can follow these instructions on your own data, but you will have to substitute your own specific paths and subject names.
Occasionally, the skull stripping step either removes more than just the skull, causing part of the brain to be removed as well, or too little, leaving behind portions of the skull. Both of these problems need to be corrected before continuing to the next step, either by manually editing the volumes or by adjusting input parameters to the skull stripping step, and running the skull strip again until a good result is obtained. Often the sagittal view reveals skull strip failures. Note that the inflated 2D surface is a less reliable gauge of skull strip failure unless large portions of the brain are missing, or lots of skull is retained.
skullstrip1_before has a poor skull strip, an entire hemisphere of the cerebellum has been stripped away along with the skull. This page will walk you through the process of fixing this particular subject and also offer suggestions for fixing other common skull stripping problems.
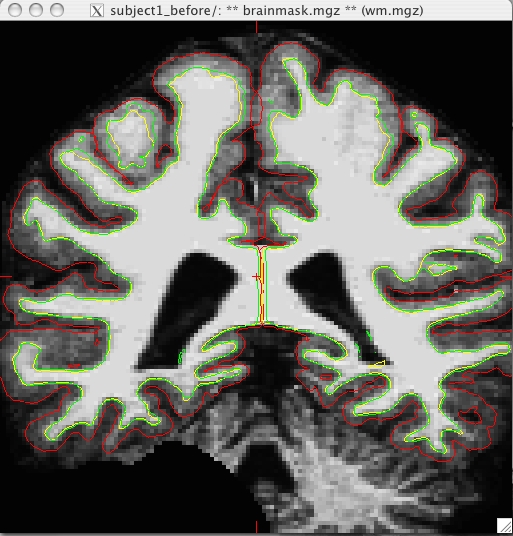
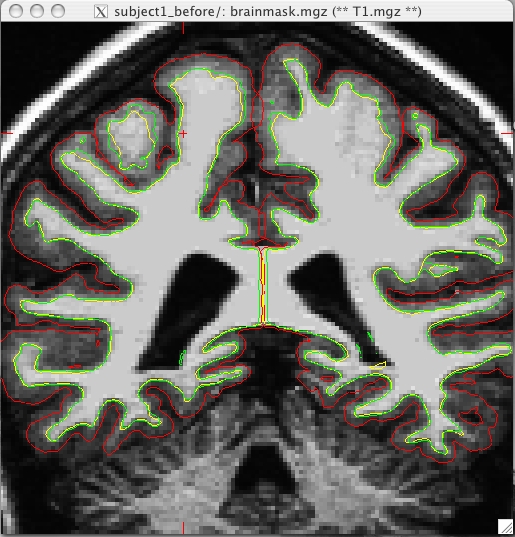
If you look at coronal slice 91 for skullstrip1_before you can see that the brainmask.mgz volume (the first picture) is missing the right hemisphere of the cerebellum and that it is present in the T1.mgz volume (the second picture):


In general there are two ways to fix a volume when there is something missing from the cortex or cerebellum, you can clone the missing pieces in manually or you can adjust the parameters of mri_watershed to do it automatically. For this case, because there is such a lot missing on so many slices you should adjust the parameters of mri_watershed.
Adjusting watershed parameters
The watershed algorithm is used during the skull stripping step to find a boundary between the brain and skull. The mri_watershed program uses a default preflooding height of 25 percent. If we want the algorithm to be more conservative (i.e. if part of the brain has been removed), you will want to make that number larger than 25. If you want the algorithm to be more aggressive (i.e. part of the skull has been left behind), you will want to make the height less than 25. There aren't any hard and fast rules about how to select your height value. You can adjust the preflooding height by passing the following flag to recon-all:
recon-all -skullstrip -wsthresh <h> -clean-bm -subjid <subject name> where <h> is replaced with the preflooding height you'd like to use and <subject name> is replaced with your subject. The clean-bm flag is used to instruct recon-all to write over the old brainmask.mgz volume with your new edits. If you do not use this flag your changes will not take effect.
Part of the brain is missing
Now we will take another look at the first volume we looked at, where part of the cerebellum had been removed. You can adjust the watershed threshold by passing the -wsthresh flag to recon-all. In this instance, since too much was removed, we want to raise the watershed threshold so use the command:
recon-all -skullstrip -wsthresh 35 -clean-bm -no-wsgcaatlas -subjid skullstrip1_before
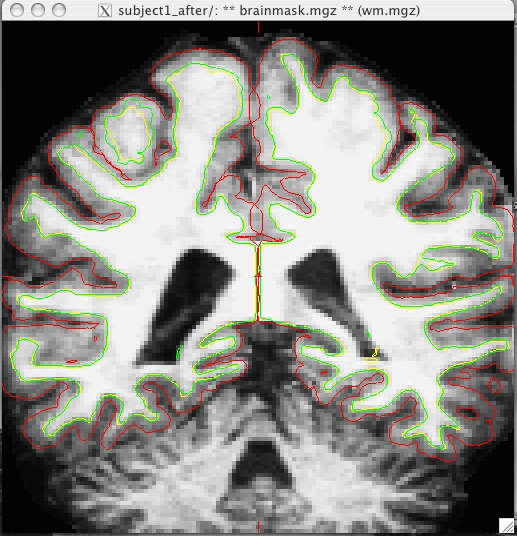
Take a look at your output volume (brainmask.mgz has been changed) along with the original T1 volume (T1.mgz), and verify the result of the new skull stripping is correct.
tkmedit skullstrip1_before brainmask.mgz -aux T1.mgz -surfs
It should look like this:

Some skull still remains
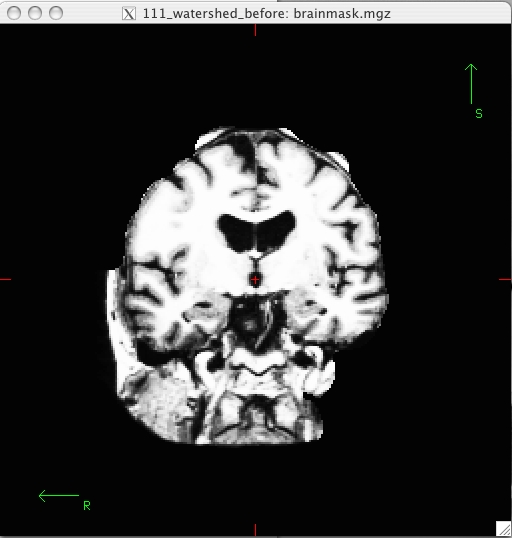
Sometimes the skull strip will leave pieces of skull in the brainmask volume. Subject skullstrip2_before is an extreme example of this, it can be the case that there is just a bit of skull left. Open skullstrip2_before to see what it looks like:
tkmedit skullstrip2_before brainmask.mgz
and you should see this:

For this example, since there is so much skull remaining, we want to lower the watershed threshold, so you could use the command:
recon-all -skullstrip -wsthresh 5 -clean-bm -no-wsgcaatlas -subjid skullstrip2_before
Take a look at your output volume (brainmask.mgz has been changed) along with the original T1 volume (T1.mgz), and verify the result of the new skull stripping is correct.
tkmedit skullstrip2_before brainmask.mgz -aux T1.mgz -surfs
You can compare this to the brain volume in skullstrip2_after to see that your changes look the same.
Reprocessing the data
If you make changes to the brainmask.mgz volume, you can re-start the recon-all process from this point by using the following command:
recon-all -autorecon2 -subjid <subject name>
Trying Several Thresholds
If you would like to quickly run several different watershed thresholds simultaneously, you can use the -multistrip flag which will create several orig, T1, and nu volumes stripped with the following preflood heights: 5, 10, 20, 30.
You can change which preflood heights it uses (instead of 5, 10, 20, 30) by first doing:
setenv SUBJECTS_DIR /path/to/your/data
setenv WATERSHED_PREFLOOD_HEIGHTS '20 30 40 50'
recon-all -multistrip -clean-bm -s <subjid> -no-isrunning
Note that it will launch mri_watershed for each one for each vol orig, nu and T1, so if you have 12 heights, for example there will be 36 processes.
Manual editing
When the skull stripping process has left just a few slices with either missing brain regions or too much skull you can edit these manually using tkmedit.
Part of the brain is missing Sometimes there will be small regions missing from the pons or cerebellum, or from part of the cortex itself. To fix these you'd need to open the output volume from the skull stripping step (brainmask.mgz) and the original T1 volume (T1.mgz) simultaneously.
For this following example we will use a subject with a missing cerebellum to demonstrate the tools, but in reality this is not an example of something you would want to edit by hand.
tkmedit skullstrip3_before brainmask.mgz -aux T1.mgz
Switch back and forth between the two volumes a few times with Ctrl-1 and Ctrl-2, and use the arrow keys to view the different slices. Notice that a large part of the cerebellum has been stripped away along with the skull around slice 91.
In the tkmedit toolbar, go to:
Tools -> Configure Volume Brush...
Set Mode to "Clone", and Clone Source to "Aux Volume". Click the Close button to close the configuration window. You can also change the size and shape of your brush, to do this go to:
Tools -> Configure Brush Info...
Select a radius and shape that you are comfortable using. Close the configuration menu, and click the "Edit Voxels" button in tkmedit toolbar.
Use Ctrl-1 and Ctrl-2 to cycle between the two volumes. Find a place in the image where the cerebellum is missing in the output volume, then use the middle button on the mouse to paint in cerebellum from the auxiliary volume. Cycle back and forth between the volumes frequently so you know where you are.
Continue painting until the slice is no longer missing part of the brain. Repeat for the other slices in the output volume. Go to File -> Save Main Volume As... and save your output.
Some skull still remains
If there are small pieces of skull still remaining on only a few slices you can manually remove the voxels. To do this make sure that the "Edit Voxels" button is still selected. Removing voxels is very similar to painting in voxels, except you use the right mouse button instead of the middle button. Use Ctrl-1 and Ctrl-2 to cycle between the volumes. Find a place in the image where skull remains. Use the right mouse button to delete the voxels. Continue on the other slices until all skull is removed. Save your volume.
Ctrl-z and Edit -> Undo Last Edit in tkmedit only allow you to go back one edit. If you need to erase a mistake made when painting in voxels, you can use the right mouse button to delete them again. If you remove too many voxels, you can use the clone tool to paint areas back in from the original T1 volume, similar to painting in voxels as described above.
