| Deletions are marked like this. | Additions are marked like this. |
| Line 2: | Line 2: |
| ||Up to FreeviewGuide||Back to [[../FreeviewQuickStart|FreeviewQuickStart]]||Continue to [[../FreeviewViewingArea|FreeviewViewingArea]]|| |
||Up to FreeviewGuide ||Back to [[FreeviewGuide/FreeviewGeneralUsage/FreeviewQuickStart|FreeviewQuickStart]] ||Continue to [[FreeviewGuide/FreeviewGeneralUsage/FreeviewViewingArea|FreeviewViewingArea]] || |
| Line 5: | Line 6: |
|
Freeview consists of one window. In this window there is the main viewing area, to the left is the control panel, at the top is the toolbar, at the bottom are the cursor and mouse coordinates, and if you are in the "Voxel Edit" mode, there will be a floating "Drawing" toolbox. |
Freeview consists of one window. In this window there is the main viewing area, to the left is the control panel, at the top is the toolbar, at the bottom are the cursor and mouse coordinates, and if you are in the "Voxel Edit" mode, there will be a floating "Drawing" toolbox. |
| Line 9: | Line 9: |
| {{attachment:fv_screenshot.jpg||width="800",height="617"}} | |
| Line 10: | Line 11: |
|
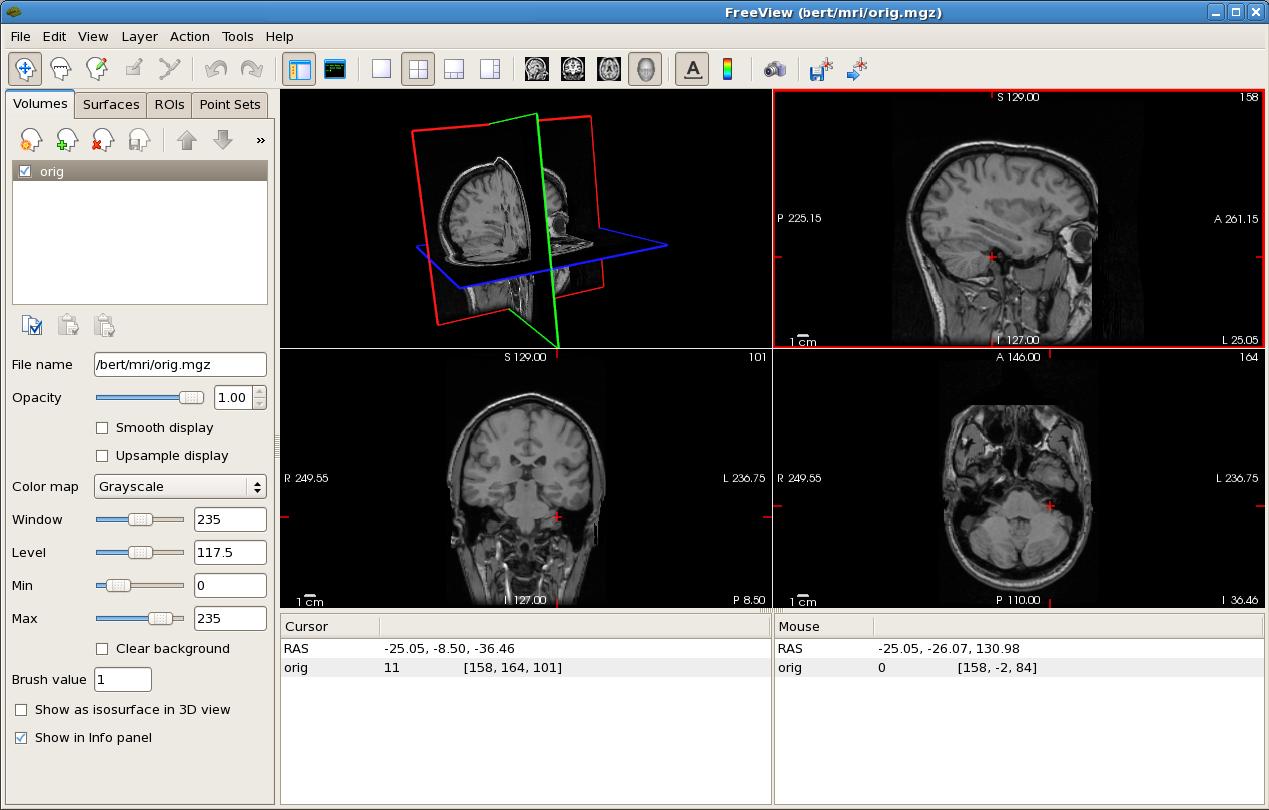
{{attachment:fvscreenshot.gif}} Here's a look at the program. In this instance, the user has chosen the 2x2 viewing option, and can see all 3 planes plus 3D together in one window. In this view, when you move the red crosshair to a point in one window, the view within the other 3 windows will move to the corresponding slice at those coordinates where the crosshair was placed. In the 3D window (bottom right), you can hold down the left mouse button and rotate the volume by dragging it. |
Here's a look at the program. In this instance, the user has chosen the 2x2 viewing option, and can see all 3 planes plus 3D together in one window. In this view, when you move the red crosshair to a point in one window, the view within the other 3 windows will move to the corresponding slice at those coordinates where the crosshair was placed. In the 3D window (bottom right), you can hold down the left mouse button and rotate the volume by dragging it. |
| Line 15: | Line 14: |
|
{{attachment:toolbar.gif}} || {{attachment:navigate.gif}} ||Navigate Tool || {{attachment:voxel_edit.gif}} ||Voxel Edit Tool || || {{attachment:ControlPanelIcon.gif}} ||Control Panel On/Off Button || {{attachment:layout_1x1.gif}} ||1x1 Screen View || || {{attachment:roi_edit.png}} ||Edit ROI (in ROI panel) || {{attachment:waypoints_edit.png}} ||Edit Waypoints (in Waypoints Panel) || || {{attachment:edit_undo_16.png}} ||Undo Last Edit || {{attachment:edit_redo_16.png}} ||Redo Last Edit || || {{attachment:layout_2x2.gif}} ||2x2 Screen View || {{attachment:layout_1n3.gif}} ||1x3 Screen View || || {{attachment:layout_1n3_h.gif}} ||1x3 Horizontal Screen View || {{attachment:view_sagittal.gif}} ||Saggital Volume View || || {{attachment:view_coronal.gif}} ||Coronal Volume View || {{attachment:view_axial.gif}} ||Axial Volume View || || {{attachment:view_3d.gif}} ||3D Volume View || {{attachment:A.gif}} ||Show Coordinate Annotation || || {{attachment:colorbar.gif}} ||Show Color Scale Bar || {{attachment:screenshticon.gif}} ||Take Screenshot || |
|
| Line 16: | Line 25: |
| {{attachment:toolbar.gif}} | |
| Line 18: | Line 26: |
|
|| {{attachment:navigate.gif}} || Navigate Tool || {{attachment:voxel_edit.gif}} || Voxel Edit Tool || || {{attachment:ControlPanelIcon.gif}} || Control Panel On/Off Button || {{attachment:layout_1x1.gif}} || 1x1 Screen View || || {{attachment:roi_edit.png}} || Edit ROI (in ROI panel) || {{attachment:waypoints_edit.png}} || Edit Waypoints (in Waypoints Panel) || || {{attachment:edit_undo_16.png}} || Undo Last Edit || {{attachment:edit_redo_16.png}} || Redo Last Edit || || {{attachment:layout_2x2.gif}} || 2x2 Screen View || {{attachment:layout_1n3.gif}} || 1x3 Screen View || || {{attachment:layout_1n3_h.gif}} || 1x3 Horizontal Screen View || {{attachment:view_sagittal.gif}} || Saggital Volume View || || {{attachment:view_coronal.gif}} || Coronal Volume View || {{attachment:view_axial.gif}} || Axial Volume View || || {{attachment:view_3d.gif}} || 3D Volume View || {{attachment:A.gif}} || Show Coordinate Annotation || || {{attachment:colorbar.gif}} || Show Color Scale Bar || {{attachment:screenshticon.gif}} || Take Screenshot || |
|
| Line 29: | Line 29: |
| In the control panel on the left you can choose to work with volumes, ROIs, Surfaces and Way Points. Each one has it's own set of controls and options described below. |
In the control panel on the left you can choose to work with volumes, ROIs, Surfaces and Way Points. Each one has it's own set of controls and options described below. |
| Line 32: | Line 33: |
| Line 37: | Line 39: |
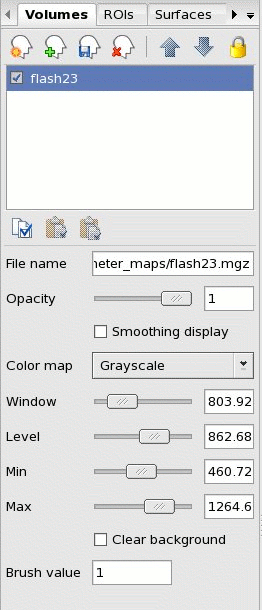
| Below, you can adjust the opacity between 0, completely transparent, and 1, completely opaque. Checking '''Smoothing display''' will smooth the edges of anything you have drawn on the volume. Underneath this is the Color Map drop down menu where you can choose Grayscale, Heat, Jet or Lookup Table. | Below, you can adjust the opacity between 0, completely transparent, and 1, completely opaque. Checking '''Smoothing display''' will smooth the edges of anything you have drawn on the volume. Underneath this is the Color Map drop down menu where you can choose Grayscale, Heat, Jet or Lookup Table. |
| Line 39: | Line 41: |
| Using the sliding bars for Window, Level, Min, and Max you can adjust the '''contrast''' of the volume. | Using the sliding bars for Window, Level, Min, and Max you can adjust the '''contrast''' of the volume. |
| Line 44: | Line 46: |
| In the panel shown, Lookup Table has been selected as the Color Map. Here too, you can adjust opacity between 0 and 1 with the sliding bar. | In the panel shown, Lookup Table has been selected as the Color Map. Here too, you can adjust opacity between 0 and 1 with the sliding bar. |
| Line 46: | Line 48: |
| Below that is a list of different brain regions, and their associated colors. From this menu you can choose which brain region you are going to code or label. This is generally used in the Voxel Edit mode (at which point the '''Drawing Toolbox''' [described below] will pop up). |
Below that is a list of different brain regions, and their associated colors. From this menu you can choose which brain region you are going to code or label. This is generally used in the Voxel Edit mode (at which point the '''Drawing Toolbox''' [described below] will pop up). |
| Line 49: | Line 52: |
| Line 51: | Line 55: |
| Line 55: | Line 60: |
| {{attachment:drawingtoolbox.gif}} | {{attachment:drawingtoolbox.gif}} |
| Line 58: | Line 63: |
|
|| {{attachment:freehand.gif}} ||Freehand tool || || {{attachment:polyline.gif}} ||Polyline tool || || {{attachment:livewire.gif}} ||Livewire tool || || {{attachment:fill.gif}} ||Fill tool || || {{attachment:colorpicker.gif}} ||Color Picker tool || |
|
| Line 59: | Line 69: |
|
|| {{attachment:freehand.gif}} || Freehand tool || || {{attachment:polyline.gif}} || Polyline tool || || {{attachment:livewire.gif}} || Livewire tool || || {{attachment:fill.gif}} || Fill tool || || {{attachment:colorpicker.gif}} || Color Picker tool || |
|
| Line 65: | Line 70: |
| Freehand will allow you to draw voxels in any shape. Polyline creates a line between every left click you make and ends where you right click. | |
| Line 67: | Line 71: |
| || Continue to [[../FreeviewViewingArea|FreeviewViewingArea]] for more information || |
Freehand will allow you to draw voxels in any shape. Polyline creates a line between every left click you make and ends where you right click. ||Continue to [[FreeviewGuide/FreeviewGeneralUsage/FreeviewViewingArea|FreeviewViewingArea]] for more information || |
Up to FreeviewGuide |
Back to FreeviewQuickStart |
Continue to FreeviewViewingArea |
Interface
Freeview consists of one window. In this window there is the main viewing area, to the left is the control panel, at the top is the toolbar, at the bottom are the cursor and mouse coordinates, and if you are in the "Voxel Edit" mode, there will be a floating "Drawing" toolbox.
Display Window

Here's a look at the program. In this instance, the user has chosen the 2x2 viewing option, and can see all 3 planes plus 3D together in one window. In this view, when you move the red crosshair to a point in one window, the view within the other 3 windows will move to the corresponding slice at those coordinates where the crosshair was placed. In the 3D window (bottom right), you can hold down the left mouse button and rotate the volume by dragging it.
Toolbar

|
Navigate Tool |
|
Voxel Edit Tool |
|
Control Panel On/Off Button |
|
1x1 Screen View |
|
Edit ROI (in ROI panel) |
|
Edit Waypoints (in Waypoints Panel) |
|
Undo Last Edit |
|
Redo Last Edit |
|
2x2 Screen View |
|
1x3 Screen View |
|
1x3 Horizontal Screen View |
|
Saggital Volume View |
|
Coronal Volume View |
|
Axial Volume View |
|
3D Volume View |
|
Show Coordinate Annotation |
|
Show Color Scale Bar |
|
Take Screenshot |
Control Panel
In the control panel on the left you can choose to work with volumes, ROIs, Surfaces and Way Points. Each one has it's own set of controls and options described below.
Volumes
When working with volumes, under Color Map, you can select Grayscale, Heat, Jet, and Lookup Table. Grayscale, Heat and Jet have similar control panel options.
Grayscale, Heat, Jet:

In the panel shown you can see your volumes listed at the top, in this case the volume is called flash23. The box next to the volume name is checked, meaning the volume is active for editing and visible in the viewing screen. The fact that it is highlighted in blue or selected means that any action you take (drawing, editing, rotating, saving, etc.) will happen on this volume.
Below, you can adjust the opacity between 0, completely transparent, and 1, completely opaque. Checking Smoothing display will smooth the edges of anything you have drawn on the volume. Underneath this is the Color Map drop down menu where you can choose Grayscale, Heat, Jet or Lookup Table.
Using the sliding bars for Window, Level, Min, and Max you can adjust the contrast of the volume.
Lookup Table

In the panel shown, Lookup Table has been selected as the Color Map. Here too, you can adjust opacity between 0 and 1 with the sliding bar.
Below that is a list of different brain regions, and their associated colors. From this menu you can choose which brain region you are going to code or label. This is generally used in the Voxel Edit mode (at which point the Drawing Toolbox [described below] will pop up).
ROIs
picture and explanation of ROIs control panel and buttons here
Surfaces
picture and explanation of Surfaces control panel and buttons here
Way Points
picture and explanation of Way Points control panel and buttons here
Drawing Toolbox

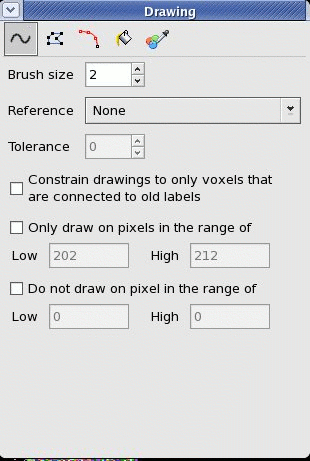
In this toolbox you can choose different drawing tools, adjust the brush size between 1 (smallest) and 10 (largest), and set limitations. Below is the name of each tool:
|
Freehand tool |
|
Polyline tool |
|
Livewire tool |
|
Fill tool |
|
Color Picker tool |
Freehand will allow you to draw voxels in any shape. Polyline creates a line between every left click you make and ends where you right click.
Continue to FreeviewViewingArea for more information |


